Managing Your Emails
From the Email Management page you can set your email configurations. The following figure shows the Email Management screen:
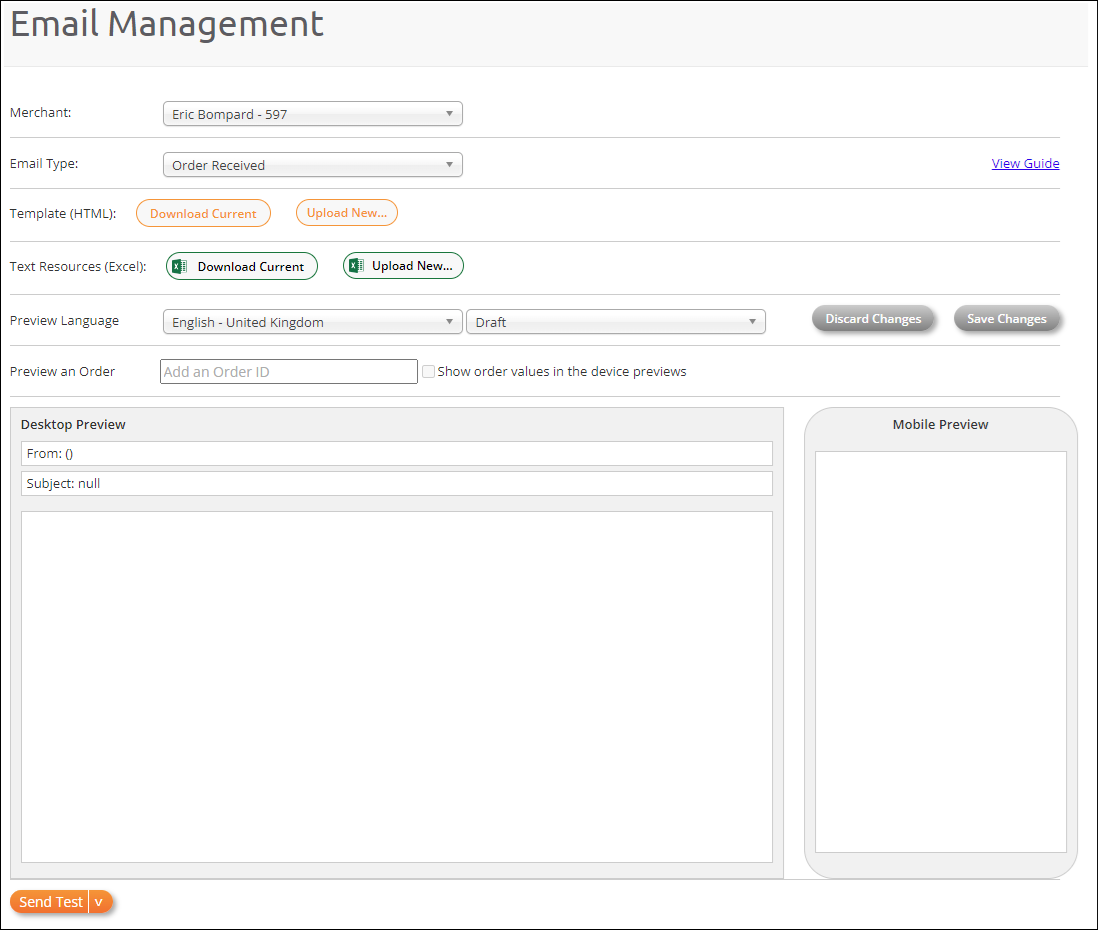
Email Management Main Screen
Before setting your email configurations, you must create your HTML and text resource template, and use placeholders:
Managing Your HTML Templates
This page describes the following:
Creating Your HTML Template
Before setting your email configurations you must create your HTML template. Uploading this template is one of the steps required when setting your email configurations.
Write the content and design your HTML template using a tool of your choice.
For a sample HTML template, click here.
Continue with one of the following as needed:
Modifying Your HTML Template
Occasionally you may need to modify your HTML template. Modifying your template is usually done in the context of setting your email configurations.
Click Download Current in the Template (HTML) row.
If a template has not been uploaded, an error message will be displayed.
Modify the HTML text using a tool of your choice.
Note
If you modify the HTML text without including its translation in the text resources file, the text will not be translated.
Save your file as HTML.
Click Upload New, locate the file on your machine, and click Open.
Continue with one of the following as needed:
HTML Template Examples
The following table lists the HTML files and their related text resource files in Excel format:
No. | Email Name | HTML File | Text Resource File |
|---|---|---|---|
1 | Customer Line Cancellation | ||
2 | Order Cancelled by Customer | ||
3 | Order Cancelled by Customer - Discontinued Product | ||
4 | Order Cancelled by Customer - Fraud Check | ||
5 | Order Cancelled by Customer - Incorrect Address Details | ||
6 | Order Cancelled by Customer - Out of Stock Product | ||
7 | Order Confirmed | ||
8 | Order Dispatched | ||
9 | Order Received | ||
10 | Partial Shipment | ||
11 | Refund Notification | ||
12 | RMA Created |
Managing Your Text Resource Templates
This page describes the following:
Creating Your Text Resources Template
After creating your HTML template, you must create your text resources file. A text resources file is an Excel sheet shown and describing the resource keys that will be displayed on your email message. Once you've filled out this file you can upload it to Global-e, described in Setting Your Email Configurations .Uploading this file is one of the steps required when setting your email configurations.
Write the content and design your text resources template using a tool of your choice.
For a sample text resources file, click here. Note that the three text resource fields shown in the figure below are the only mandatory fields.

Text Resource Template Sample
Verify that you'd added all the mandatory text resources as defined in Step 1.
Note
By default, you must define the language of all text resources in English. In the text resources file, the column English - United Kingdom must always contain text in English. This text is used as a basis for the translation to other languages.
Save your file as Excel.
Continue with one of the following as needed:
2. Text Resource Excel Format and Example
This page describes the elements required to create a text resource file.
A text resource file can include the resource keys shown below. Note that only SenderEmail, SenderName, and Subject are required resource keys.
Resource Key | Description | Example | Status |
|---|---|---|---|
SenderEmail | Shows the sender’s email address. | Required | |
SenderName | Shows the sender’s full name. | Required | |
Subject | Shows the email’s subject line. | Required | |
TR_AutomaticEmail | Shows the automatically generated response to an incoming email. | ||
TR_ContactUs | Shows the contact message. | ||
TR_DescriptionParagraph | Shows the email body. | ||
TR_OrderNumberText | Shows the order number. | ||
TR_OrderPlacedText | Shows the placed order. | ||
TR_PaymentDetailsText | Shows the payment details. | ||
TR_PoweredBy | |||
TR_PreHeader | Shows the email body’s preheader. | ||
TR_Privacy | Shows the privacy policy. | ||
TR_PRODUCT_ATT_CATEGORY | Shows the email category. | ||
TR_PRODUCT_ATT_COLOR | Shows the color. | ||
TR_PRODUCT_ATT_SIZE | Shows the size. | ||
TR_ProductsTotalPriceText | Shows the product's total price. | ||
TR_Qty | Shows the quantity. | ||
TR_RefundDescriptionParagraph | Shows the refund description paragraph. | ||
TR_ReturnedItemsText | Shows the returned item text. | ||
TR_Salutation | Shows the salutation. | ||
TR_ShipmentItemsText | Shows the shipments item text. | ||
TR_ShippingMethodText | Shows the shipping method text. | ||
TR_Support | Shows the support message. | ||
TR_TermsConds | Shows the terms and conditions text. | ||
TR_YourBillingAddress | Shows your billing address. | ||
TR_YourShippingAddress | Shows your shipping address. |
Managing Your Placeholders
This page describes the following:
Introduction to Placeholders
The Global-e templates are based on the Mustache templating specification and language. Mustache serves as a powerful templating system that enables the utilization of pre-existing text files containing designated placeholders. These placeholders are dynamically substituted with values specific to a particular request during runtime. Global-e supports two types of placeholders that you can use in the HTML template: Placeholders related to orders, such as the order ID, shipping address, totals, products, and more. Custom placeholders to manage Text Resources, which can hold texts, translations, links, and html snippets for the header, footer, and CSS.
Emails are automatically generated based on predefined templates containing specific email elements, known as resource keys, that make up the email. Some examples of resource keys are SenderEmail, SenderName, and Subject. Because the emails are sent to different recipients, these resource keys have variables that pull information to personalize them. The resource keys are populated in the subsequent rows in the sheet, with each column representing one of the available languages. Note that you see both a desktop and mobile preview below the available menus.
A text resource file can include the resource keys shown below. Note that only SenderEmail, SenderName, and Subject are required resource keys.
Resource Key | Description | Example | Status |
|---|---|---|---|
SenderEmail | Shows the sender’s email address. | Required | |
SenderName | Shows the sender’s full name. | Required | |
Subject | Shows the email’s subject line. | Required | |
TR_AutomaticEmail | Shows the automatically generated response to an incoming email. | ||
TR_ContactUs | Shows the contact message. | ||
TR_DescriptionParagraph | Shows the email body. | ||
TR_OrderNumberText | Shows the order number. | ||
TR_OrderPlacedText | Shows the placed order. | ||
TR_PaymentDetailsText | Shows the payment details. | ||
TR_PoweredBy | |||
TR_PreHeader | Shows the email body’s preheader. | ||
TR_Privacy | Shows the privacy policy. | ||
TR_PRODUCT_ATT_CATEGORY | Shows the email category. | ||
TR_PRODUCT_ATT_COLOR | Shows the color. | ||
TR_PRODUCT_ATT_SIZE | Shows the size. | ||
TR_ProductsTotalPriceText | Shows the product's total price. | ||
TR_Qty | Shows the quantity. | ||
TR_RefundDescriptionParagraph | Shows the refund description paragraph. | ||
TR_ReturnedItemsText | Shows the returned item text. | ||
TR_Salutation | Shows the salutation. | ||
TR_ShipmentItemsText | Shows the shipments item text. | ||
TR_ShippingMethodText | Shows the shipping method text. | ||
TR_Support | Shows the support message. | ||
TR_TermsConds | Shows the terms and conditions text. | ||
TR_YourBillingAddress | Shows your billing address. | ||
TR_YourShippingAddress | Shows your shipping address. |
For more information on Mustache, see the Mustache Manual.
Creating Custom Placeholders
Custom placeholders often start with the prefix TR_ to differentiate between order placeholders and resource placeholders. However, this convention is not mandatory.
Custom Placeholder Examples
Setting Your Email Configurations
After creating your HTML and text resource templates and placeholders, you can set your email configurations. This is done on the Global-e platform.
Navigate to Configuration > Email Management from the top menu.
Select an email type from the Email Type dropdown menu.
Upload your HTML template from the Template (HTML) row:
Download Current - You download the current template if you need to modify it.
Upload New - You can either upload an HTML template that you just modified, or one stored on your machine.
Upload your text resources file from the Text Resources (Excel) row:
Download Current - You download the current text resources file if you need to modify it.
Upload New - You can either upload a file that you just modified, or one stored on your machine.
Select a language from the Preview Language menu.
Make a publishing selection from the publishing option menu to the right of the Preview Language menu.
Select one of the following:
Discard Changes
Save Changes
Add an order from the Preview an Order field to preview it.
You can show order values in the device preview by selecting Show order values in the device previews.
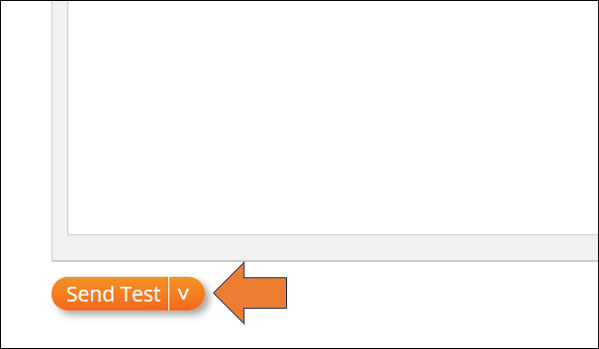
Click Send Test.
The Send test email panel is displayed.
Provide the following in the Send test email panel:
Enter the orrder ID.
Select the email type.
Select the language.
Select the version.
Enter the email address to send the test email to.
A confirmation message is displayed.
Run a quick send if your email management screen already contains the above information by clicking the down arrow
 .
.
Running the Send Test
A confirmation message is displayed, and by default, the email test is sent to you (the logged-in user's email address).
Open and review the test email.