Configuration
Integration Summary
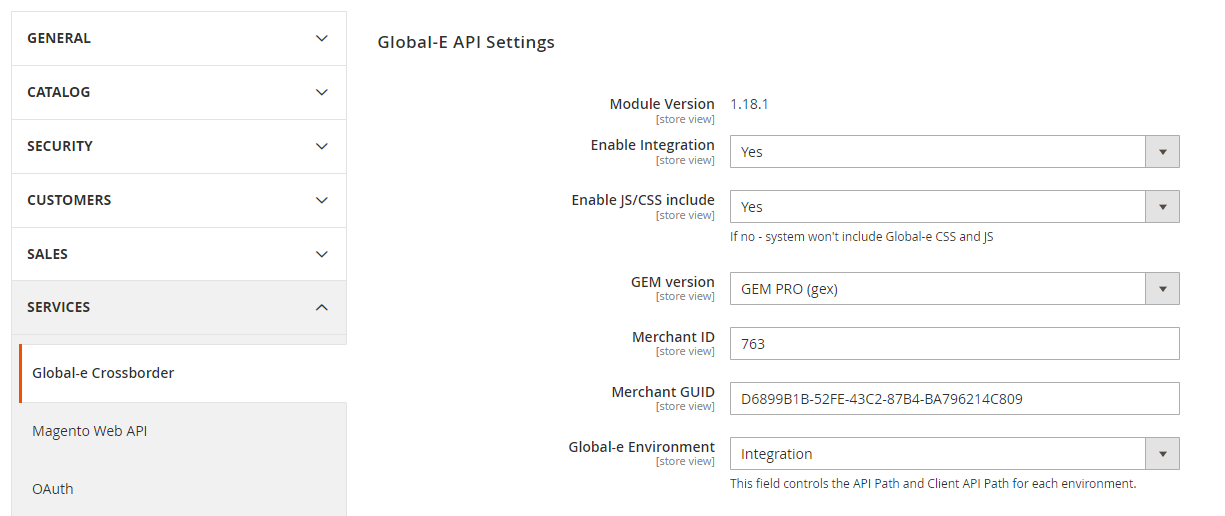
When you sign up with Global-e, Global-e creates a Merchant account in the Global-e system and sends you your Global-e merchant credentials:
Global‑e Merchant ID: The ID of your Global‑e account.
Global‑e Merchant GUID: A GUID number for your Global‑e account. Note that Global‑e sends you a different GUID for each applicable Global-e environment.
Global-e provides you with the CSS and JavaScript 'includes' to add to your sandbox site.
Make sure you have shared with Global-e the features you want Global-e to support, including the list of countries and special features such as Fixed Prices, multiple sites, and more.
# | Description |
Step 1 | Prepare a sandbox storefront (as close to production) for integration purposes and send us the URL. For Base Authorization, share your username and password, along with your Magento Admin credentials (Admin URL, username, and password). |
Step 2 | Install the Global-e module using Composer. See Installation instructions, |
Step 3 | Go to the Magento Admin > Stores > Configuration > Services > Global-E Integration Lite, Fill in your Merchant ID, Merchant GUID, and the Global-e Environment. |
Step 4 | Customize the Welcome pop-up, Country Switcher, Checkout page, and Marketing Banner to match your brand. |
Step 5 | Prepare and Upload your Catalog as a CSV file to the Global-e server via SFTP. Continuously upload deltas. |
Order Placement
After the customer completes the checkout process on the Global-e checkout page, the order data, including the customer’s data, is placed on the merchant’s platform via a dedicated API call. While generated by Global-e, this order contains all the relevant customer attributes, thereby enabling the merchant to process the order using existing business processes, including stock-holding procedures, order fulfillment, customer service, and more.
Order placement is implemented as a two-step process:
The order is first placed in “Pending” status.
Once Global-e’s verification processes are completed, a second call is made to confirm the order and indicate that it can now be pushed to fulfillment (“processing” status).
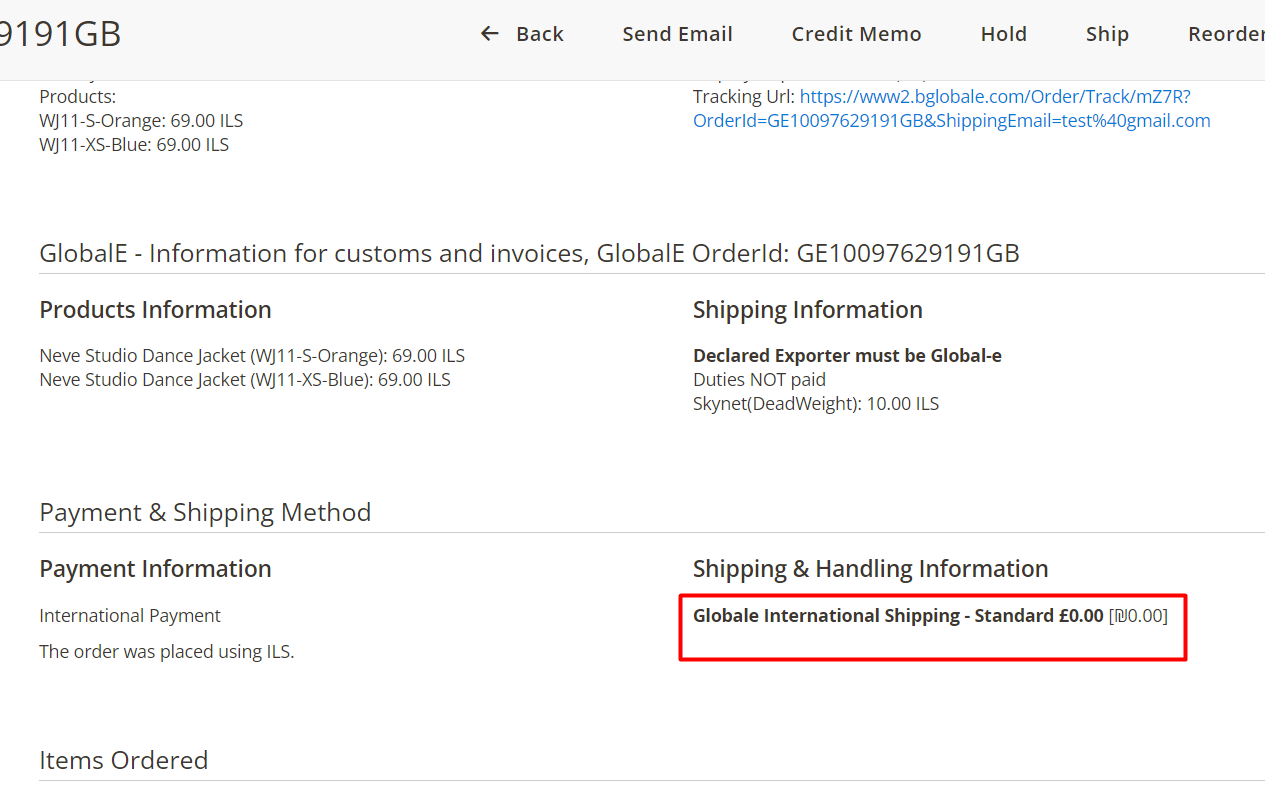
Shipping Method Code
The Global-e extension creates a new shipping method in Magento to support international orders coming in via the Global-e API.
The carrier code is named Globale and is titled International Shipping. Per the merchant’s request, additional mapping can be defined to enable different shipping methods in Magento (based on the shipping methods selected in the Global-e checkout).
The Magento database stores the following default values in tables quote_shipping_rate:

The information is displayed in Magento Admin:
Shipping Method Configurations
In Magento admin you can add mapping that changes the data for a specific carrier.
In the Global-e admin add a
shippingMethodCode.In the example below the code mor_test is added.

In Magento Admin Navigate to Stores > Configuration > Services > Global-e Integration Lite > Shipment.
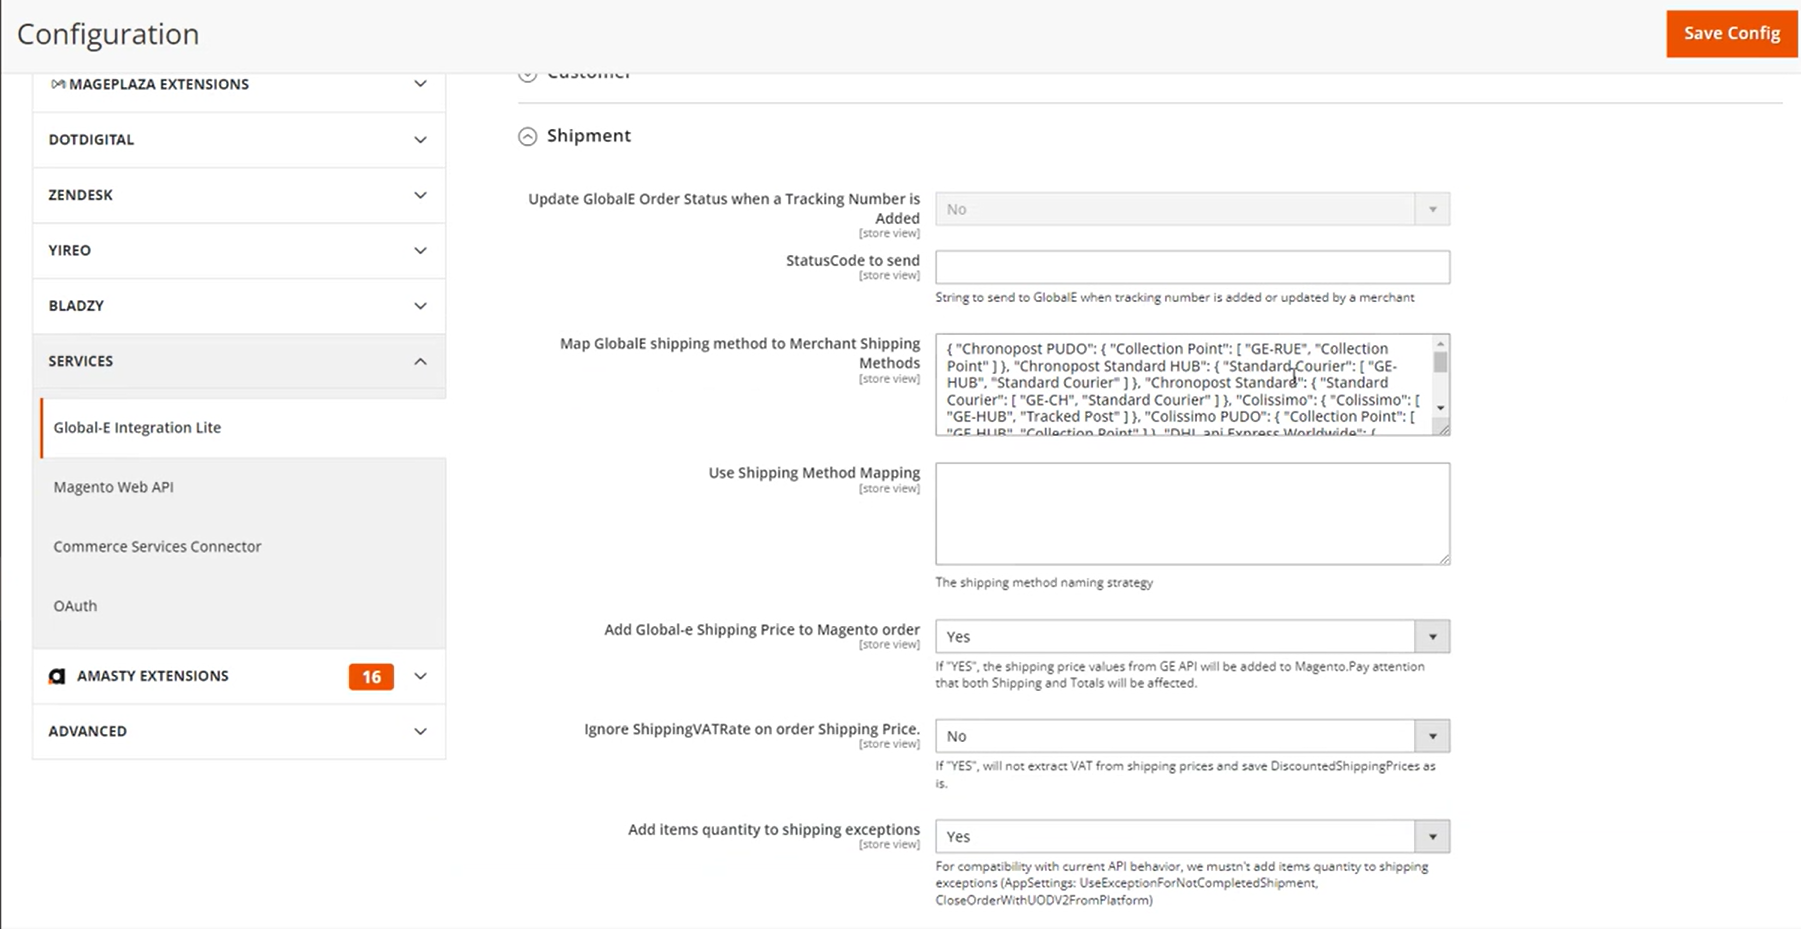
In Map GlobalE shipping method to Merchant Shipping Methods add mapping to change data for a specific carrier.
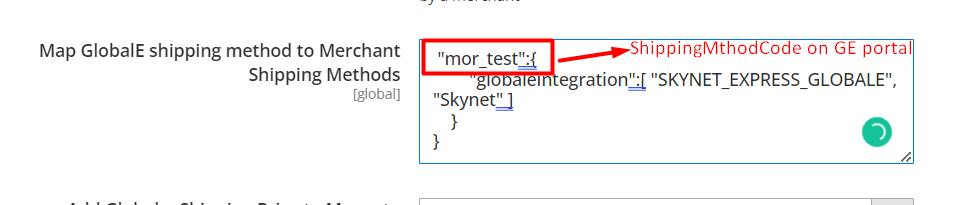
  {
         "geShippingMethodCode":{
                  "newCarrierName":[ "methodCode", "methodName" ]}
Example:
{
    "mor_test":{
        "globaleintegration":[
          "SKYNET_EXPRESS_GLOBALE",
          "Skynet" ]
    }
}
{
    "mor_test":{
        "globaleintegration":[
          "SKYNET_EXPRESS_GLOBALE",
          "Skynet" ]
    }
}
Checkout Flow
The Checkout integration combines ultimate security with integration robustness since this integration method is independent of the structure and characteristics of the webstore’s cart page.
The Global-e Magento2 Lite extension implements the GetCheckoutCartInfo(GetCart) API method that uses a Magento Quote object to load the contents of the user’s cart and pass it securely to the Global-e checkout using a server-to-server RESTful API call.
The checkout page (container page) is provided by the Global-e Magento2 Lite extension on the URI /international/checkout. This page will be used to open the iframe with Global-e checkout.
Discounts
Global-e supports standard discounts through the Magento platform.
With Magento’s Global-e extension, you can offer your customers the following discounts:
Percent of product per discount: Reduces the price of a product by a certain percentage. For example, you can offer a 10% discount on all shirts.
Fixed Amount Discount: Reduce the price of a product by a set amount. For example, you can offer a $5 discount on all hats.
Fix the Amount for the whole cart: Offer a discount on the total cart value, such as a 10% discount on orders over $100.
By X Get Y: A promotional discount that offers customers a free item when they purchase one or more items. For example, you can offer one free pen with the purchase of two pens.
Split Cart Discount to Item Level
Before getting started you want to ensure that the Split Cart Discount to Item Level is set to enabled.
This ensures that the discount is split up per item instead of being applied to the entire cart.
To enable the Split Cart Discount to Item Level:
From the Magento dashboard navigate to Stores > Configuration.
The configuration page opens.
Scroll down the page to Services and select Global-e Crossborder.
Scroll down the page to Checkout/Order > Split Cart Discount to Item level.

Make sure the setting is set to Yes.
At the top-right click Save Config if any changes are made.
Creating a Discount
Create a new discount by adding and configuring a new cart rule.
Step 1. Add a new cart rule
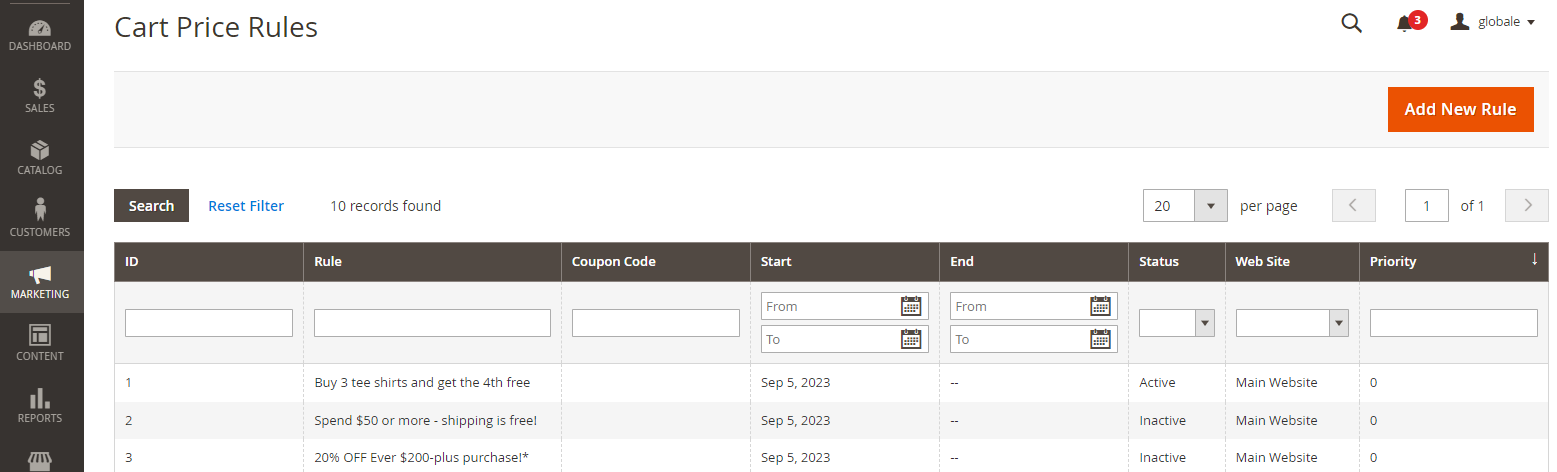
From the Magento dashboard go to Marketing > Cart Price Rules.
The Cart Price Rules page opens.
At the top-right, click Add New Rule.
The New Cart Price Rule page opens.
In the Rule Information section complete the following information:
Give your rule a name and description.
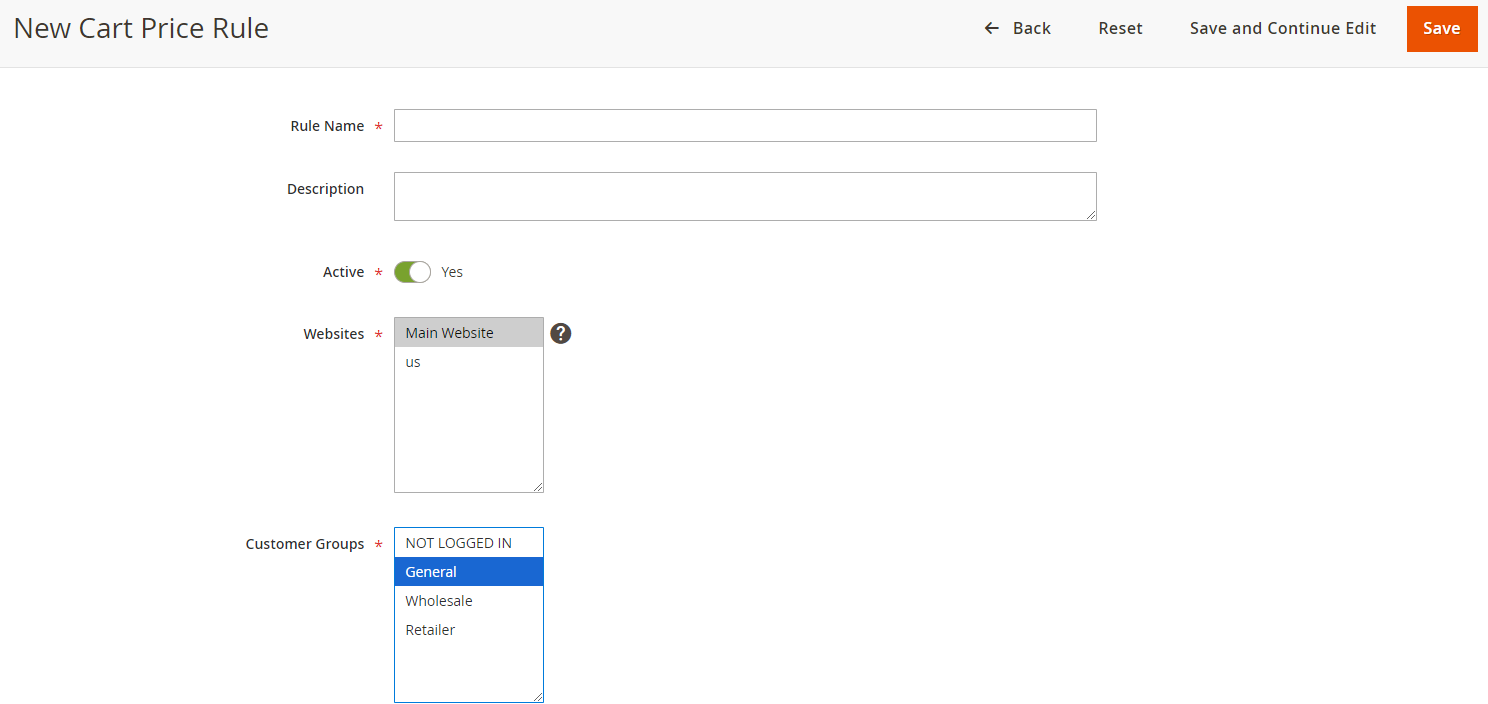
Ensure the Active option is set to Yes if you want the rule to go into effect immediately.
Select the websites where you want to activate the discount and the customer groups to which the discount applies.
Under Coupon, set the rule to apply with or without a coupon:

Select No Coupon to apply the cart rule to all cart items,
Select Specific Coupon to associate a coupon with a price rule, then:
Enter a Coupon Code that the customer must input to receive the discount.
Set a limit on the number of times the coupon can be used (optional).
Set a limit on the number of times a customer can use the coupon (optional).
Use the Calendar to select the start and end dates for the promotion.
In the Priority field, enter a number to define the priority of this rule.
This is relevant if you have other coupon codes or cart rules for the same products simultaneously.
Step 2. Configure the cart rule
In the Conditions section, configure conditions for the discount by selecting relevant options in the dropdown menu and entering data manually (e.g. figures) when needed.
Under the Actions section:
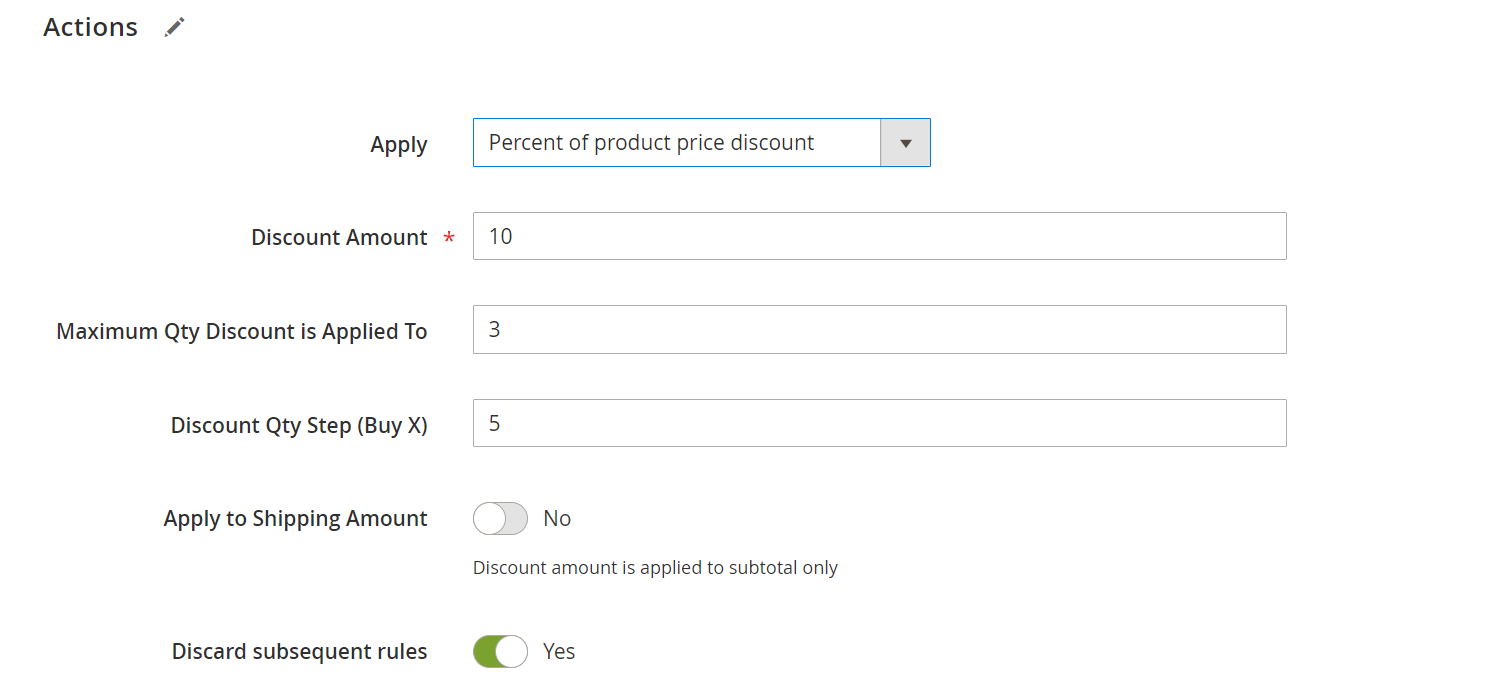
From the Apply dropdown menu select the desired discount:
Percent of product per discount
Fixed amount discount
Fixed amount discount for the whole cart
Buy X get Y free
Enter a number amount for the selected discount.
In the Discount Amount field, enter a number to indicate a percentage, fixed amount, or a quantity of items.
In the Discount Qty Step (Buy X) field, enter the quantity the customer must purchase to receive the Buy X get Y Free discount.
In the Maximum Qty Discount is Applied To field, enter the maximum quantity of the same product that can qualify for the discount in the same purchase.
The remaining options in this section are optional so you can fill them out if relevant to you.
Set Apply to Shipping Amount.
Select yes if the discount applies separately to the subtotal and shipping amounts.
Select No if the discount applies only to the subtotal.
Set Discard subsequent rules to Yes if you want to stop running other rules after this rule is applied.
This prevents multiple discounts from being applied to the same product.
In the label section, you can add custom labels to the discount. These are displayed on the checkout page.
In the Manage Coupon Codes section, you can generate a list of coupon codes by filling out the requested details.
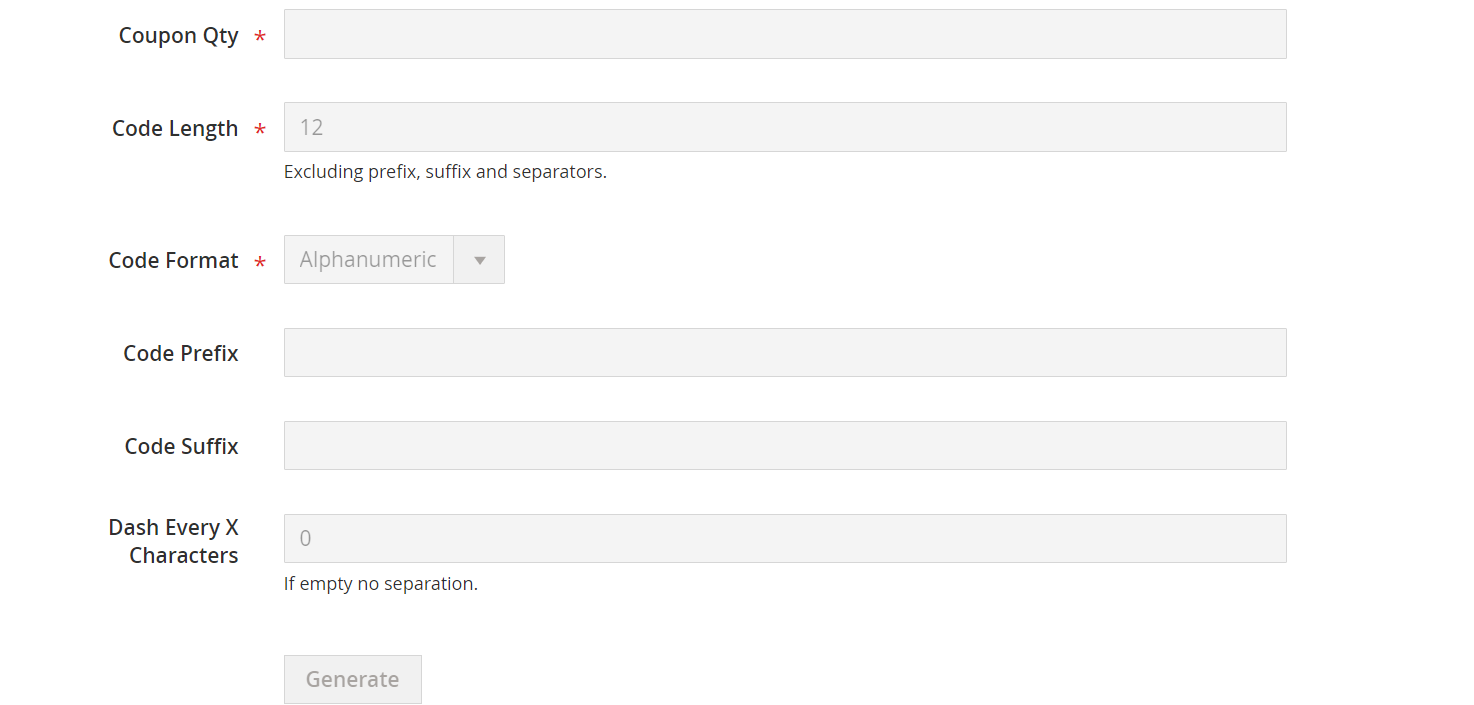
Coupons Qty: The number of coupons that you want to generate.
Code Length: The length of the code, not including the prefix, suffix, or separators.
Code Format: Set it to one of the following:
Alphanumeric
Alphabetical
Numeric
Code Prefix (optional): To be added at the beginning of the code.
Code Suffix (optional): To be added at the end of the code.
Dash Every X Characters: (optional) If using a code with characters and dashes, here you select the number of characters that you want to have between each dash.
Click Generate to generate the codes.
The list of codes appears at the bottom of the screen.
Click Save.
Step 3. Test the cart rule
Test the rule to make sure that it works correctly.
Applying a Discount
Customers can apply a discount code to the shopping cart or to the Global-e Checkout page once they finish shopping.
To apply a discount code
After a customer finishes shopping, they click the shopping cart icon at the top of the page.
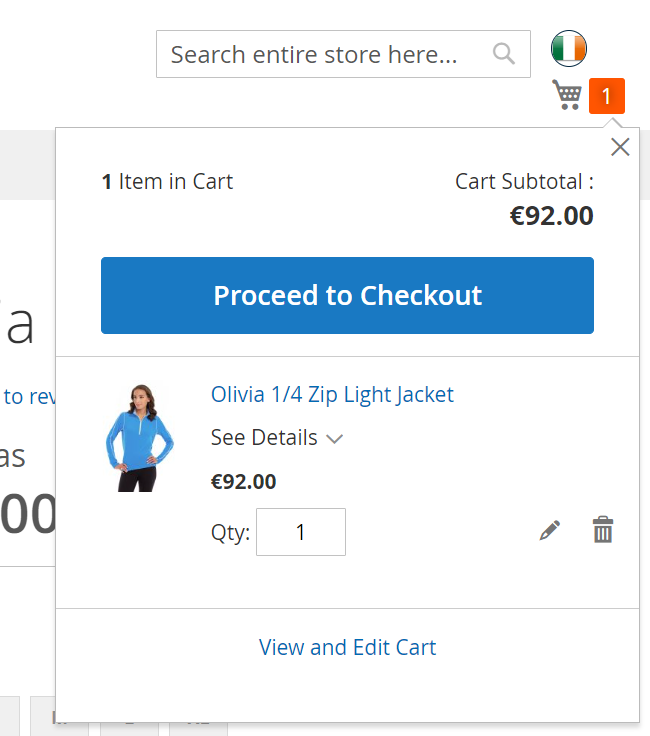
The customer clicks > Proceed to Checkout.
The Checkout page opens.
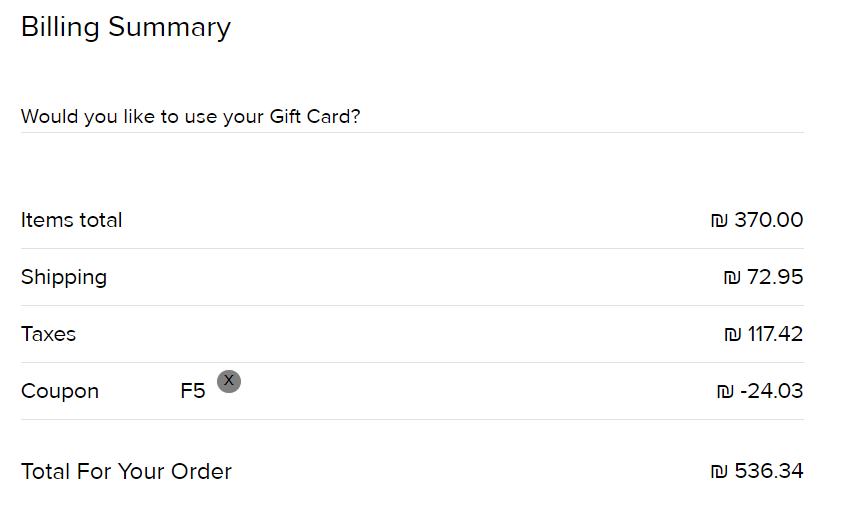
The customer scrolls down to Billing Summary and enters their discount code.
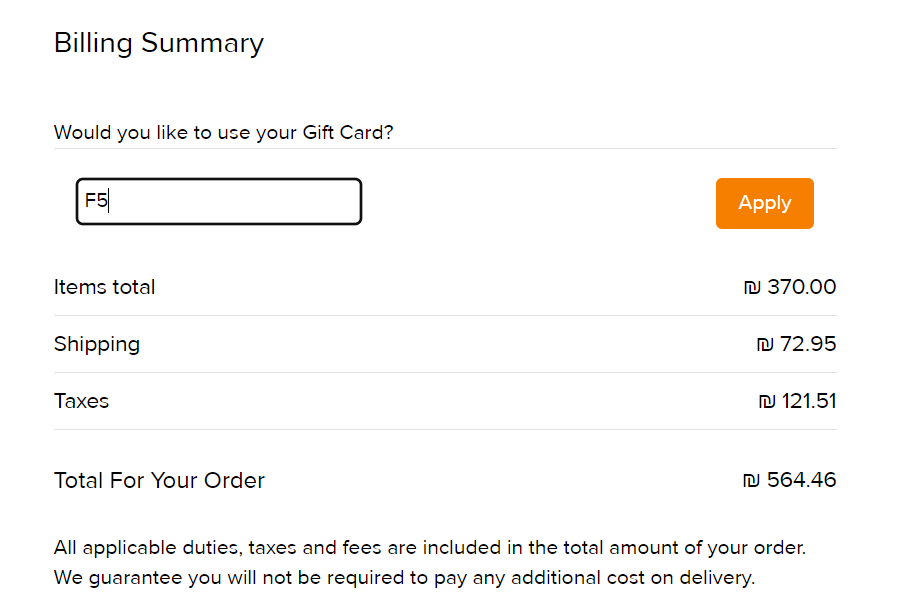
The customer clicks Apply.
The discount is subtracted, displaying the new total.
The customer fills out their payment details and clicks Pay and place order to complete their order.
Viewing Your Discounts
To view or edit existing discounts:
From the Magento dashboard go to Marketing > Cart Price Rules.
The Cart Price Rules page opens, displaying all existing discounts.
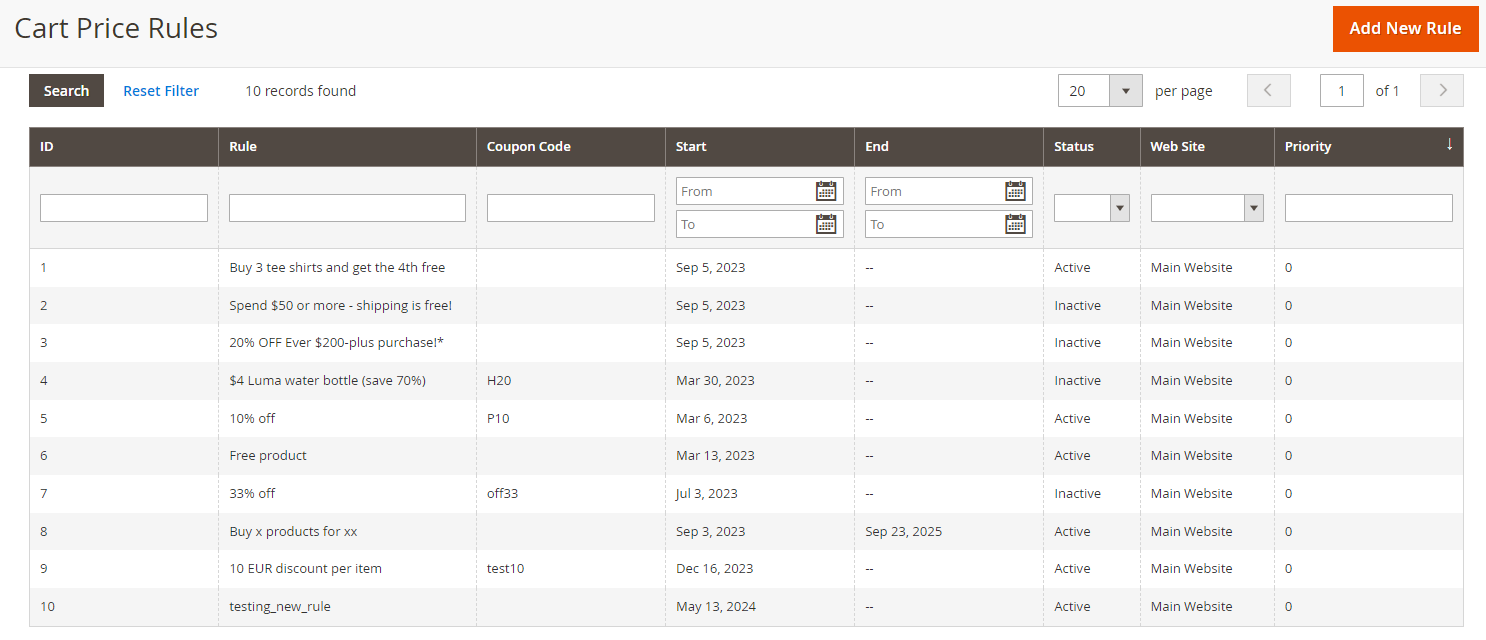
Click on one of the rules from the list to view or edit the discount details.
My Account
Logged in Customer Details in the Global-e Checkout
When a registered customer logs into the Merchant’s webstore before proceeding to Global-e checkout, the Global-e Magento2 Lite extension transfers securely transfer the customer’s details to Global-e checkout, where shipping and billing information will be pre-populated.
Order history
Orders placed by logged-in customers through Global-e are assigned to the corresponding account in your merchant store.
You must update your order history pages to show the correct localized prices for your international orders. The prices displayed should show the same currency and prices that the customer paid and sent to your platform via the sendOrderToMerchant request.
Fixed Prices Support
In addition to sophisticated dynamic price localization capabilities across multiple target countries and currencies (such as country uplift coefficients, VAT handling rules, marketing rounding rules, etc.), the Global-e Magento2 Lite extension supports fixed prices per country functionality.
Fixed Price From Magento Catalog
This can be achieved by defining separate stores per target country’s currency and configuring the respective countries as “fixed price” on the Global-e side. For example, if a store in Magento has a base currency EUR, it can be used as a fixed price for all (or some) countries having EUR as a default currency.
The fixed price will be used for all products.
Configuration:
The country should be defined to support fixed prices in the Global-e back office
Magento store should be updated with prices including VAT
Global-e extensions should be configured on the store level to support fixed prices from the catalog (see screenshot below)
 |
Fixed Prices Using Pricebook Upload (CSV)
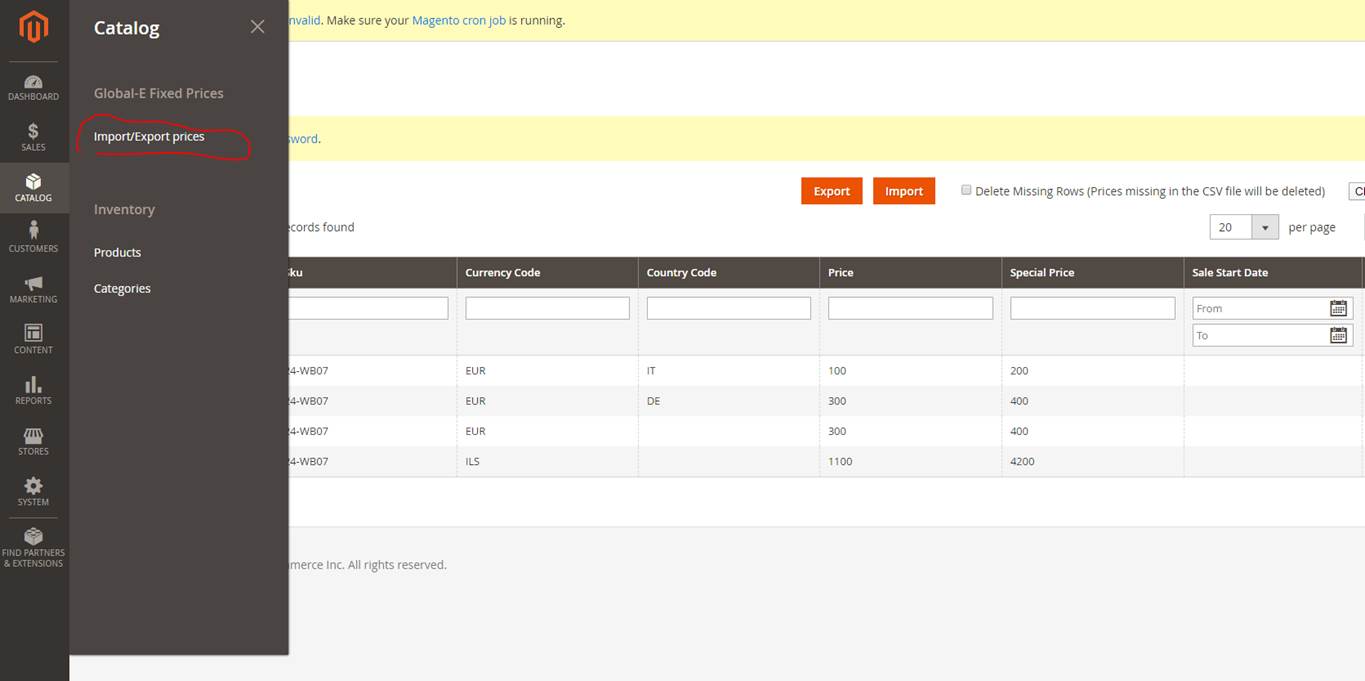
It’s possible to manage fixed prices by uploading the Pricebook CSV via the interface provided by the Global-e Magento2 Lite extension in the Magento admin: Catalog-> Global-e Fixed prices.
To display fixed prices on your site, make sure to enable the Global-e module setting Add data-fp to product attribute automatically. This adds data-fp attributes to products on HP/PLP/PDP/Search.
Enabling the Global-e Module
You must enable the following Global-e modules in order to display fixed prices on your site.
Globale_BrowsingLite
Globale_OrderLite
To enable the Global-e Modules use the below command:
bin/magento module:enable [-c|--clear-static-content] [-f|--force] [--all] <module-list>
Where
<module-list> is a space-delimited list of modules to enable or disable. If any module name contains special characters, enclose the name in either single or double quotes.
--all to enable or disable all modules at the same time.
-f or --force to force a module to be enabled or disabled despite dependencies. Before you use this option, see About enabling and disabling modules.
-c or --clear-static-content cleans generated static view files.
Upload Pricebook
To upload the Pricebook into Magento Admin, please proceed to Catalog -> Global-E Fixed Prices -> Import/Export prices
 |
Price should have the following columns: product_code - product SKU from Magento (mandatory)
country_code - ISO2 letters country (optional)
currency_code - ISO3 currency mode (mandatory)
price - fixed price in the specified currency (mandatory)
special_price - fixed price for the special price (optional)
date_from - the date when the special price is applied (optional)
date_to - the date until the special price is applied (optional)
Fixed prices should be uploaded for configurable and child products
After upload, fixed prices will be stored in the dedicated table created by Global-e in the Magento database:
globale_fixed_price table.
Additional Integration Features
Conversion Tracking for Global-e Orders
The Global-e confirmation page comes from the Global-e platform, not the Magento confirmation page.
To allow merchants to implement conversion tracking for Global-e orders, there are JavaScript events that will be sent from the Global-e checkout iframe to the container page.
The OnCheckoutStepLoaded event is fired when the Global-e checkout is open (in this case no additional data is provided) and also when the confirmation page is showing. In the 2nd case, the data object with all the order details will be provided. This object can be used by merchants to report events to any platform (GA, GTM, Facebook etc).
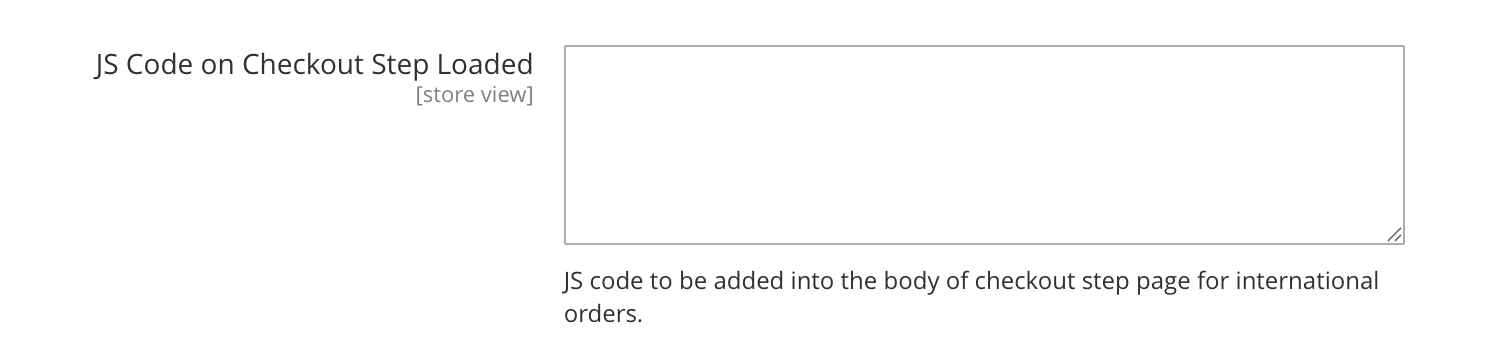
To simplify the implementation of conversion tracking, the Global-e Magento2 Lite extension provides 2 configuration fields in the Magento admin panel. Merchants can use these fields to add tracking code (in the form of executable JavaScript) to report the transaction.
The advanced analytics feature allows merchants to track customer activities inside the checkout form and OnClientEvent will be fired on every change inside the form. This can be particularly useful in capturing customer e-mail addresses and implementing abandoned checkout integration. More details about this event can be found here.
Conversion Tracking
Global-e checkout is opened in an iframe and this iframe is then reloaded to display the confirmation page to the customer.
In order to allow merchant to perform conversion tracking and implement goals in the GA, the Global-e iframe will fire JavaScript events to the container page.
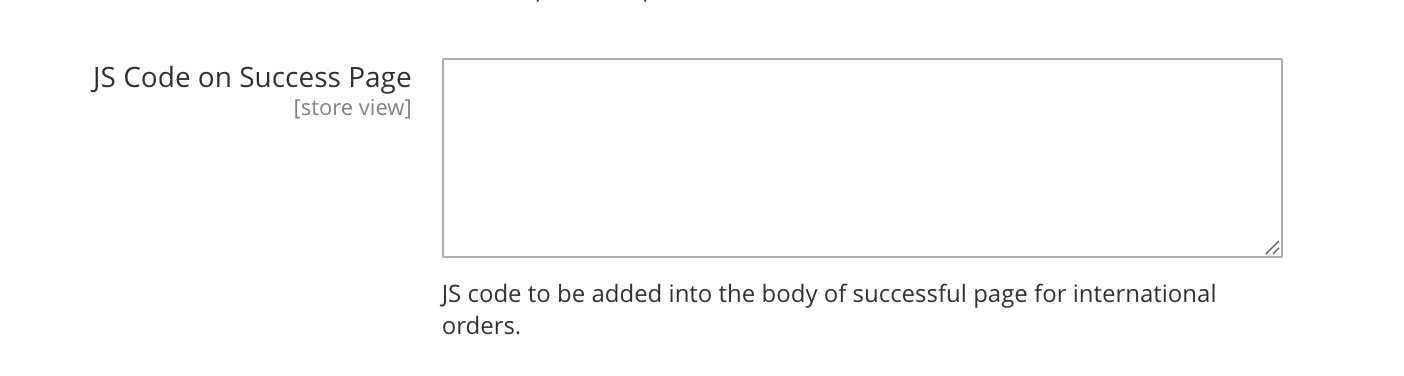
As part of the extension, Global-e provides a configuration field in Magento Admin (Stores > Configurations > Services > Global-E Integration Lite > Checkout > JS Code on Success Page) where this event handler can be added.
Conversion Tracking Example
if (data.IsSuccess && !data.IsPageReload){
      // data contains order information;
      // Include analytics triggers here
      // using data object fields for data.OrderId;
      // window.location = "http://www.yourconfirmationpage.com";
}
Mapping Data Attributes to GA4 (Example)
Global-e Data | Google Analytics 4 | Description |
|---|---|---|
| item_id | Product SKU |
| item_name | Product Name |
| currency | Base Currency |
| price | Product Price in base currency |
| quantity | Product Quantity |
| transaction_id | Order Id |
| value | Order value (excluding shipping and tax) in base currency |
| tax | Customer paid tax in base currency |
| shipping | Customer paid Shipping cost in base currency |
Configuration (Example)
Add JS Code for successful international orders. These settings can be found under the Global-e Crossborder Checkout or Analytics section depending on the module version.
Add JS Code to the body of the checkout page for successful international orders:
Add JS Cod to the body of the page for successful international orders:
Pre-Order and Backorder (Magento)
The Global-e Extension for Magento features a logic that determines whether an order should be marked as Backordered during the GetCart request process.
This decision is based on specific criteria:
The item is marked as eligible for backorders in Magento ("
backOrders" is enabled).The item's quantity is less than or equal to 0.
When both conditions are met, IsBackOrdered = true.
Additionally, a BackOrderMessage is included in the MetaData.
By default, this message is set to "pre-order".
However, you can customize this message can be customized through the configuration settings of the Global‑e module within the Magento Admin panel.
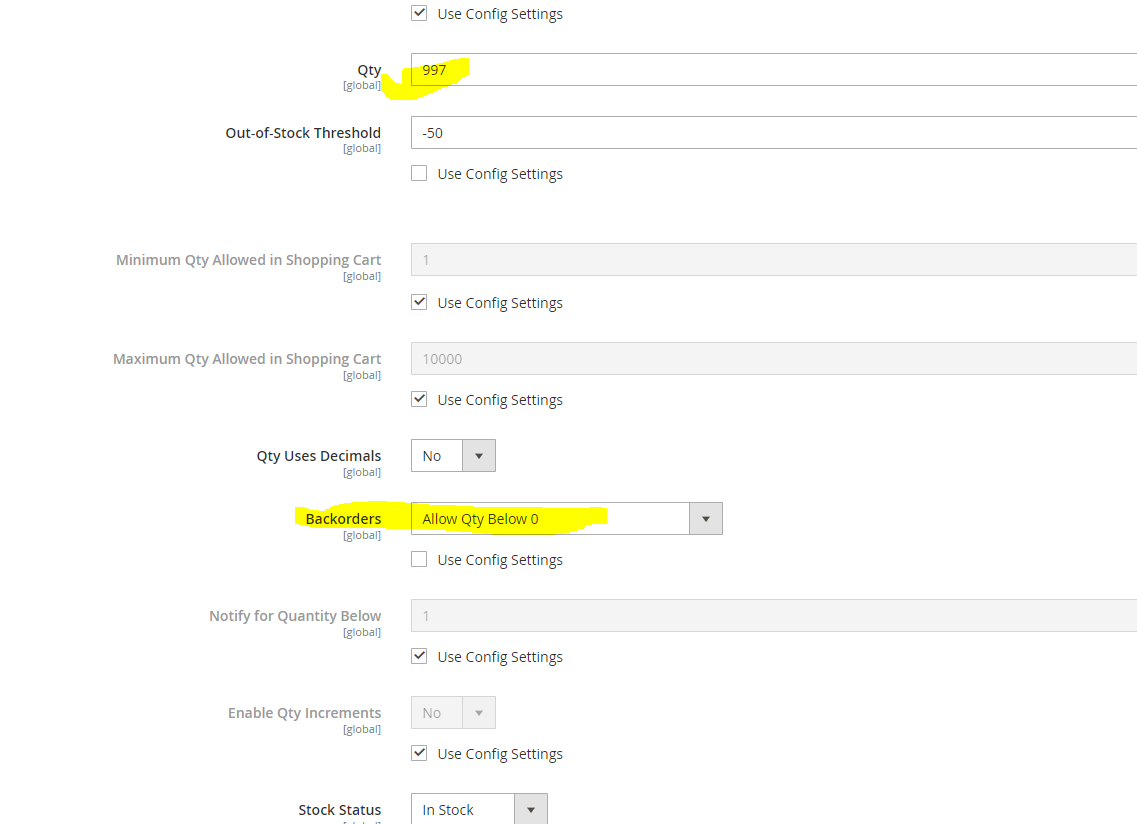
This feature allows for a tailored communication strategy regarding back-ordered items to customers.
Pre-Order and Backorder
To inform Global-e that a product is on pre-order or backorder, include the following fields in your getCheckoutCartInfo response:
IsBackOrdered: Set to true for products ordered as backorders or pre-orders.BackOrderDate: Provide the estimated stock date for backordered or pre-ordered items in the formatyyyy-MM-dd HH:mm:ss.
Adding a metadata field to getCheckoutCartInfo allows the Global-e design team to display additional details on the checkout page and in transactional emails.
Example:
{
    "productsList": [{
            "ProductCode": "ProductCode",
            "CartItemId": "line 1",
            "Name": "Product Name",
            "NameEnglish": "Product Name",
            "Description": "Description",
            "DescriptionEnglish": "Description",
            "ImageURL": "https://domain/img/imageName.jpg",
            "ImageWidth": "",
            "ImageHeight": "",
            "OriginalListPrice": 100,
            "OriginalSalePrice": 100,
            "OrderedQuantity": 1,
            "IsBackOrdered": true,
            "BackOrderDate": "2023-10-30 11:57:13",
            "MetaData": {
                "Attributes": [{
                        "AttributeKey": "BackOrderMessage",
                        "AttributeValue": "Shipping on 2023-10-30"
                    }
                ]
            }
        }
    ]
}