Installation
To install the the Global‑e Salesforce B2C Commerce cartridge(s):
Upload the Global‑e cartridges. Each cartridge uploads the int_globale cartridge as well as the cartridge suited to the architecture used on your storefront:
If using an SFRA extension cartridge run the following command:
npm run uploadCartridge:sfra
The SFRA extension cartridge uploads both the int_globale and int_globale_sfra cartridges.
If using a SiteGenesis extension cartridge run the following command:
npm run uploadCartidge:sitegenesis
The SiteGenesis extension cartridge uploads both the int_globale and int_globale_sitegenesis cartridges.
To upload all extension cartridges at once ( int_globale, int_globale_sitegenesis and int_globale_sfra) run the following command:
npm run uploadCartridge
Navigate to Administration> Sites > Manage Sites > (Your Site) > Settings.
Add the Global-e cartridge to the cartridge path.
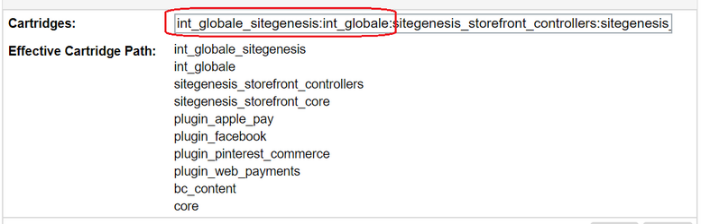
The two Global‑e cartridges should be added before your brand cartridges (from left to right) - int_globale_sitegenesis and int_globale.
In Site Preference, import the metadata and set the configurations.
Run GlobaleSettings Job.
SFRA
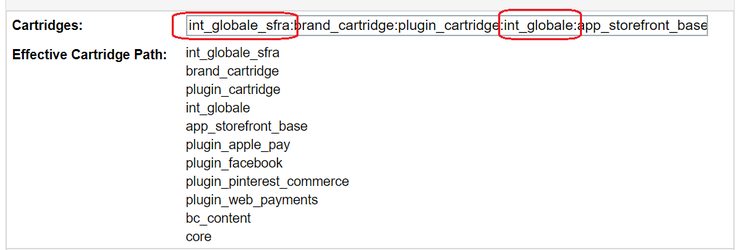
Add two Global‑e cartridges before the app_storefront_base cartridge and after your brand cartridges (from left to right) - int_globale_sfra and int_globale, as shown on the screenshot:
Build client CSS & JS files
Before you can run any node npm commands in your terminal you need to install node.js (the latest stable version is recommended). Once node.js is installed, run the following command in your terminal: npm install
This install requires npm packages and modules to build CSS and JS files as well as SGMF (Salesforce B2C Commerce Cloud) scripts.
After npm is installed you can run the following npm commands in your terminal (from top to bottom in package.json)
Run unit tests:
npm run test
compile CSS for SiteGenesis only
npm run compile:scss:sitegenesis
compile CSS for SFRA only
npm run compile:scss:sfra
compile all available CSS in all extension cartridges
npm run compile:scss
compile js for sitegenesis only
npm run compile:js:sitegenesis
compile js for SFRA only
npm run compile:js:sfra
compile all available js in all extension cartridges
npm run compile:js
lint your CSS
npm run lint:css
lint your js
npm run lint:js
Import Metadata
Before you begin using the Global‑e cartridge functionality you have to import Global‑e metadata (metadata/*.xml)
Metadata File Name | Description |
|---|---|
globale.system.xml | System object Global‑e custom attributes |
globale.custom.xml | Global‑e Custom object definitions |
globale.services.xml | Global‑e Services, to be used by Global‑e cartridge |
globale.jobs.xml | Global‑e Scheduled Jobs |
globale.paymentmethods.xml | Global‑e Payment Methods |
globale.shippingmethods.xml | Global‑e Shipping Methods |
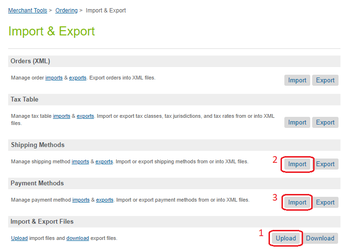
Import these files in the following order (all in MERGE mode):
for globale.system.xml and globale.custom.xml files:
for globale.services.xml and globale.jobs.xml files:
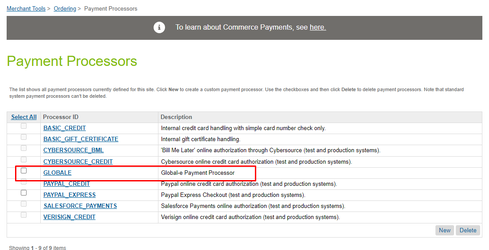
Create the GLOBALE Payment Processor manually.
For globale.paymentmethods.xml and globale.shippingmethods.xml files:
Check the Tax Class for Global‑e Shipping Methods after a fresh import, as it might be reset to an undefined or non-existing Tax Class.
Services
After importing the globale.services.xml metadata file, you will have Global‑e Services (starts as "Globale-") which will be used by Global‑e cartridges.
Each service has a respective Global‑e Service Credential which normally will contain only the second part of the service URL (like "/Browsing/AppSettings"). The first part of the Global‑e service will be stored in Global‑e Site Preferences since it is the same for all Global‑e services, so the full-service URL will be calculated automatically in Global‑e cartridge as a combination of the value stored in Global‑e Site Preference and respective Global‑e service Credential.
Make sure that the Rate Limit for Global‑e SendCart Service is disabled, and the Communication Log is enabled for all Global‑e Services at least for the first couple of weeks after Production launch.
Scheduled Jobs
Global‑e Jobs (starts as "Globale") becomes available after you import the globale.jobs.xml metadata file.
All Global‑e Jobs except 'GlobaleSettings' are just samples, so you might have to extend/customize them according to your business logic/requirements.
All Global‑e Jobs (except GlobaleSettings) are disabled by default, so you have to review the configuration of each job and enable those jobs that need to be enabled.
Check the Site assignments of each Global‑e Job to ensure they are assigned only to those Sites operated by Global‑e.
Payment Method
After importing the globale.peymentmethods.xml metadata file you will have the Global‑e General Method (GLOBALE) and Global‑e Payment Method (GLOBALE_PAYMENT) for which will be assigned to Global‑e Payment Processor (GLOBALE). The payment processor you need to create manually (see step 4 above).
Shipping Methods
After importing the globale.shippingmethods.xml metadata file you will have Global‑e Shipping Methods (begins with "GLOBALE_").
Note that these imported Shipping Methods are not "real Global‑e Shipping Methods", they are only needed to make Salesforce B2C Commerce able to Create SFCC Order properly.
Ensure that the Tax Class of each Global-e Shipping Method is listed as either Standard or another custom Tax Class, but not "Undefined".

Site Import
It's possible to import all the required metadata using site import.
In the metadata folder, there is a RefArchGlobal.zip archive that could be used for this purpose.
Please also keep in mind that it's required to modify the archive before importing it if you have a different site ID than RefArchGlobal.