Site Customisation
This section does not apply to Shopify. For information about Shopify, see Shopify Native. |
Overview
From the Global‑e Merchant Portal, go to Merchants > Site Customisation.
The Site Customisation screen is displayed, showing by default the Welcome Pop-up customisation settings.
 |
Customise the Elements on Your Site
Use the Site Customisation screen to customise the following elements on your site:
Save your Changes
When done, click Save .
- OR -
Click Cancel or Reset to default to reset the web element to its default appearance and setting.
Welcome Pop-up
The Welcome pop-up appears when a visitor initially lands on your site.
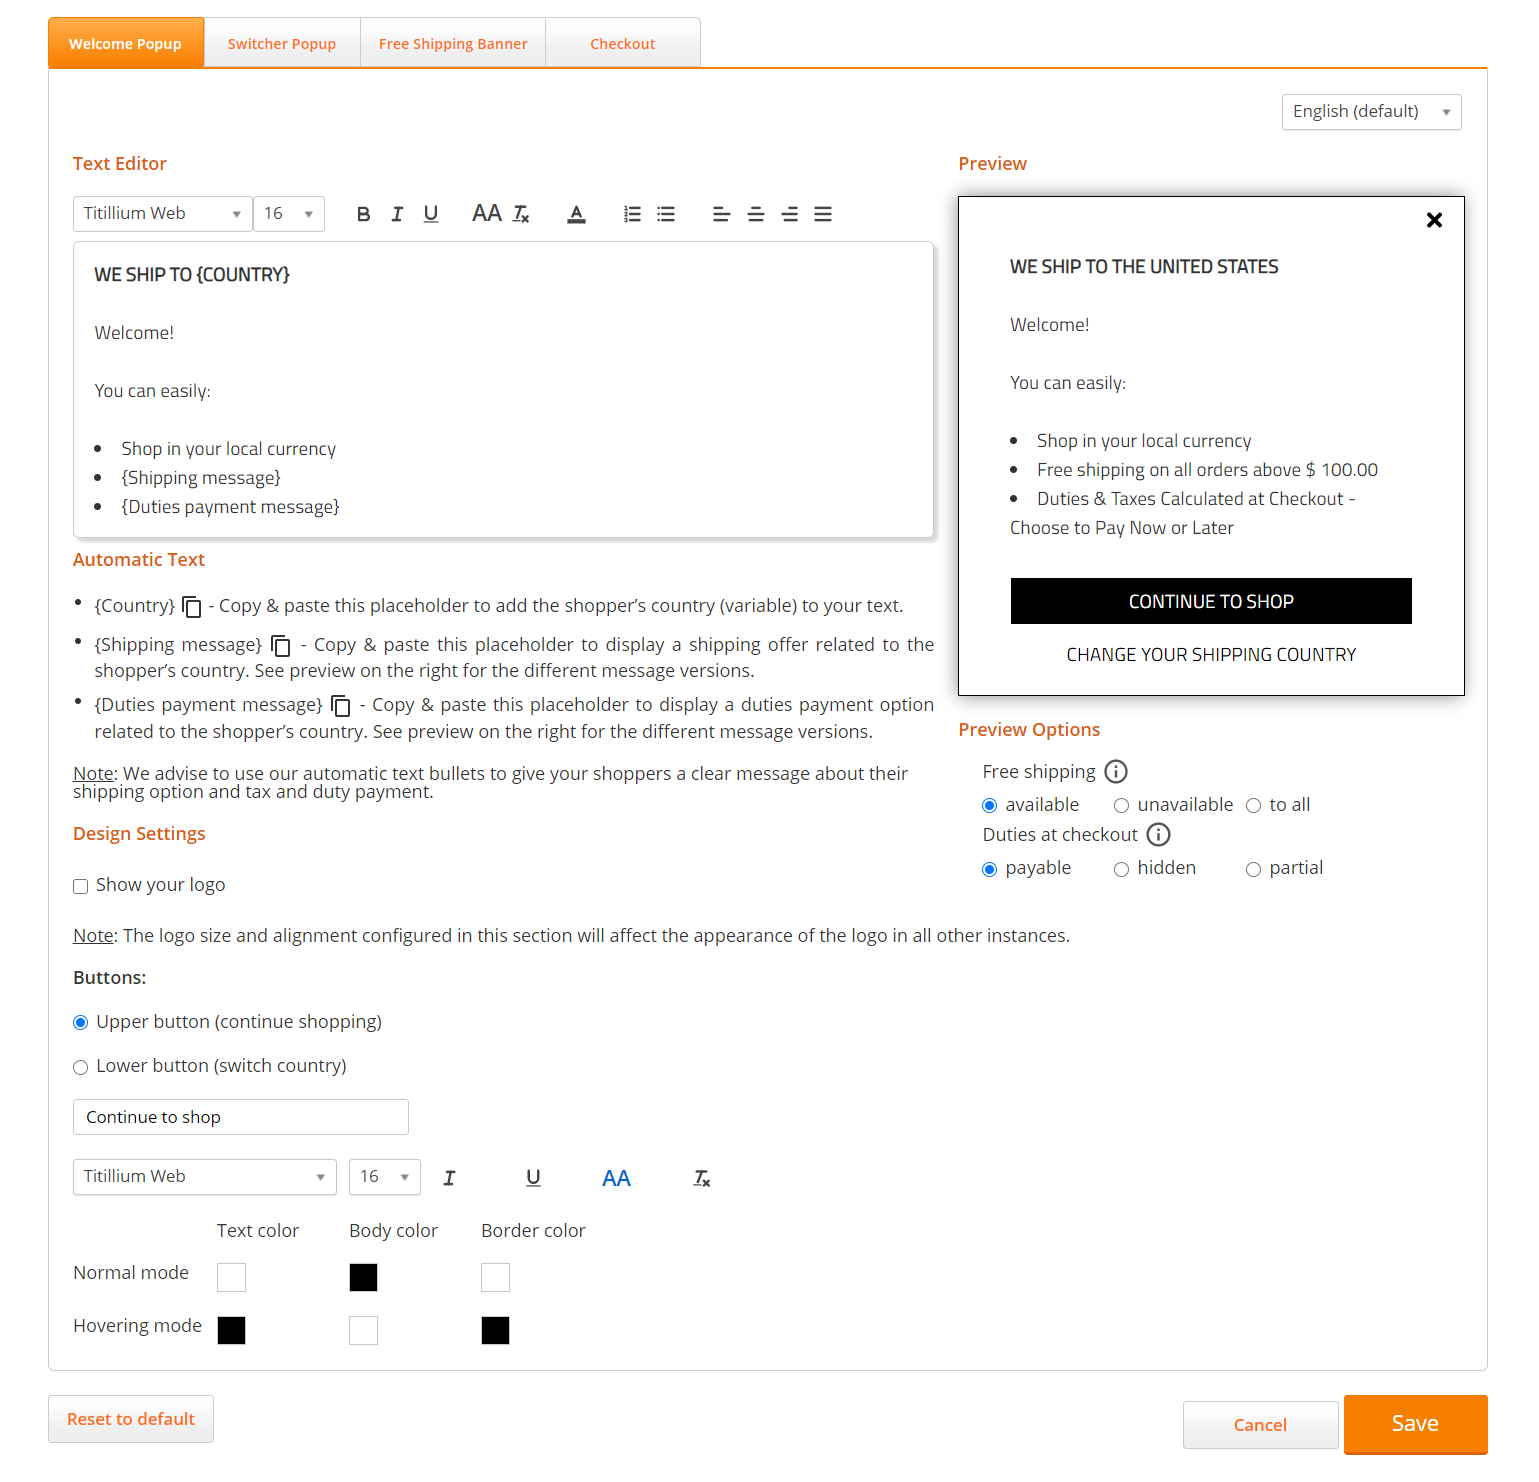
The following figure shows an example of the Welcome pop-up within the Site Customization screen.
 |
Customise the Welcome Pop-up
The Welcome Pop-up screen includes the following editing tools:
Text Editor
You can modify the text in the Welcome pop-up template using the Text Editor.
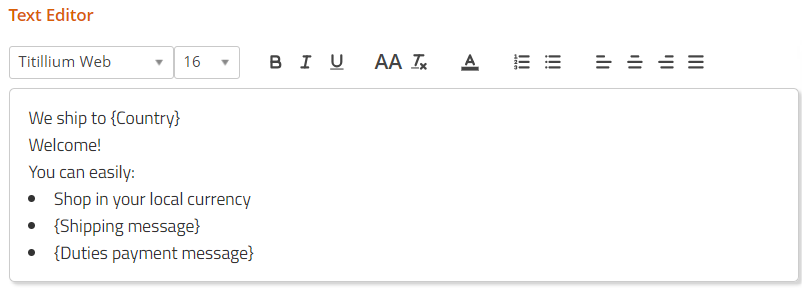
The default text is in English and has been professionally translated into twenty-seven languages to meet your localisation needs.
Important
If you edit the text in one of the language versions, the text edits are only applied to that specific language version - the text in the other language versions remains unchanged.
To avoid having language versions with inconsistent text, when you edit the text of a specific language, apply the same (translated) text edits to the remaining twenty-six languages.
Three placeholders for automatic text (
Country, Shipping message, and Duties payment message) are incorporated in the default text. We advise that you use our automatic text bullets to convey to your shoppers a clear message about their shipping options as well as tax and duty payment.
To edit the Welcome Pop-up text:
In the language drop-down, select the language version of the text you want to edit.
By default, the English language version of the Welcome Pop-up text is displayed in the Text Editor.
Note
The English language version of the Welcome pop-up is viewed by site visitors from countries that do not have a localized (translated) version of the pop-up.
Edit the text in the Text Editor section, and use the text formatting tools to change the appearance and alignment of the text.
Note
Unlike text edits, using formatting and alignment tools affect all language versions. For example, if the font size is increased in the Dutch language version, it is also increased in all the other language versions.
Use the Preview pane to view or review your changes.
Click Save to apply your changes.
If required, select an additional language from the language drop-down, and repeat steps 2 - 4.
Preview Pane
The Preview pane displays the Welcome Pop-up message as it appears to your store visitors.
At the center of the Preview pane is the text from the Text Editor and at the bottom are two buttons that offer customers the option to continue shopping or change their shipping country.
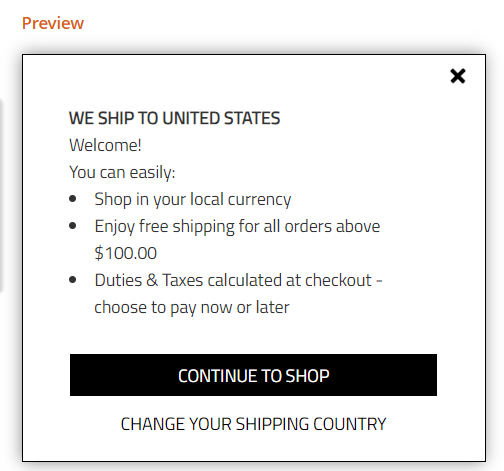
Any changes that you make to the text in the Text Editor are immediately reflected in the Preview pane.
The colour and text of the buttons can be edited in the Design Settings.
Preview Options
The Preview Options section allows you to view each of the shipping and duty payment messages as they appear to store visitors.
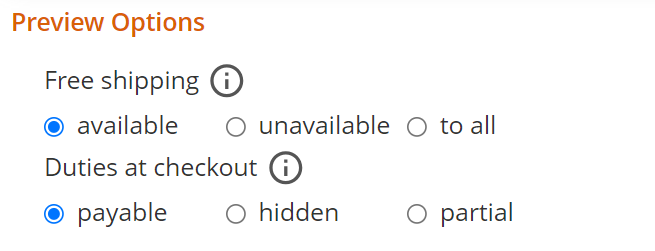
Select the desired option to view the related message in the Preview pane.
Free shipping:
Available: Minimum order required for free shipping.
Default message: Enjoy free shipping for all orders above $x
Unavailable: No free shipping available.
Default message: Enjoy our great international shipping rates
To all: Free shipping on all orders.
Default message: Free shipping to (your country) on all orders
Duties at checkout:
Payable: Duties are displayed separately at checkout with the option to prepay.
Default message: Duties & Taxes calculated at checkout - choose to pay now or later
Hidden: Duties are incorporated in the product price.
Default message: All Duties & Taxes are already included - no hidden fees
Partial: Duties are incorporated in the product price, with taxes displayed separately at the checkout with the option to prepay.
Default message: All duties are already included. Taxes calculated at checkout
Automatic Text
The Welcome Pop-up template contains parameters that automatically incorporate personalized information for each shopper into the message.
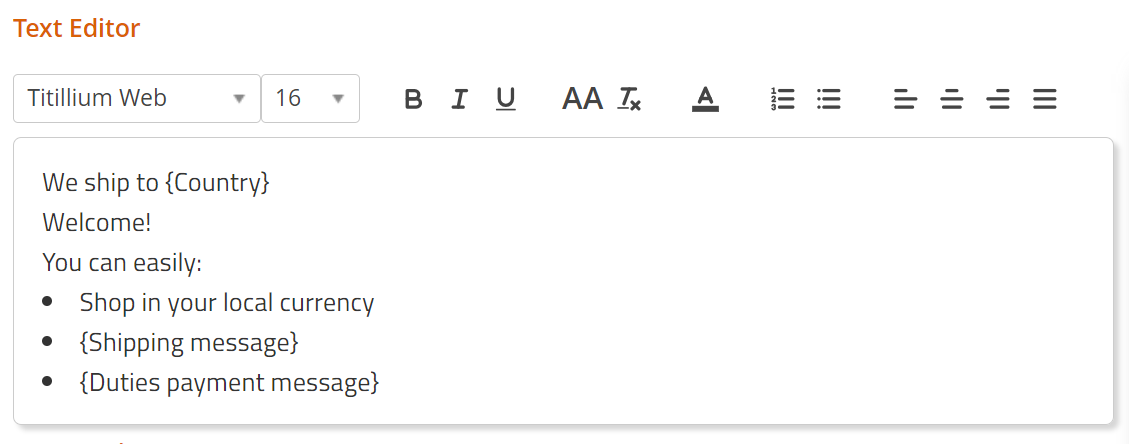
{Country}parameter: Informs shoppers that the goods can be delivered to their country.{Shipping message}parameter: informs shoppers about the lowest cart range required to qualify for free shipping to their country.{Duties payment message}parameter: informs shoppers about the duties payment option required for their country during checkout.
Note
When a customer visits your store, Global-e detects their location and automatically inserts the country name, and displays the relevant messages regarding shipping and duties & taxes.
Using the {Country} automatic text.
To use the {Country} parameter and add it to your message:
Copy the
{Country}automatic text placeholder and paste it into your text. The parameter inserted shows the shopper’s country.Example: We ship to
{Country}= We ship to GermanyClick Save to apply the changes.
Using the {Shipping message} automatic text.
The shipping messages displayed to your shoppers, based on their location:
If the shopper’s country requires a minimum order amount to qualify for free shipping, the text reads:
Free shipping on all orders above $X
(X represents the minimum order sum for free delivery to the shopper’s country and is displayed in the shopper’s currency).
If free delivery for all orders is offered in the shopper's country, the text reads:
Free shipping on all orders!
If free delivery for all orders is not offered in the shopper's country, the text reads:
Enjoy our great international shipping rates!
To use the {Shipping message} parameter:
Recommendation: Leave the automatic text placeholder
{Shipping message}as is, in the 2nd bullet, to show the shipping message text, as described above. This is to make sure you clearly communicate to your customers the shipping option for which their country is eligible. Note that it is already translated into all languages.Alternatively, you can override the automatic text with your own text.
Click Save to apply the changes.
To learn more about shipping options and fees when shipping via Global-e, refer to the Global-e Marketing Proposition guide .
Using the {Duties payment message} automatic text.
The Duties messages displayed to your shoppers, depending on their location:
If duties are configured to be part of the product price (hidden), the text reads:
All Duties & Taxes are Already Included - No Hidden Fees.
If duties can be paid at the checkout, the text reads:
Duties & Taxes Calculated at Checkout - Choose to Pay Now or Later.
If duties are configured to be part of the product price while taxes are paid at checkout (mainly configured for Canada), the text reads:
All Duties are Already Included. Taxes Calculated at Checkout.
To use the {Duties payment message} parameter:
Recommendation: Leave the automatic text placeholder {Duties payment message} as is, in the 3rd bullet to show the text as described above. This is to make sure you communicate to your customers the duties payment option for their country. Note that it is already translated into all languages.
Alternatively, you can override the automatic text with your own text.
Click Save to apply the changes.
You can view the different text options as the customer sees them in the Pop-up Preview pane. Click the various radio buttons under Free Shipping and Duties at Checkout to view in the Preview pane the various phrases that the Welcome Pop-up shows.
Show or Hide Your Logo
To show or hide your logo in the Welcome Pop-up:
Select the Show Your Logo option to display the logo you uploaded at the beginning of the onboarding process. If required, resize and align the logo.
Note
When you apply logo settings in the Welcome pop-up, the changes are also applied to all other instances where your logo is displayed, for example, the Checkout page and in customer-facing email notifications.
Clear the Show your logo option to prevent displaying your logo on any pop-up, page, email notification, and more.
Click Save to apply your changes.
Change Button Text and Appearance
There are two buttons on the default Welcome pop-up: an upper button and a lower button.
Use the formatting and design tools to change the text and appearance of each button in both normal mode and hover mode.
Click Save to apply the changes.
Additional Features
These features can be added to your Welcome Pop-up by request. Contact your Project Manager to enable them.
Switch to English option
By default, the Welcome Pop-up displays the language of the country where a customer is located. However, some customers may prefer to view the pop-up in English. To cater to these customers, Merchants have the option to add a button to the Welcome Pop-up that switches the language to English.
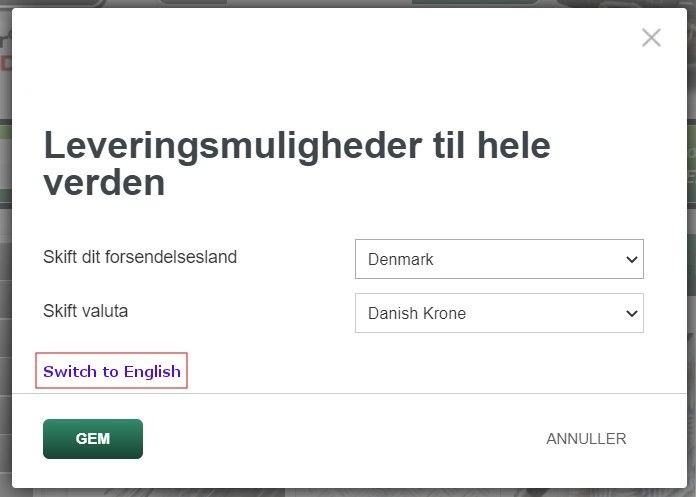
The color, size, and location of the button can all be configured.
Country Display Name
Merchants who prefer that a country name be displayed differently from what the default setting offers, can request to have the country name displayed according to their preference. For example, in the pop-ups below one option displays the country as Ireland (Republic of) while the other as Ireland.
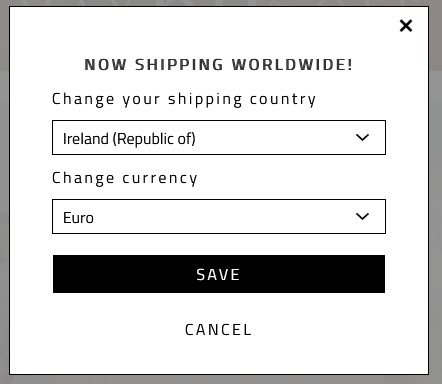
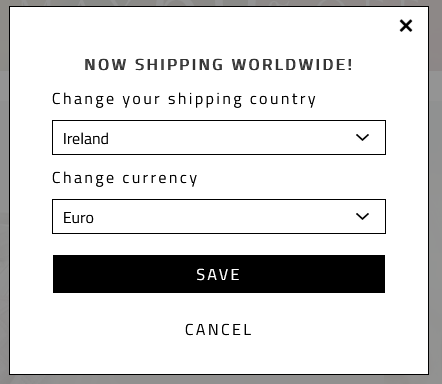
The alternative country name will be displayed in the following locations:
Checkout page
Confirmation page
Emails
Customer receipts
VAT invoice
Country Switcher
Welcome Pop-up
Country Switcher Pop-up
This section does not apply to Shopify. For information about Shopify, see Shopify Native. |
The Country Switcher pop-up appears when a visitor lands on your site from a country whose language is supported.
You can customize the pop-up as follows:
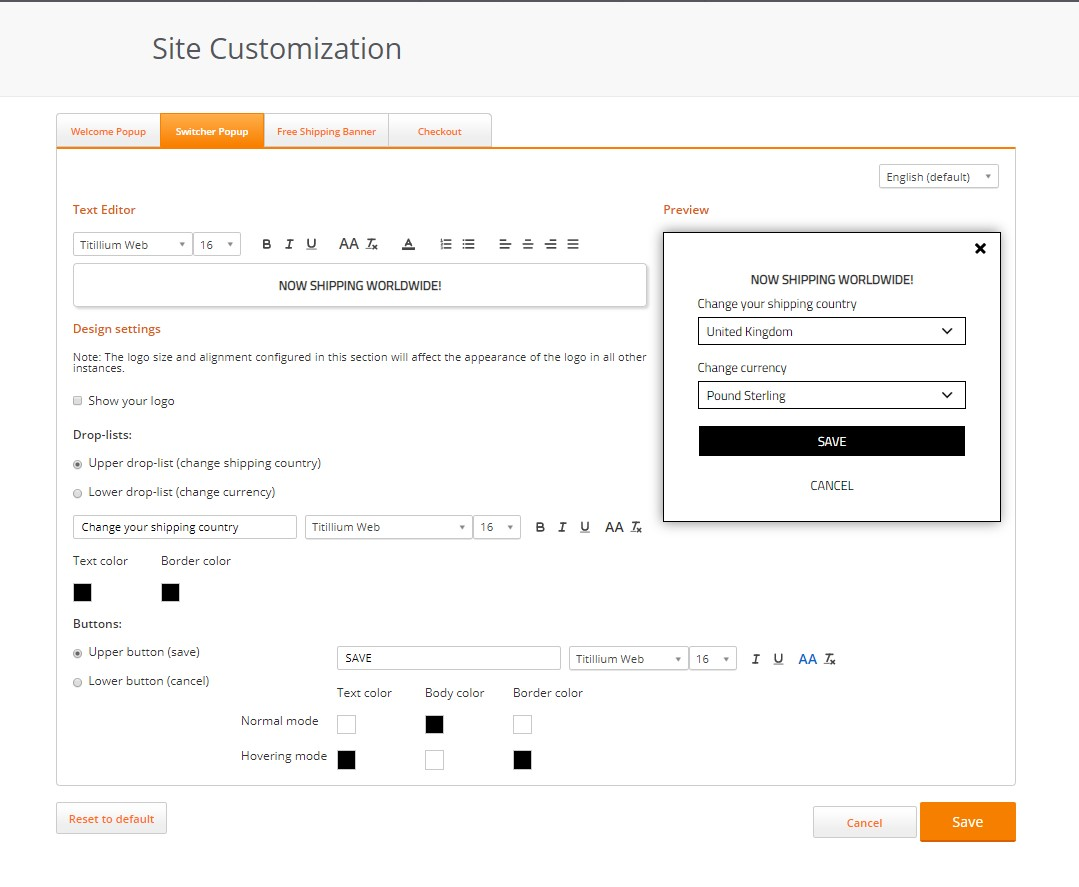
After you make changes to the Country Switcher pop-up, do one of the following:
Click Save to apply the changes
Click Cancel to cancel the changes
Click Reset to default to reset the Country Switcher pop-up to its default appearance and settings
Edit the Country Switcher Pop-up Text
The default text in the Country Switcher pop-up template was originally written in English. The text has been professionally translated from the original English language version into twenty-one languages to suit your localization requirements.
Important
If you edit the text in one of the language versions, the text edits are only applied to that specific language version - the text in the other language versions remains unchanged.
To avoid having language versions with inconsistent text, when you edit the text of a specific language, apply the same (translated) text edits to the remaining twenty languages
In the language drop-down, select the language version of the text you want to edit. By default, the English language version of the Country Switcher pop-up text is displayed in the Text Editor.
Note
The English language version of the Country Switcher pop-up is viewed by site visitors from countries that do not have a localized (translated) version of the pop-up.
Edit the text in the Text Editor section.
View the changes in the Preview pane
Use the text formatting tools to change the text appearance and alignment
Note
Unlike text edits, the formatting and alignment tools affect all language versions. Meaning if the font size was increased in the Dutch language version, it will also be increased in all the other language versions.
When you have finished editing the text, do one of the following:
Click Save to apply the text edits
Click Cancel to cancel the text edits
Click Reset to default to reset the Country Switcher pop-up to its default appearance and settings
If required, select an additional language from the language drop-down, and repeat steps 2 and 3.
Show or Hide Your Logo
Select the Show your logo option to display the logo you uploaded at the beginning of the onboarding process. If required, resize and align the logo.
Note
When you apply logo settings in the Country Switcher pop-up, the changes are also applied to all other instances where your logo is displayed, for example, the Checkout page and in customer-facing email notifications
Clear the Show your logo option to prevent displaying your logo on any pop-up, page, email notification, etc.
Click Save to apply your selection.
Change the Appearance of the Drop-downs
There are two drop-downs on the default Country Switcher pop-up - an upper drop-down and a lower drop-down.
In the Dropdowns section, use the formatting and design tools to change the appearance of both the upper and lower drop-downs.
When you have finished designing the drop-downs, do one of the following:
Click Save to apply the changes
Click Cancel to cancel the changes
Click Reset to default to reset the drop-downs to their default appearance
Change the Button Text and Appearance
There are two buttons on the default Country Switcher pop-up: an upper button and a lower button.
Use the formatting and design tools to change the text and appearance of each button in both normal mode and hover mode.
When you have finished designing the buttons, do one of the following:
Click Save to apply the changes
Click Cancel to cancel the changes
Click Reset to default to reset the buttons to their default appearance
Marketing Banner
Marketing Banner (Free Shipping Banner)

The Global-e Marketing Banner is available to Merchants who offer free shipping options. Merchants can use the standard Banner as a promotional tool or as an informative banner.
By default, the Banner is enabled for every country.
To meet your localisation needs, the banner's promotional message has been translated and is available in twenty-four languages.
Note
If your site does not include the Marketing Banner and you wish to add it, contact us at [email protected]
Access the Marketing Banner
To access the Marketing Banner:
Go to the Global‑e Merchant Portal > Merchant > Site Customisation Screen.
Select the Free Shipping Banner tab.
A preview of your banner is displayed.

The design settings are now available
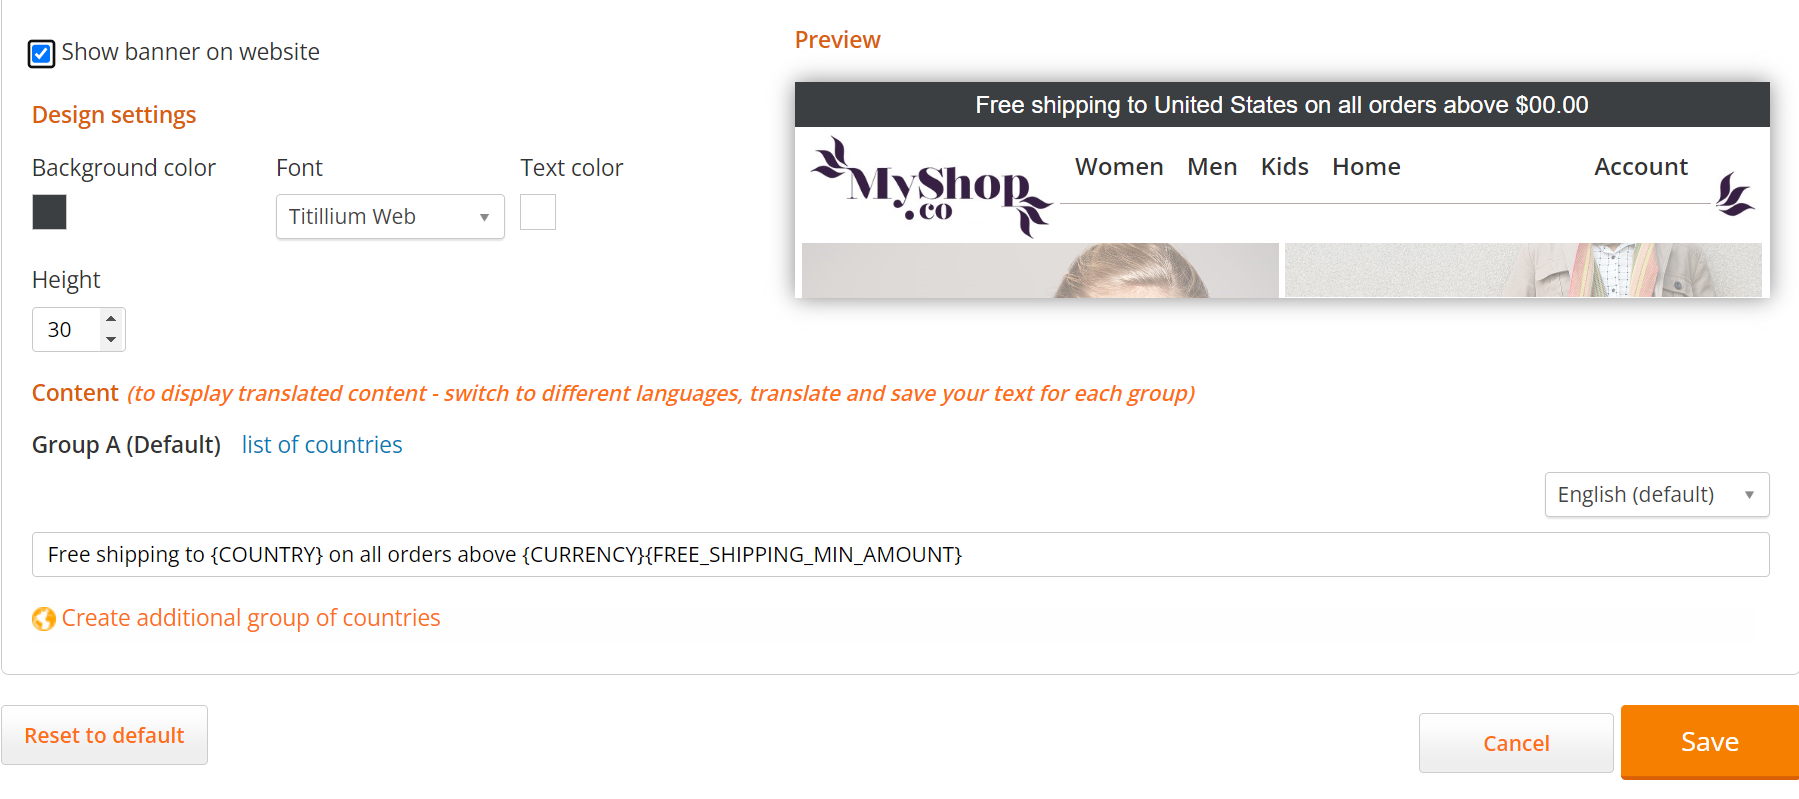
To hide the banner, clear the Show banner on website option.
Use the Banner's Editor to make the following changes to the default banner:
Show or hide the Banner
Position the Marketing Banner
The Free Shipping Banner is inserted as the first element on your storefront. However, if this does not suit your store, Global-e can place the banner in a different location using the ID of an element.
To insert the Free Shipping Banner in your preferred location on your storefront, add a new DIV element with a unique ID into your chosen location and share that ID with Global-e. This gives you complete control of the location of the banner and its position.
For Example:
<div id=”GlobaleFreeShippingBannerContainer”></div>
Customise the Banner's Design
To customise the Banner's design:
Under Design settings, customise the banner's design as detailed below and view your changes in the Preview pane.
Note
Unlike text edits, changes made to the banner's design and appearance are applied to each language and each country.
Field
Description
Change the banner background colour
Click the colour-well next to Background colour and select a colour.
Modify the banner height
In the Height field, specify the height of the banner (in pixels).
Change the font of the banner text
From the Font drop-down, select the banner's text font.
Change the colour of the banner text
Click the colour well next to Text colour and select the colour of the banner text.
Click Save.
Banner Options
Your Marketing Banner page includes a section called Group A with a set of default settings.

Group A includes a default Banner text and a list of countries to whom that banner is displayed.
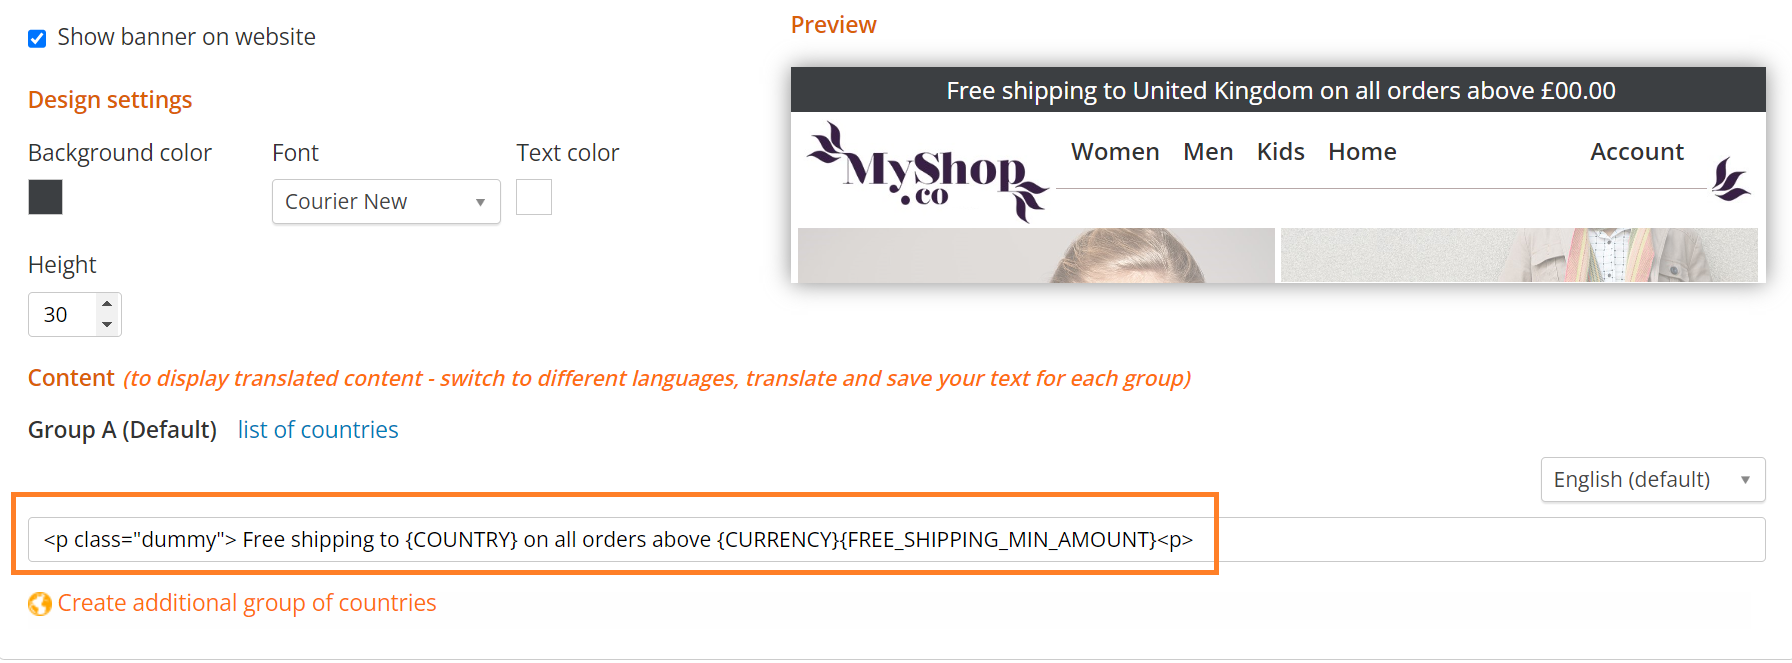
You are free to edit the Banner text as long as you include the default text parameters:
Country Name – the shipping country’s name
Currency – the chosen currency for the shipping country
Free Shipping Minimum Amount – the minimum cart value from which free shipping is offered
To view the default list of countries:
Above the default text, click on List of Countries
The list of selected countries opens.
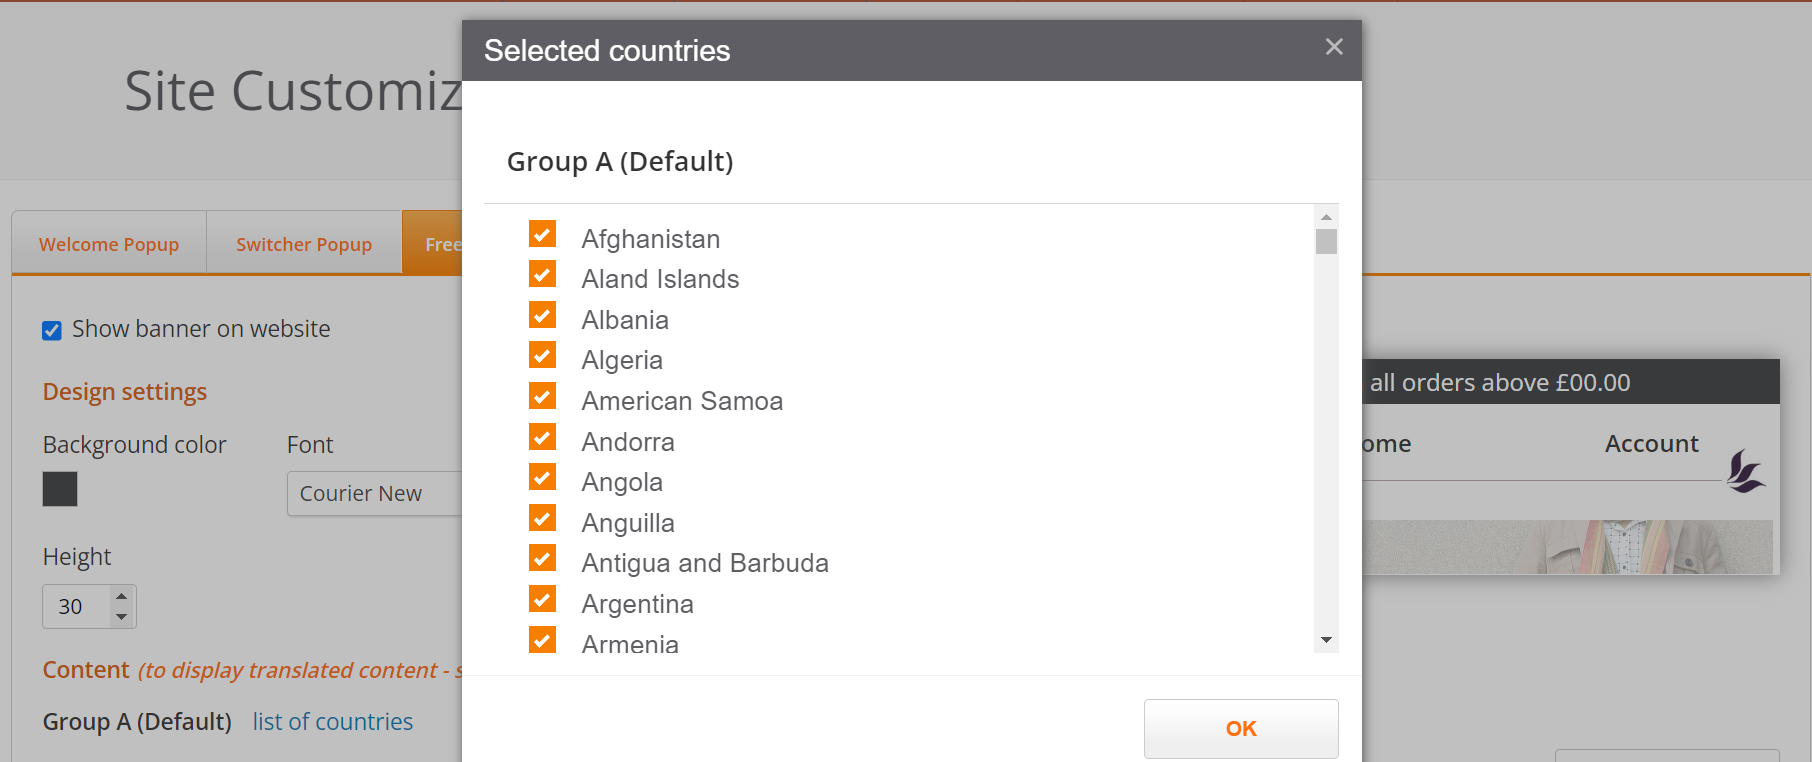
To create customized Banner messages and individual country lists, you need to create additional groups.
For more information on creating custom groups go to Create Additional Groups and Banners
Create Customized Banners
Create compelling and targeted Banner campaigns by showing customized messages to visitors in specific countries.
For example, you can show visitors in Europe a banner with one particular message while displaying a different banner message to visitors in Australia.
To create customized Banners and targeted campaigns you need to create additional groups, as detailed below.
Create Additional Groups and Banners
To display customised messages to visitors in different countries, you need to create a new Group for each collection of countries that you are targeting.
To create customised messages for a group of countries:
At the bottom of Design Settings click Create additional group of countries.
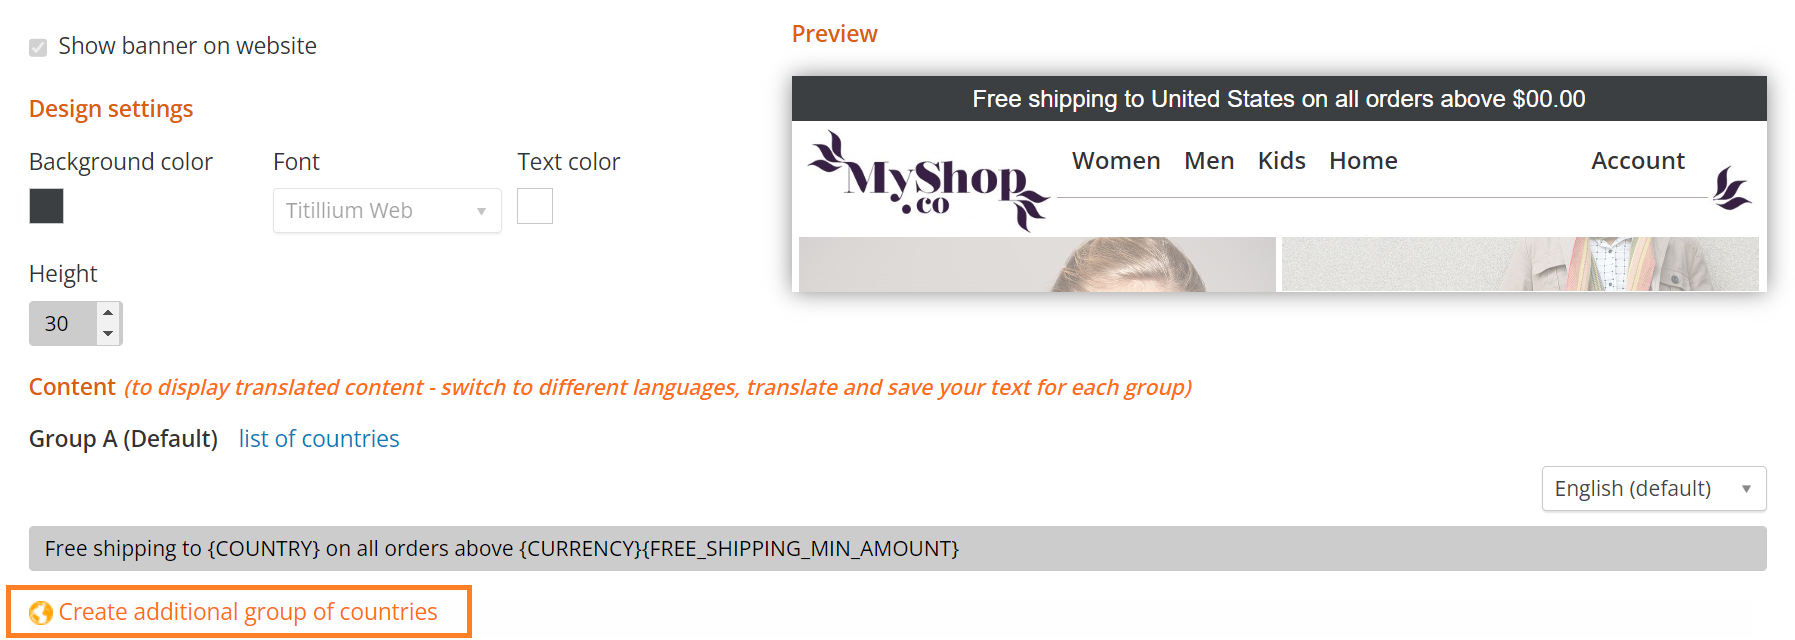
The Create a new group of countries window opens.
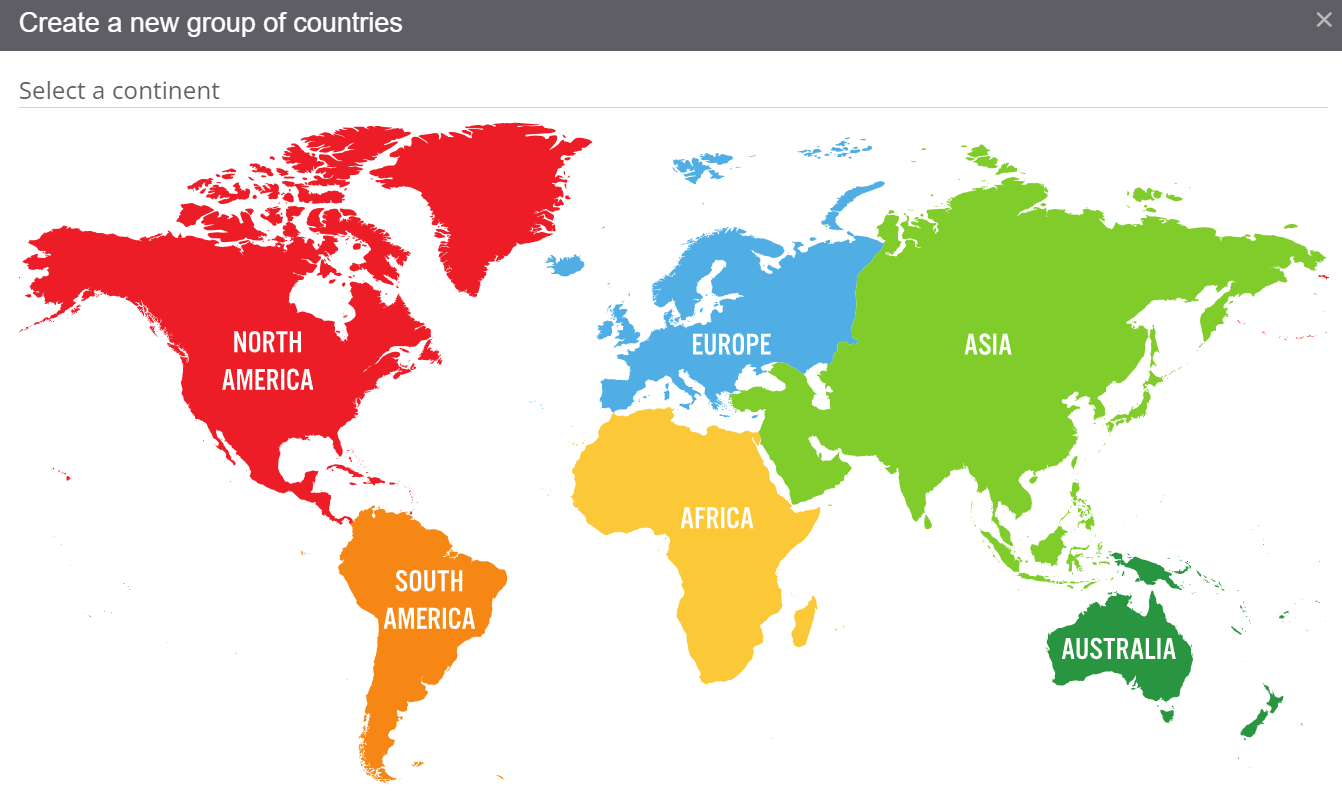
Click on the desired continent.
A list of all the countries in that continent opens.
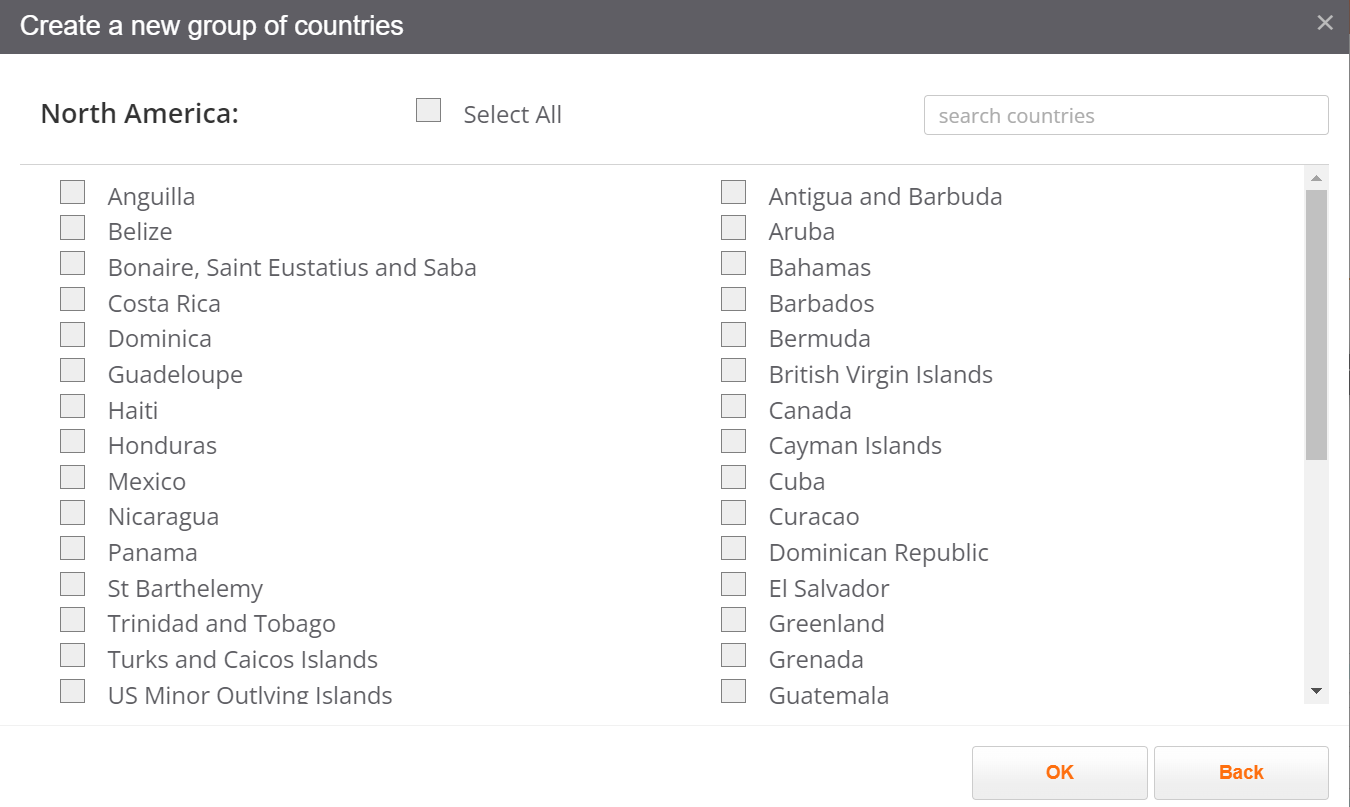
Note
A country can only belong to one group at a time. By default, all countries are members of Group A. When a country is added to an additional group, the country is automatically removed from Group A.
If the name of a country is disabled, it indicates the country has already been added to an existing group.
Select all the countries you want to add to the group > Click OK.
At the bottom of Design Settings, the new group, Group B, now appears under Group A.
Click the pencil icon to edit the name of the group.

In the language drop-down, select the appropriate language for the countries in the group. For example, select Spanish if the group contains Spain.
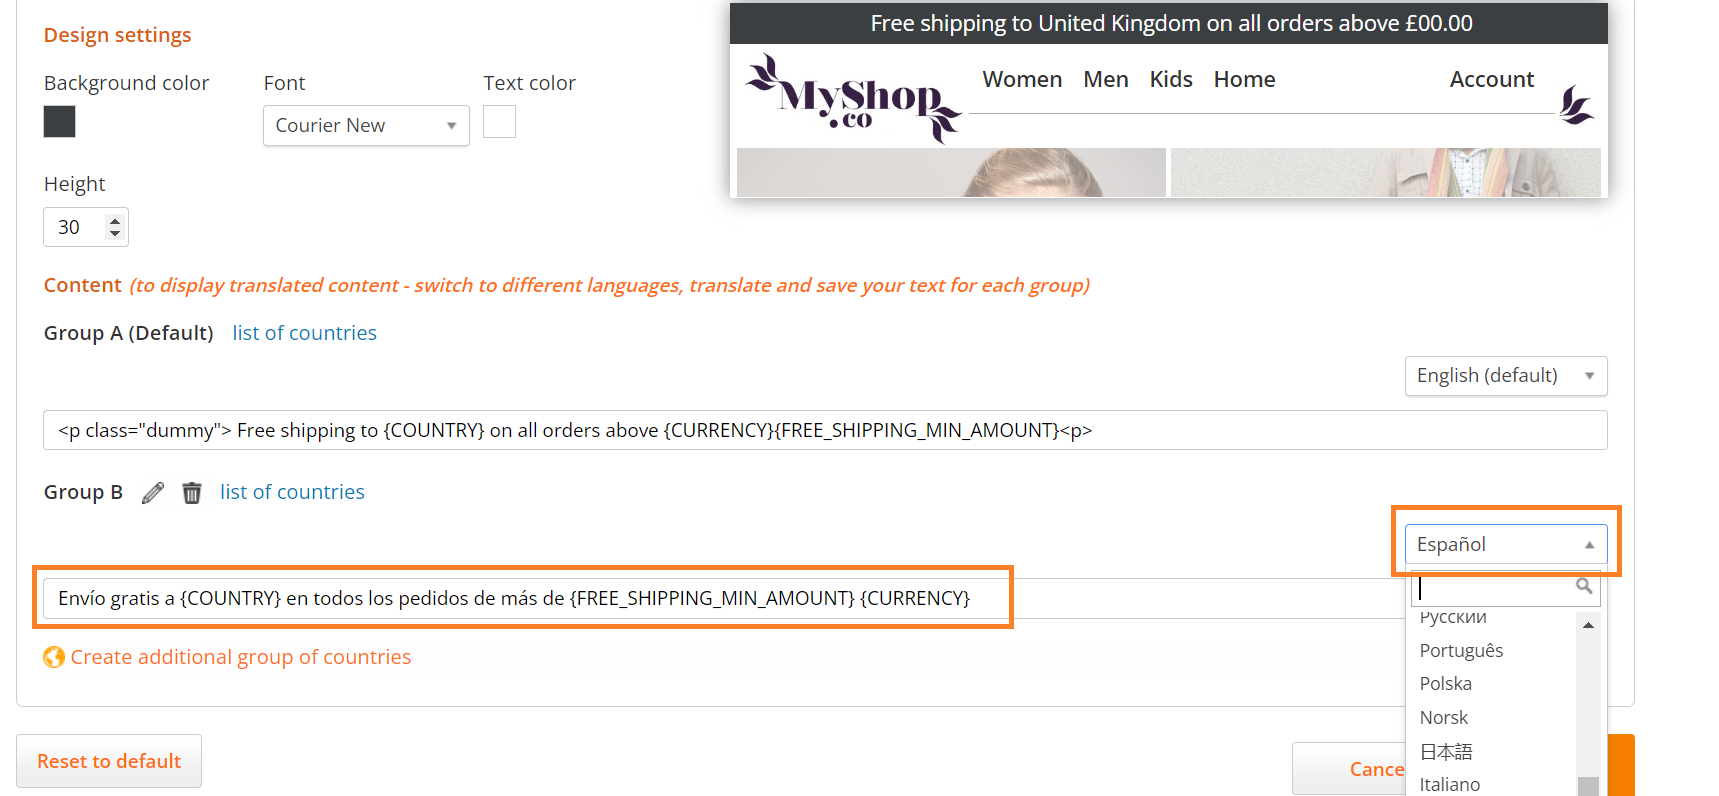
Set up your customised message for the group by editing the text in the Banner text box.
Click Save.
Delete a Group
To delete a group:
Select the group you wish to delete.
Next to the name of the Group, click the trash icon.

Click Save.
Show or Hide the Banner
By default, the standard banner is shown on your website.
To show or hide the banner:
Select Show banner on website to show the banner.

Deselect Show banner on website to hide the banner.

Checkout Pop-up
This section does not apply to Shopify. For information about Shopify, see Shopify Native. |
The Checkout pop-up appears when a shopper is checking out items they intend to purchase.
Customize the pop-up as follows:
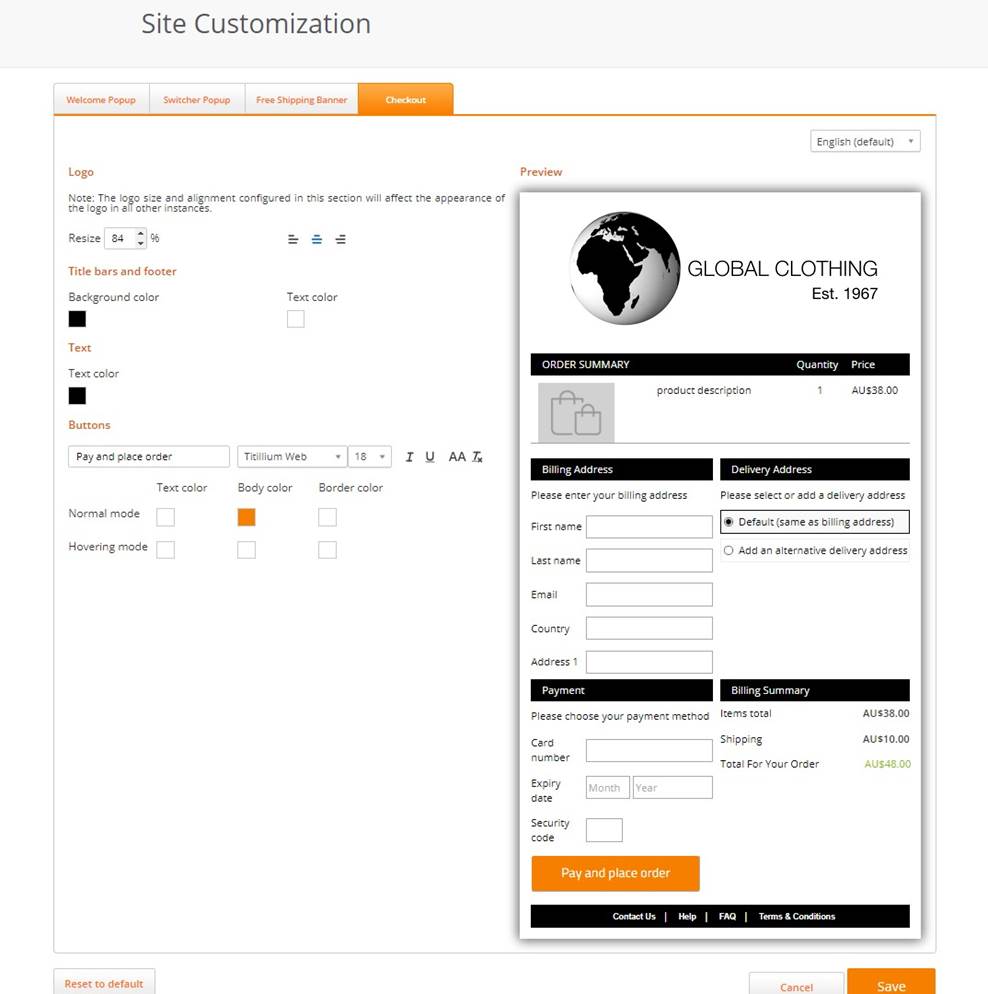 |
Adjust the Logo Size and Alignment
In the Resize field, increase or decrease the size of the logo
Align the logo according to your requirements
View the changes in the Preview pane
Note
When you save any logo adjustments in the Checkout pop-up, the changes are also applied to all other instances where your logo is displayed, for example, the Welcome pop-up and in customer-facing email notifications.
Change the Appearance of the Checkout Pop-up
Change the colours of the copy text, title bars, and footer bar. View the changes in the Preview pane
To do this...
Perform this action...
Change the color of the title bars and footer
Click the colour-well next to Background colour, and select a new colour
Change the color of the title bars and footer copy text
In the Title bars and footer section, click the colour-well next to Text colour, and select a new copy text color
Change the color of the copy text
In the Text section, click the colour-well next to Text colour, and select a new colour
Customize the buttons
Use the formatting and design tools to change the text and appearance of the button in both normal mode and hover mode
After you make changes to the Checkout pop-up, do one of the following:
Click Save to apply the changes
Click Cancel to cancel the changes
Click Reset to default to reset the Welcome pop-up to its default appearance and settings