Merchant Management
The Merchant Management main screen serves as the central control panel for managing all aspects of a selected merchant's configuration across environments (e.g., production, QA). It is designed for use by platform administrators, onboarding specialists, or implementation engineers to view and update the full suite of merchant-specific settings:
The Merchant Management feature is relevant to the following user roles:
Merchant Customer Service
Merchant Customer Service Administrators
Merchant Administrators
Hub Administrators
Hub Operators
This page describes the following:
Accessing the Merchant Management Feature
The Merchant Management feature lets you view and edit the following merchant information in an easy to access manner.
|
|
Navigate to Merchants > Merchant Management.
Select a merchant from the merchant menu.
The merchant's Summary information is displayed by default.
Importing Merchants
The Import tool lets platform administrators import a merchant's configuration and settings from one environment to another. This is especially useful during deployment, onboarding, or when promoting tested configurations from QA or Staging to Production.
The Merchant Management feature is relevant to the following user roles:
Merchant Customer Service
Merchant Customer Service Administrators
Merchant Administrators
Hub Administrators
Hub Operators
Select a merchant from the Merchant menu.
Click Import Merchant.
Choose an origin environment from the Choose origin environment menu.
Choose a merchant to import from the Choose merchant to import menu and click Next.
Provide the required parameter values for your QA environment.
You can click the information icon for information about the parameter.
Verify that your parameter values are correct and click Import.
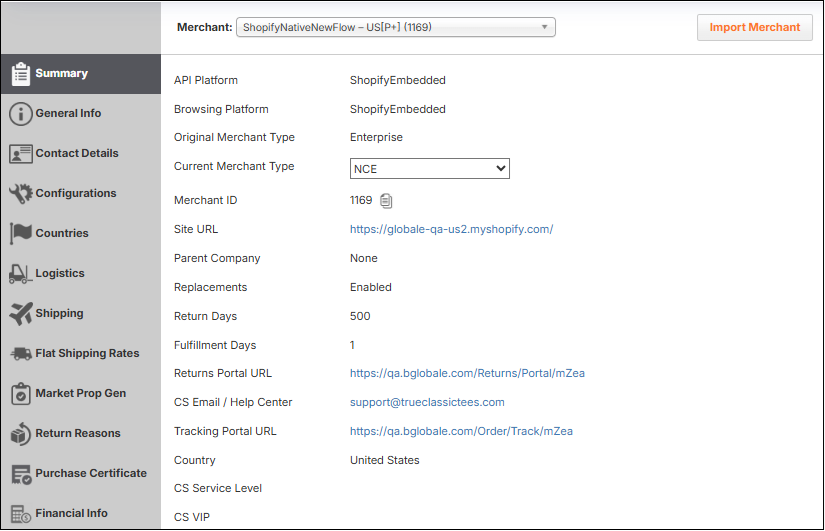
Summary
Description of Parameters
The following table describes the Summary feature. Comment: Is it okay to publish these live examples?
Parameter | Description | Example |
|---|---|---|
Parent Merchant | Shows the parent merchant, if one exists | Arlettie |
API Platform | Shows the merchant's API platform | ShopifyEmbedded |
Browsing Platform | Shows the merchant's browsing platform | ShopifyEmbedded |
Original Merchant Type | Shows the merchant's original merchant type | Enterprise |
Current Merchant Type | Lets you select a merchant type | |
Merchant ID | Shows the merchant ID. You can copy it by clicking the Copy icon | 2069 |
Site URL | Shows a link to the merchant's site | https://arlettie-e-shop-marque-blanche.myshopify.com |
Parent Company | Shows the parent company | None |
Replacements | Shows whether replacements are enabled or disabled | Enabled |
Return Days | Shows the amount of return days set for returns | 30 |
Fulfillment Days | Shows the amount of fulfillment days set for orders | 10 |
Returns Portal URL | Shows the link to the merchant's return portal | https://web.global-e.com/Returns/Portal/mZK8 |
CS Email / Help Center | Shows the merchant's customer service email address | |
Tracking Portal URL | Shows the merchant's tracking portal URL | https://web.global-e.com/Order/Track/mZK8 |
Country | Shows the merchant's country | France |
CS Service Level | Shows the merchant's customer service level | |
CS VIP | Shows the merchant's customer service VIP level | |
CS Procedures | Comment: What does this show? | |
Merchant Tier | Lets you select a merchant tier: | |
Sensitive Merchant | Lets you set whether the merchant is sensitive or not |
The Comments section is located below the Summary parameters where you can view and write comments. Verify that you've clicked Save to save your changes, or Undo to undo them before saving.
General Information
From the General Information page you can view and modify the following parameters:
General:
| Merchant Vertical:
|
Merchant Settings:
| Merchant Address:
|
Verify that you've clicked Save to save your changes, or Undo to undo them before saving.
Contact Details
Comment: Speak with Itay Cohen.
Configurations
From the Configurations page you can enable, configure, and manage API-related settings for your merchants. Specifically, administrators can use this feature to toggle or assign values to various API-related options that control how the platform integrates with merchant services, such as returns, shipping, fraud detection, and order dispatching.
The Merchant Management feature is relevant to the following user roles:
Merchant Customer Service
Merchant Customer Service Administrators
Merchant Administrators
Hub Administrators
Hub Operators
Select a merchant from the Merchant menu.
Select Configurations.
The Configurations screen is displayed.
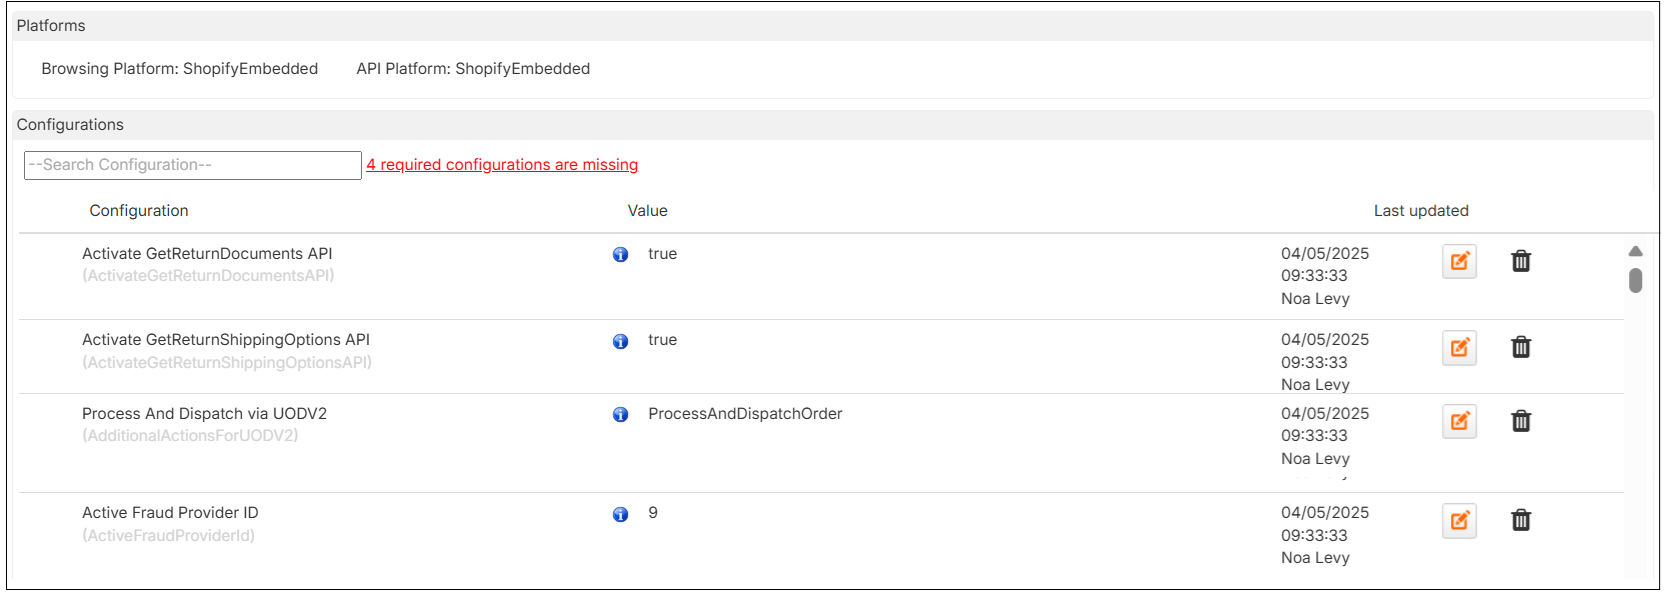
Searching for and Viewing Missing Configurations
If needed, you can search for and view missing configurations.
(Optional) Select a configuration from the --Search Configurations-- menu.
Click the red link labeled <number> required configurations are missing.
The Required Configuration screen is displayed:
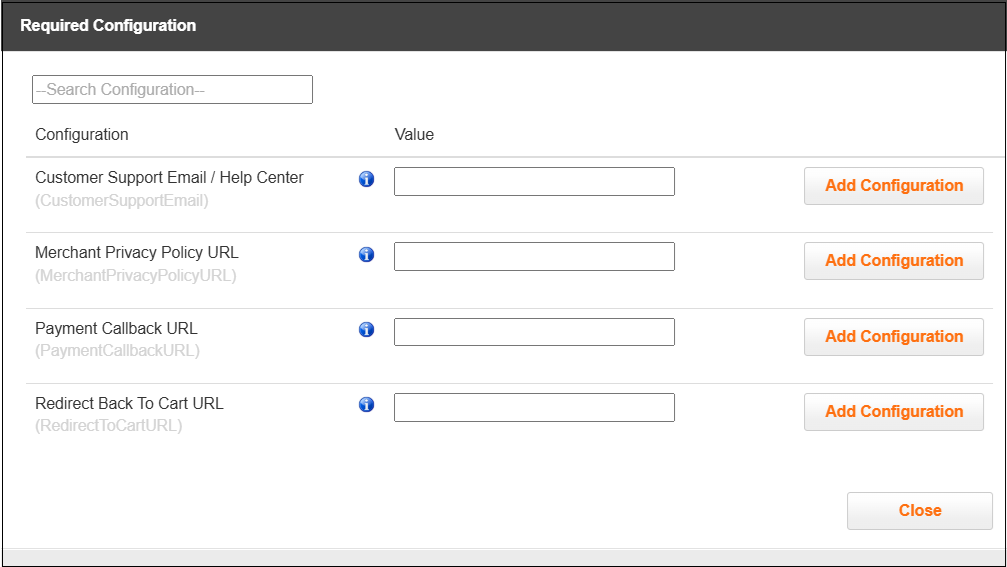
Define the Value for the configuration that you want to set.
Click Add Configuration corresponding to the configuration that you defined.
Click Close.