Site Customization
The Site Customization feature includes the following:
Welcome Popup: Shows you the welcome popup message displayed when users visit your site.
Switcher Popup: Lets you set the countries that the merchant can ship to.
Free shipping banner: Lets you modify your shipping banner.
Checkout: Lets you modify your checkout page.
Accessing the Customization Page
To customize your page configurations, you must access the Customization page.
Navigate to Configuration > Customization from the top menu:

Select a merchant from the Merchant menu.
The following page is displayed.

Configure the elements above according to the table below:
No.
Element
Description
1
View, modify, and manage elements related to your Welcome popup screen.
2
View, modify, and manage elements related to your Switcher Popup screen.
3
View and modify your shipping banner page configuration.
4
Configure your checkout page.
Configuring Your Welcome Popup Page
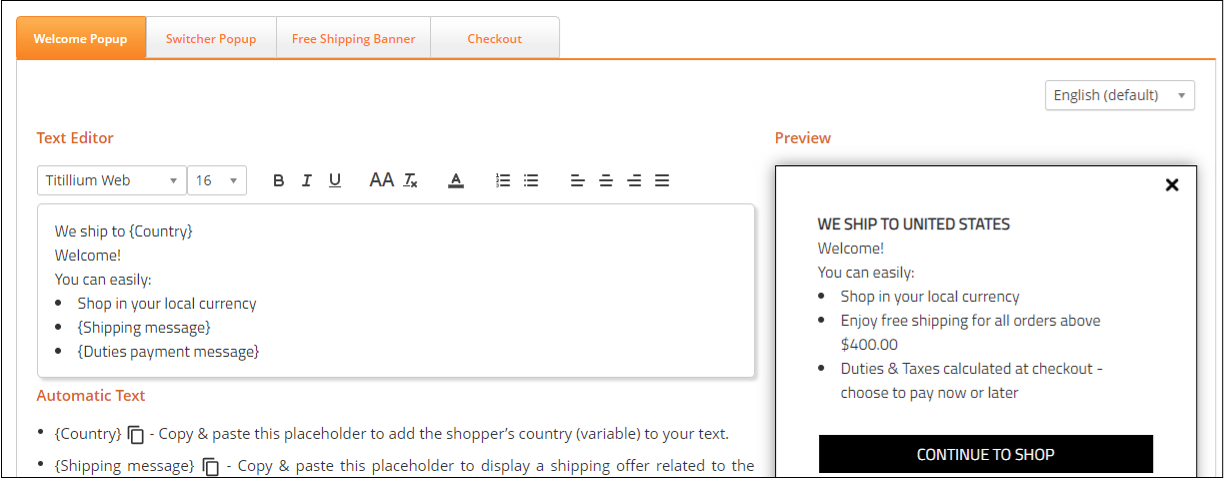
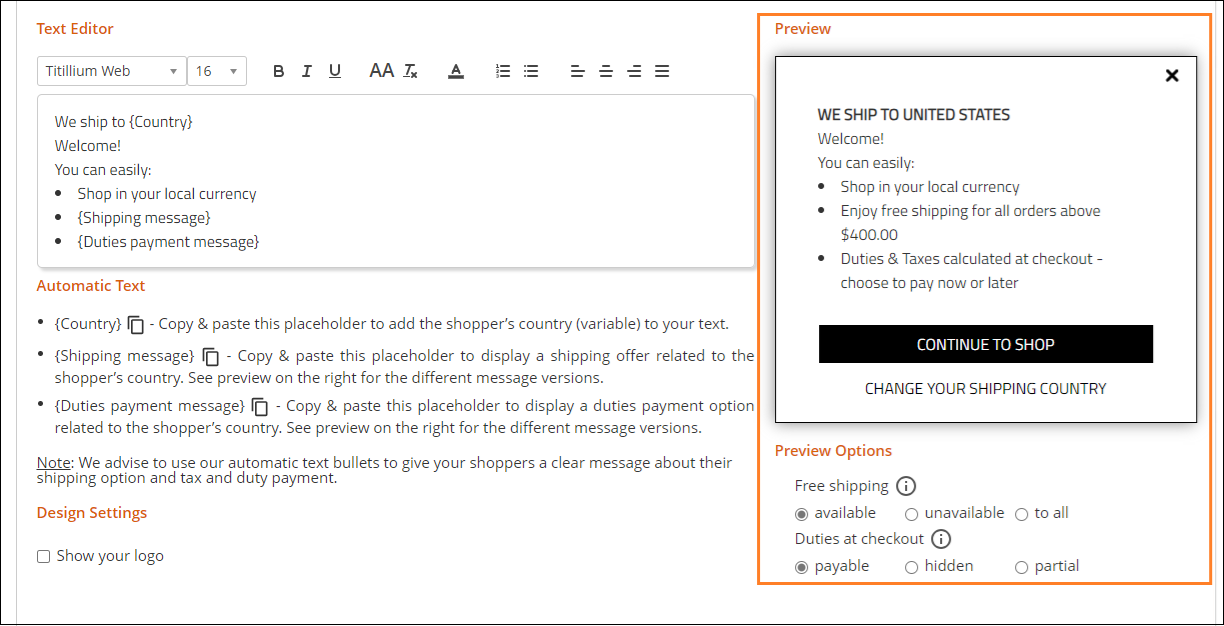
From here you can view, modify, and manage elements related to your Welcome popup screen. This page includes a text editor containing some default template text to display as your site’s popup message. It also includes a Preview panel located to the right of the text editor.
Follow steps 1 and 2 in Accessing the Customization Page.
Modify the following elements:
Default language setting menu located above the Preview panel.
The English language version of the Welcome pop-up is viewed by site visitors from countries that do not have a localized (translated) version of the pop-up.
Automatic text (optional) to be used in your welcome popup message:
{Country} parameter: Informs shoppers that the goods can be delivered to their country.
{Shipping message} parameter: informs shoppers about the lowest cart range required to qualify for free shipping to their country.
{Duties payment message} parameter: informs shoppers about the duties payment option required for their country during checkout.
Note
When a customer visits your store, Global-e detects their location and automatically inserts the country name, and displays the relevant messages regarding shipping and duties & taxes.
Design settings (show/hide your logo).
Preview options:
Free shipping:
Available - Minimum order required for free shipping. Default message: Enjoy free shipping for all orders above $x
Unavailable - Free shipping not available. Default message: Enjoy our great international shipping rates
To all - Free shipping on all orders. Default message: Free shipping to (your country) on all orders
Duties at checkout:
Payable - Duties are displayed separately at checkout with the option to prepay. Default message: Duties & Taxes calculated at checkout - choose to pay now or later
Hidden - Duties are incorporated in the product price. Default message: All Duties & Taxes are already included - no hidden fees
Partial - Duties are incorporated in the product price, with taxes displayed separately at the checkout with the option to prepay. Default message: All duties are already included. Taxes calculated at checkout
Button message and formatting.
Normal and hover mode text, body, and border color settings.
Note
You can reset your settings to their default configurations by clicking Reset to default at the bottom of the page.
Text Editor
This section describes the following:
Overview
You can modify the text in the Welcome Popup region using the Text Editor.

Important
Three placeholders for automatic text (Country, Shipping message, and Duties payment message) are incorporated in the default text. We advise that you use our automatic text bullets to convey to your shoppers a clear message about their shipping option as well as tax and duty payment.
Editing the Welcome Popup Text
The default language setting for the Welcome Popup text is English, which is used for sites from countries that don't have localized (translated) versions of the Welcome Popup text.
Select a language from the language menu located in the top right corner of the Welcome Popup region.
The content in the Text Editor and Preview regions is displayed in the language you selected.
Note
Changes you make to the text in one language are not automatically applied to any of the other languages.
Edit the text in the Text Editor region using the formatting tools.
Note
Unlike textual edits, adjusting the formatting in one language applies the modification to all other languages.
Continue with viewing your Preview.
Automatic Text
Automatic Text is an optional feature used for automatically customizing personalized shopper information in your Welcome Popup text. This is done using variables that pull information from the database.
The Automatic Text region is located directly beneath the Text Editor and describes the following variables:
{Country} parameter: Displays the shopper's country
{Shipping message} parameter: informs shoppers about the lowest cart range required to qualify for free shipping to their country.
{Duties payment message} parameter: informs shoppers about the duties payment option required for their country during checkout.
Global-e recommends using the default automatic text placeholder {Duties payment message}. This communicates to your customers the duties payment option for their country. Note that it is already translated into all languages.
If you modify any of the above, verify that you have clicked Save to apply your settings.
Note
When a customer visits your store, Global-e detects their location and automatically inserts the country name, and displays the relevant messages regarding shipping and duties & taxes.
Note
Global-e recommends using the preformatted text bullets in the Text Editor to give your shoppers a clear message about their shipping option and tax and duty payment.
As described in the Preview section, the settings you select in Preview Options region are associated with and determine the content displayed in the Text Editor, as follows:
Preview Setting | Generated Text Editor Message |
|---|---|
Free shipping | |
Available | Free shipping on all orders above $X |
Unavailable | Enjoy our great international shipping rates! |
To all | Free shipping on all orders! |
Duties at checkout | |
Payable | Duties & Taxes Calculated at Checkout - Choose to Pay Now or Later. |
Hidden | All Duties & Taxes are Already Included - No Hidden Fees. |
Partial | All Duties are Already Included. Taxes Calculated at Checkout. |
Design Settings
From the Design Settings region you can set various design elements, such as showing or hiding your logo, shows buttons, and format your text.
This section describes the following:
Setting Your Design Elements
From the Design Settings region you can set the following:
Show/hide your logo - Shows or hides the logo you selected during onboarding in the Welcome Popup page. This setting shows or hides the logo in all places it appears, such as the Checkout page and customer facing email notifications.
Upper button (continue shopping) - Lets you modify the text in the black Continue to Shop button shown in the Preview.
Lower button (switch country) - Lets you modify the text in the Change Your Shipping Country button shown in the Preview.
Formatting elements - Lets you format the font, size, and text type (italics, bold, all caps, regular caps) for the selected button (upper or lower)
Normal mode - Lets you set the button text color, body color, and border color for the selected button (upper or lower).
Hover mode - Lets you set the color shown when you hover over the selected button (Pay and place order or Apply).
Adding the Customized Country Feature
Global-e lets you request using English as the default Welcome Popup language instead of the language of the country the customer is located. To add this feature, contact your Project Manager.
Merchants can also set their country instead of the default:
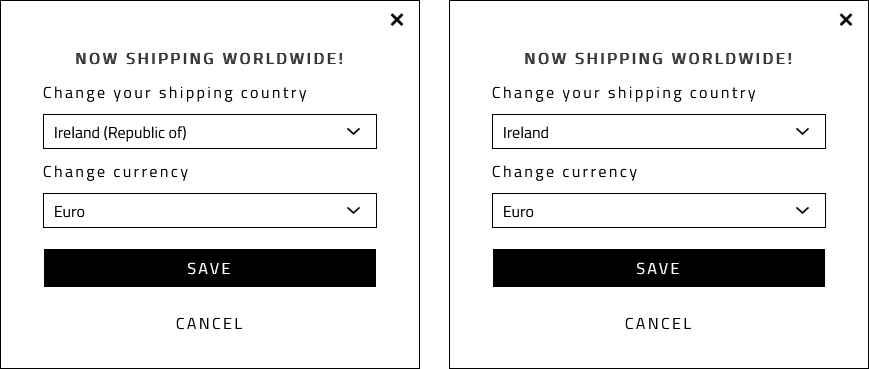
The alternative country name is displayed in the following locations:
|
|
Preview
This section describes the following:
Overview
The Preview region displays a preview of the Welcome Popup message as it appears on your site.
Setting Your Preview Options
You can set your preview options from the Preview Options region located directly below the Preview region. The settings you select in the Preview Options is associated with and determines the content displayed in the Text Editor. For example, setting Free shipping to available automatically generates the message Free shipping on all orders above $X in the Text Editor, with X representing the minimum order sum for free delivery to the shopper's country in the correct currency.
You can view your Preview Option settings in the Preview region.
For more information, see Automatic Text.
Under Free shipping, select one of the following:
Available - Minimum order required for free shipping. Default message: Enjoy free shipping for all orders above $x
Unavailable - Free shipping not available. Default message: Enjoy our great international shipping rates
To all - Free shipping on all orders. Default message: Free shipping to (your country) on all orders
Under Duties at checkout, select one of the following:
Payable - Duties are displayed separately at checkout with the option to prepay. Default message: Duties & Taxes calculated at checkout - choose to pay now or later
Hidden - Duties are incorporated in the product price. Default message: All Duties & Taxes are already included - no hidden fees
Partial - Duties are incorporated in the product price, with taxes displayed separately at the checkout with the option to prepay. Default message: All duties are already included. Taxes calculated at checkout
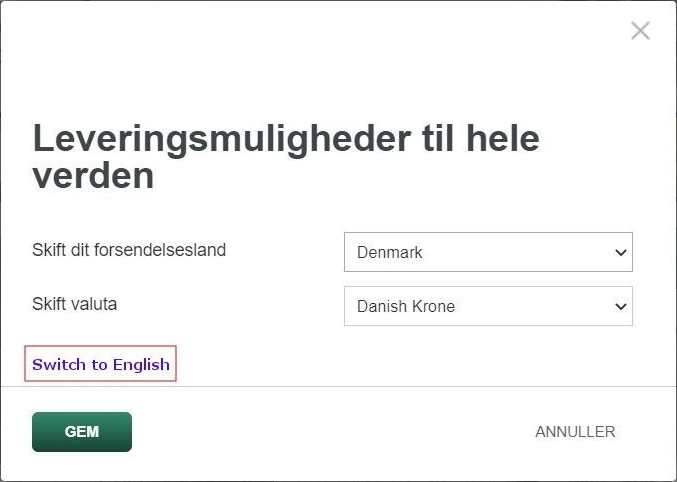
Configuring Your Switcher Popup Page
From here you can view, modify, and manage elements related to your Switcher Popup screen. This page includes a text editor containing some default template text to display as your site’s popup message. It also includes a Preview panel located to the right of the text editor.
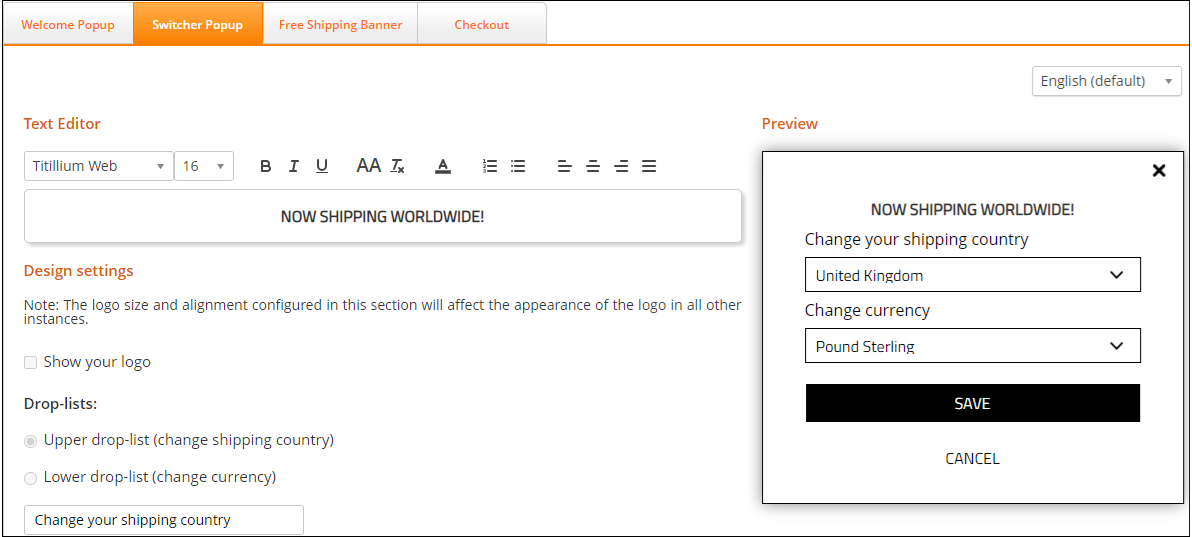
Follow steps 1 and 2 in Accessing the Customization Page.
Click Switcher Popup.
Modify the following design elements as needed:
Text editor
Design settings
Click Save or Cancel.
Configuring Your Shipping Banner Page
From here you can view and modify your shipping banner page configuration. A live preview of your configurations is displayed on the right side of the page.
Note that you can reset your settings to their default configurations by clicking Reset to default at the bottom of the page.
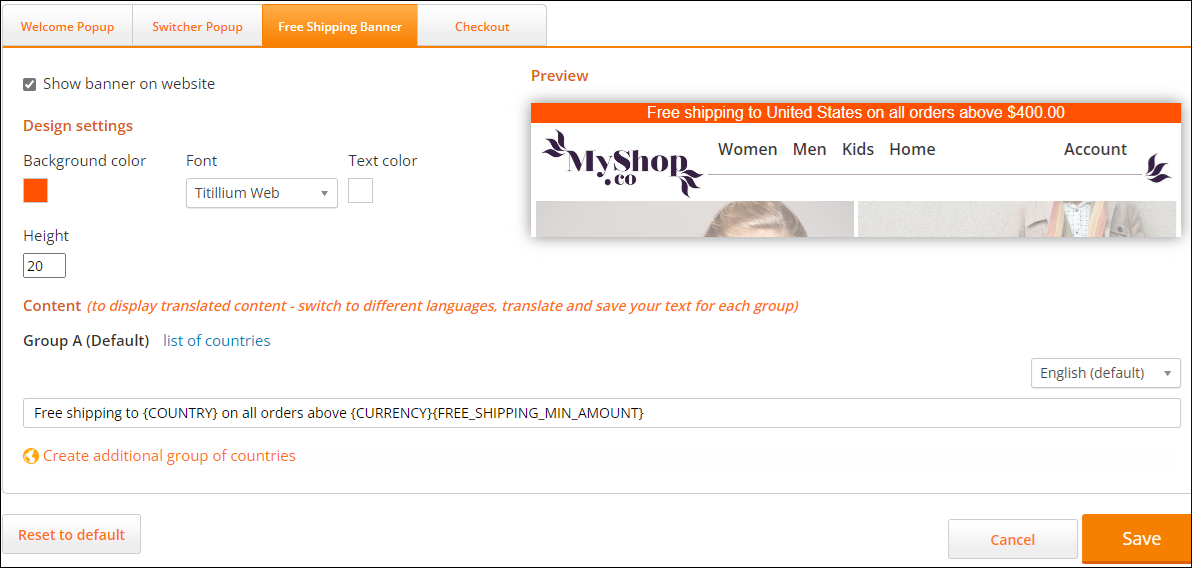
Follow steps 1 and 2 in Accessing the Customization Page.
Click Free Shipping Banner.
Click Show banner on website.
Modify the Design settings section as needed.
Modify your list of countries (optional):
Click list of countries.
Select all of the relevant countries.
Click OK.
Select a language from the language menu on the far right of the page.
Enter the text of your shipping banner message in the text field.
Note
The text in the curly brackets pulls information from the database.
Create an additional group of countries (optional):
Click Create additional group of countries.
Select a continent from the map.
Select your countries from the Create a new group of countries panel.
Click OK.
Click Save.
Configuring Your Checkout Page
From here you configure your checkout page. A preview of your banner is displayed on the right side of the screen.
Note that you can reset your settings to their default configurations by clicking Reset to default at the bottom of the page.
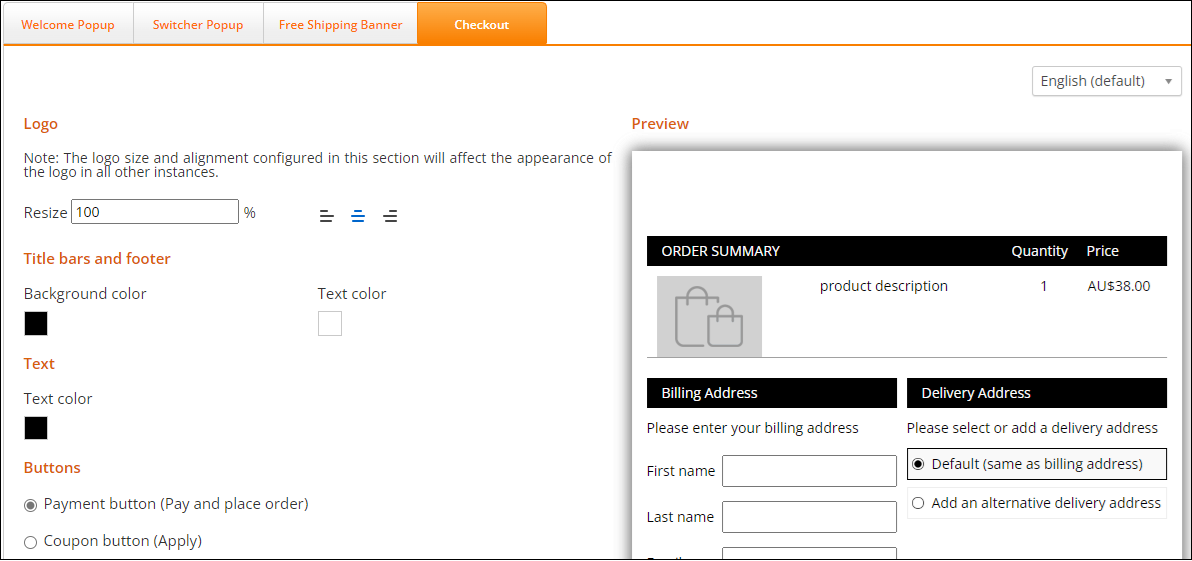
Follow steps 1 and 2 in Accessing the Customization Page.
Click Checkout.
Select a language from the language menu located at the far right of the page.
Modify the following design settings as needed:
Logo - Lets you resize and adjust the logo in all places where it appears, such as the Checkout page and customer facing notification emails.
Title bars and footer - Lets you set the background and text color of your title bars and footers.
Text - Lets you set the body text color.
Payment button (Pay and place order) - Lets you set the text, size, and text type of the Payment button
Coupon button (Apply) - Lets you set the text, size, and text type of the Apply button.
Normal mode - Lets you set the button text color, body color, and border color for the selected button (Pay and place order or Apply).
Hover mode - Lets you set the color shown when you hover over the selected button (Pay and place order or Apply).
Total price - Lets you set the color, font, size, and text type of the total price.
Click Cancel, Save, or Reset to default.