Email Management
When an order reaches a specific status, Global-e automatically sends a localized email to your customer. The Global‑e Email Management tool lets you modify the content of this email, customize the look and feel, add custom text, and provide your own translation. In addition, you can preview your email configuration settings both on desktop and mobile and test your settings before submitting (publishing) your final template to Global‑e.
Before configuring your email template, see the following:
Prerequisites
Important
For optimal use of the Email Management tool, a basic understanding of HTML and familiarity with HTML structure and CSS styling concepts are required.
Verify the Email Management feature is enabled.
Verify you have one of the following roles in the Merchant Portal for configuring emails:
Global Merchant Admin with the default Merchant Admin username and password
Merchant Emails Operator with the default Merchant Email Operator username and password.
Contact your Success Manager if you cannot access the Merchant Portal or do not have permission.
Manage your HTML content:
The Merchant owns the HTML for creating email.
Translation of the texts to other languages is handled by the Merchant.
Familiarity with the Mustache Templating Specification and Language is required.
For more information, see https://mustache.github.io/mustache.5.html.
Legal Statement
The following legal statement must be included in the email description paragraph (in all languages):
Your order will be processed by Global-e as a merchant of record for this transaction.
Create your Email Template and Text Resources
Before getting started:
Create your email HTML template. Make sure to include all the default text resources and placeholders.
For more information, see:
Create your Text Resources Excel file, as detailed in:
Create your Text Resources File
Manage your Emails
This procedure assumes that you have already created your HTML template and Text Resources.
To manage your emails:
Log in to the Global‑e Merchant Portal.
Go to Configuration > Email Management.
The Email Management screen opens.
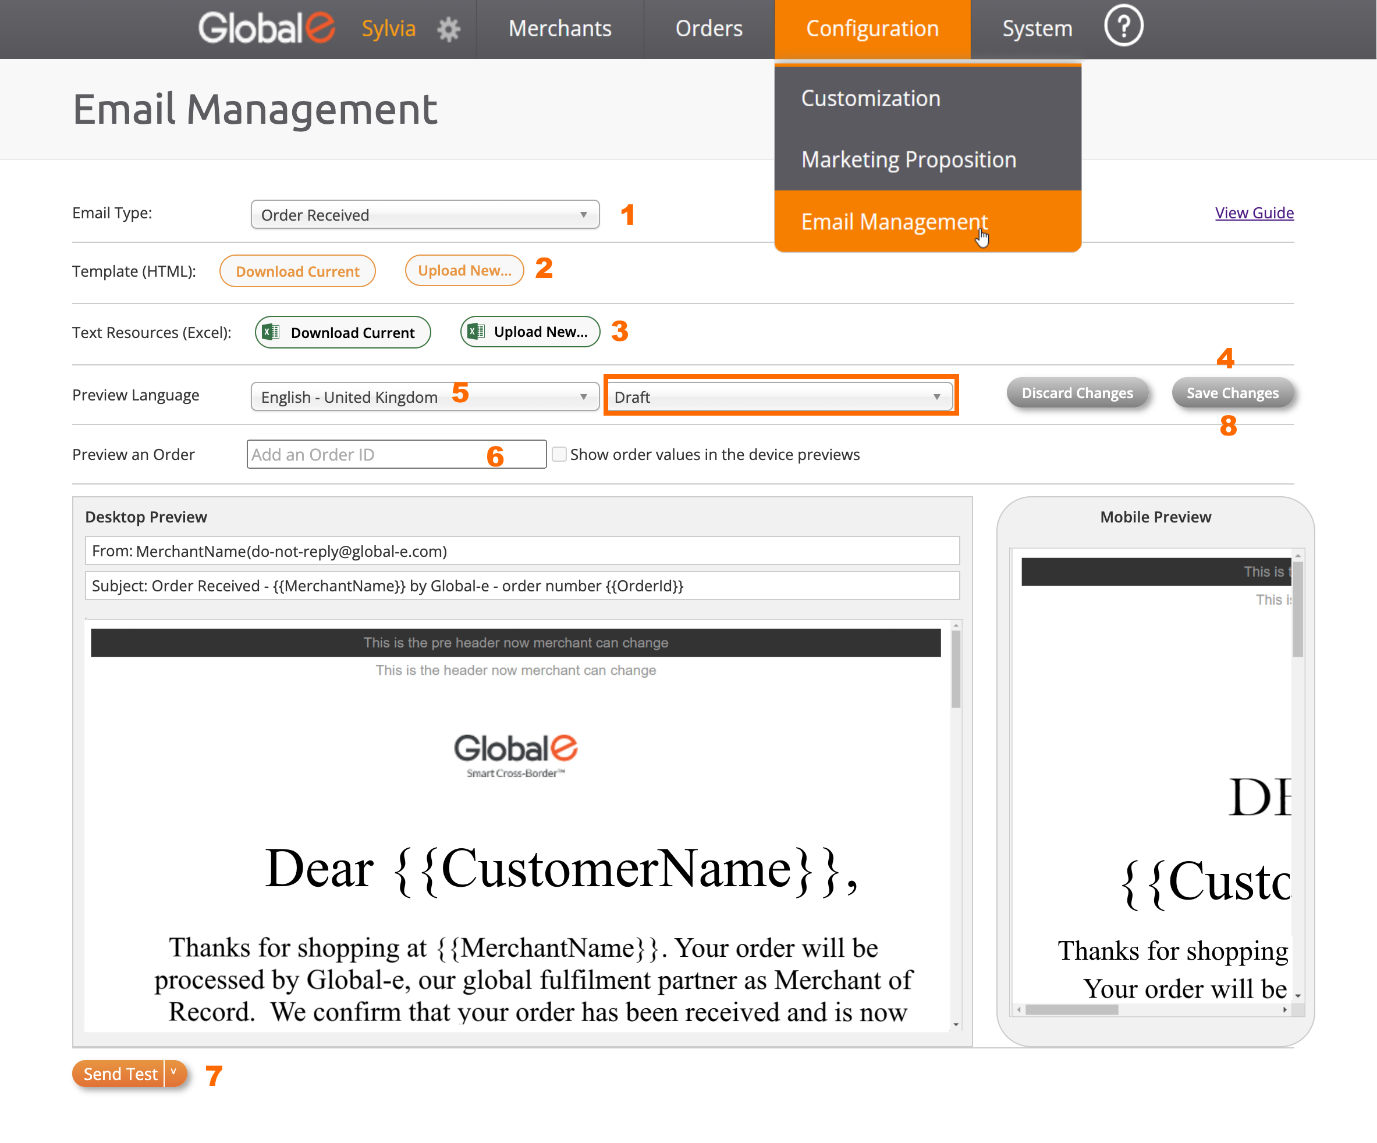
Set up and manage your email template, as detailed in the screen capture above and in the following table.
Step | For more information | |
|---|---|---|
Step 1 | Select the Email Type you wish to customize from the drop-down menu. | |
Step 2 | Upload the HTML template you have created: Click Upload New and select your HTML file. | |
Step 3 | Upload the new Text Resources: Click Upload New and select your Text Resources file (Excel). | |
Step 4 | Preview your draft template in the preview area: Click Save Changes. (Make sure you are in draft mode). Note that, when switching from Draft mode to Publish mode, the Save Changes button switches to a Publish button [8]. | |
Step 5 | Preview your email language: Select the desired language from the drop-down menu. | |
Step 6 | Preview an order as part of your email template: Enter the order ID | |
Step 7 | Test your Draft or Publish template before publishing it to Global‑e: Click Send Test and fill out the Send Test email form. - OR – Select Send for a quick send (if you have already filled out the form). | |
Step 8 | Publish your changes: Select the Publish mode and click Publish Changes. | |
Optional | Unpublish your changes |
[1] Email Type
Select the Email Type you wish to customize from the drop-down menu.
See the list of email types here, Global‑e Default HTML Template.
All email transactions are supported.
[2] HTML Template
This section provides instructions on how to create or modify your HTML template.
Create your HTML Template
To create your HTML template:
Write the content and design your HTML template using a tool of your choice.
Add all the mandatory text resources at the correct location, as defined in the TextResources file.
When done, click Upload New to upload your HTML template.
Click Upload New to upload the text resources file have created (see Create your Text Resources File
Click Save Changes and preview your draft.
Example:

Modify your HTML Template
To modify your HTML Template:
Click Download Current HTML template.
Modify the HTML text using a tool of your choice.
Note that if you modify the HTML text and you do not include that new text with its translation in the text resources file, the text will not be translated.
Make sure you have included all the mandatory text resources at the correct location, as defined in the TextResources file.
Save your file as HTML.
When done, click Upload New to upload your HTML template.
[3] Text Resources
TextResources are the strings that are included in the placeholders within your email template. They are displayed in curly brackets.
When you create or modify text resources in your email template, make sure that all mandatory text resources are included in your email and formatted correctly.
Create your Text Resources File
To create your Text Resources file:
Create your text resources file by using the format and example TextResources file.
Make sure to add all the mandatory text resources as defined in the TextResources file.
Important
By default, you must define the language of all text resources in English.
In the text resources file, the column "English - United Kingdom" must always contain text in English. This text is used as a basis for the translation to other languages.
Save your file as Excel.
When done, click Upload New to upload your TextResources file.
Click Save Changes.
After uploading your text resources, if you have included the text resources in your HTML Template (see [2] HTML Template,) you can preview your email with the placeholders of the text resources.
Example:
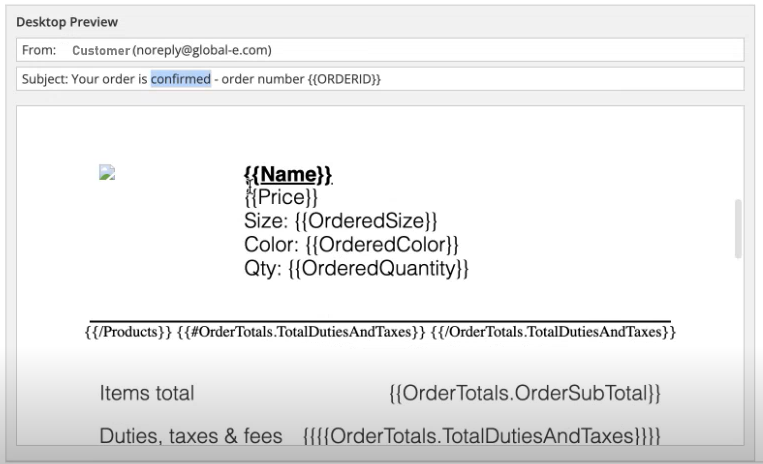
See:
Placeholders for the list of supported placeholders.
Preview an Order to view how the template with the placeholders converts to actual data.
Modify Text Resources
This section assumes that you have previously uploaded your text resources file. See Create your Email Template and Text Resources.
Important
By default, the language of all text resources is set to English United Kingdom. In the text resources file, the column English - United Kingdom must always contain text in English. This text is used as a basis for the translation to other languages.
To modify a Text Resource:
Click Download Current text resources file.
To modify English Text Resources, modify the text in the column English – United Kingdom.
To modify Text Resources in Other Languages:
Translate the TextResource you have modified under the column English - United Kingdom to the target language.
Add the translation of each text resource in the corresponding language column and row (cell).
Click Upload New to upload your file.
Add a New Text Resource
Important
By default, the language of all text resources is set to English United Kingdom. In the text resources file, the column English - United Kingdom must always contain text in English. This text is used as a basis for the translation to other languages.
To add new Text Resources:
In your HTML template, add the new text resource at the correct location. For example:
{{TR_NewSaltutation}}In your TextResources Excel:
Add a new row for the new text resource.
Mandatory: Add a description in the column English – United Kingdom.
Note: English UK must be filled as it is used as the basis for translations.
To add Other Languages:
Make sure you have added a column for the target language.
Translate the text you have added under the English - United Kingdom column to the target language.
Add the translation of each text resource in the corresponding language column and row (cell).
When done, click Upload New to upload your TextResources file.
HTML template:
Make sure you have added all the required TextResources in your HTML template.
When done, click Upload New to upload your HTML template.
Remove a Text Resource
To remove a text resource, you must remove the resource from both:
The HTML template
The TextResource Excel
[4] Save your Template and Preview your Changes
To save your template and preview your changes:
Select Draft or Publish mode, as required.
When you are satisfied with your modifications, click Save Changes. and preview your changes.
If you are in draft mode, you can edit the draft at a later stage.
Optional: Click Discard Changes if you do not wish to save your changes.
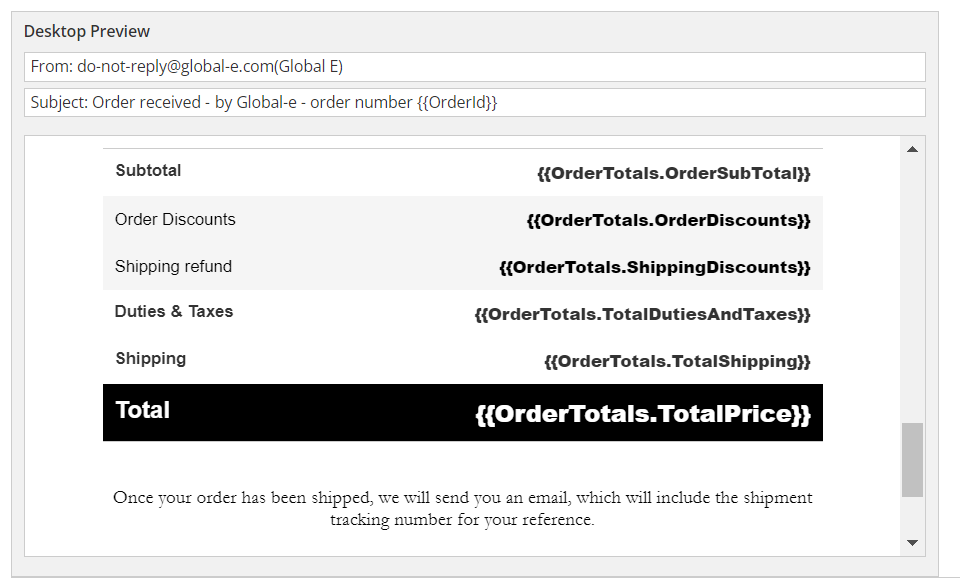
Example:
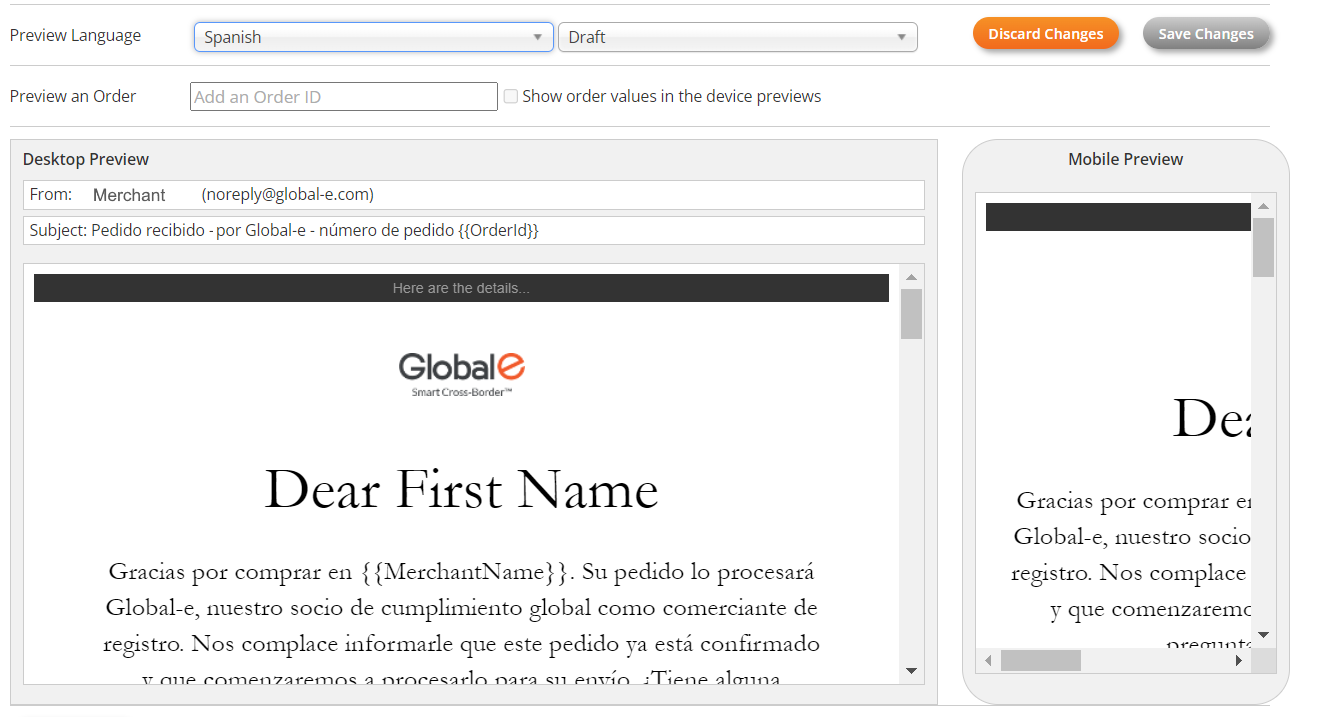
[5] Preview the Language
To preview the language:
Select Draft or Publish mode, as required.
Select the language you wish to preview.
Notes:
You must have translated the text in the TextResources Excel file for the text to be displayed in the selected language.
Static text is text that has not been defined as a Text Resource. Static text is not translated or modified. If you have included static text in your HTML template and you wish to translate it, you must first define it as a text resource in the TextResources (Excel), provide the translation, and upload your modified text resource.
You can modify the Sender and the Subject line in the text resources.
Example:
In this example, the email was translated into Spanish, but "Dear First Name" has not been translated since it is static text, and the translation was not defined in the TextResources file.
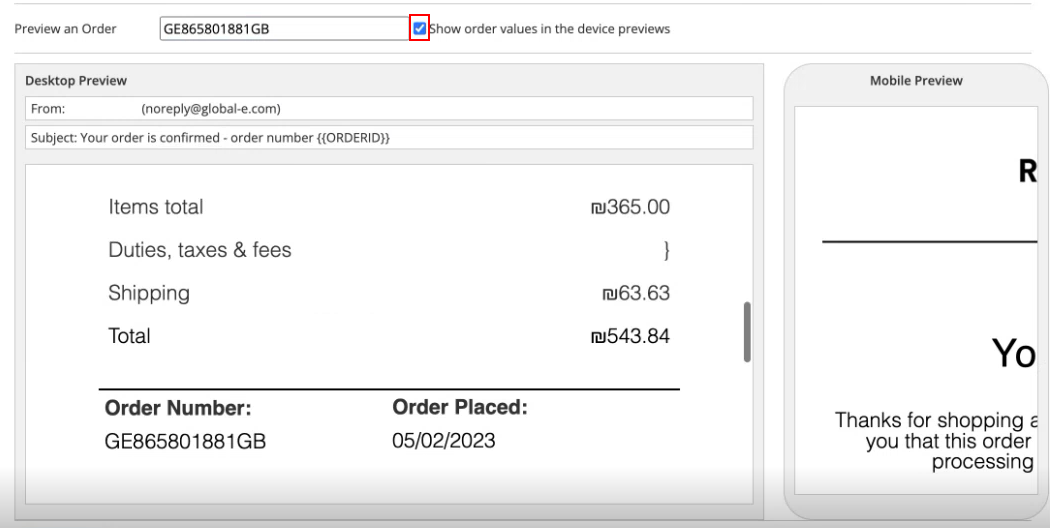
[6] Preview an Order
To preview an order:
Select Draft or Publish mode, as required.
In Preview an Order, enter the order ID or the Merchant ID.
Select Show Order Values in the device previews.
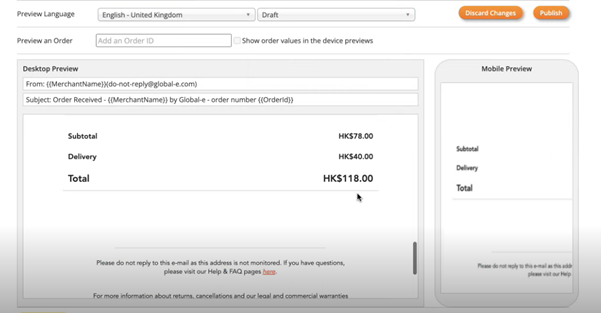
This option toggles the preview between the placeholders and the real data.
When selecting this option, the preview area shows the template with the data taken from the real order. The placeholders in the template are converted to actual data.
Example:
[7] Test your Setup - Send a Test Email
To test your setup:
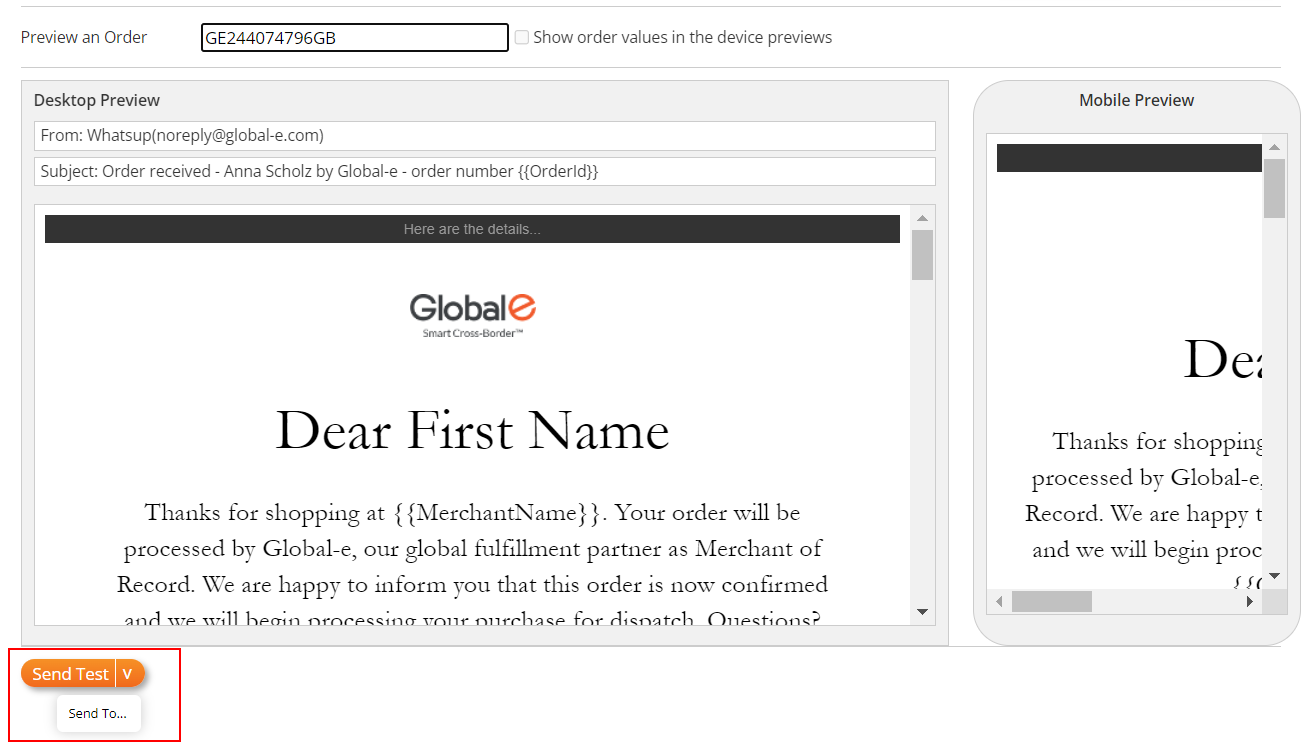
Click Send Test.
The Send test email box opens.
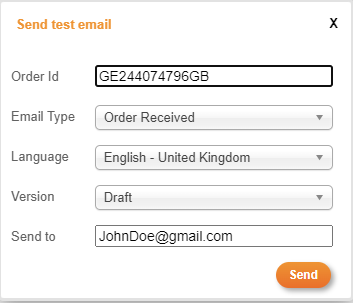
In the Send test email box:
Enter the Order ID.
Select the Email Type.
Select the language.
Select the Version: Draft or Publish
Enter the email address to which the test should be sent.
Click Send.
A confirmation message is displayed.
Open the email and review it.
To perform a "quick send":
If your email management screen already contains the above information, click the down arrow and select Send To.
A confirmation message is displayed and by default, the email test is sent to you (the logged-in user's email address).
[8] Publish your Changes
When you are satisfied with the results, you can publish your changes.
Click Publish to submit your final changes to Global‑e.
A confirmation message is displayed.
Your published template is uploaded to the Global-e system. This is the email template that Global-e will be using for your email templates from now on.
Note
Clicking Publish uploads the final email template (HTML) to the Global‑e Production whereas Save Changes saves your draft for further editing.
Revert your Published Changes (Optional)
After publishing, you can click Unpublish to revert to the default Global‑e template.
Using Custom Fonts
Follow these guidelines when using non-standard fonts in your emails.
Use Web-Safe Fonts as Fallbacks
Always specify a web-safe font as a fallback in case the custom font does not load.
Common web-safe fonts include Arial, Verdana, Georgia, and Times New Roman.
Host Fonts Appropriately
Host the fonts on a reliable server or use a service like Google Fonts or Adobe Fonts.
Ensure that the font files are compressed (e.g., WOFF or WOFF2 format) to minimize loading time.
Use Inline CSS for Font Integration
Apply custom fonts using inline CSS within the <style> tag or directly within HTML elements.
Example:
 <style>
 @font-face {
 font-family: 'CustomFont';
 src: url('https://your-server.com/fonts/customfont.woff2') format('woff2');
 }
 .custom-text {
 font-family: 'CustomFont', Arial, sans-serif;
 }
 </style>
 <p class="custom-text">This is custom font text.</p>
Test Across Multiple Email Clients
Different email clients render fonts differently. Test emails across popular clients to ensure the custom font displays.
Pay attention to mobile clients as well.
Limit the Use of Custom Fonts
Use custom fonts sparingly, reserving them for headers or branding elements.
For longer bodies of text, use standard web-safe fonts.
Consider Email Load Times
Custom fonts can increase the size of the email, which might affect load times. Ensure the font files are as small as possible.
Keep the total email size under 102KB to avoid clipping in some email clients.
Ensure Legal Compliance
Verify that you have the correct licensing to use and distribute the font in emails.
Monitor Email Deliverability
Custom fonts can sometimes cause deliverability issues. Monitor open rates, click rates, and spam reports.
Fallback on System Fonts in Case of Issues
If any issues arise, be prepared to revert to system fonts to ensure the email remains functional.
Moving from Testing Environment to Production
When you are ready to move to Production, follow these steps for each email type:
In the Testing environment, download the current HTML and the current text resources file.
Download Current HTML

Download the current text resources file
In the Production environment, select the relevant email type (e.g. Order Confirmed).
Upload the HTML downloaded in step #1.
Upload the text resources file downloaded in step #2.
Click Save Changes.

Preview and Test.
Click Publish.

Placeholders
The Global‑e templates are based on the Mustache templating specification and language. For more information on Mustache, see https://mustache.github.io/mustache.5.html.
Mustache serves as a powerful templating system that enables the utilization of pre-existing text files containing designated placeholders. These placeholders are dynamically substituted with values specific to a particular request during runtime.
Global‑e supports two types of placeholders that you can use in the HTML template:
Placeholders related to Orders, such as the order ID, shipping address, totals, products, and more.
Custom placeholders to manage Text Resources, which can hold texts, translations, links, and html snippets for the header, footer, and CSS.
Custom Placeholders
Custom placeholders often start with the prefix TR_ to differentiate between order placeholders and resource placeholders. However, this convention is not mandatory.
Example: TR_Salutation
To add, create and upload custom placeholders:
Include your custom placeholder values in your text resource file as keys (without
{}).Include the custom placeholders' unique key {
TR_Salutation} in your HTML template.
Required Placeholders
Subject
SenderName
SenderEmail
Variations
[CountryName].SenderName
[CountryName].SenderEmail
Note
CountryName is a 2-letter country code. For example, use US for USA.
Available Placeholders
This section provides a list of placeholder tags and examples.
Customer
The following placeholders are supported in all email types.
{{FirstName}}{{LastName}}{{FullName}}- the recipient's first name and last name{{Email}}- the recipient's email address
Usage:
<div>Dear {{FirstName}}</div>
<div>Hello {{FullName}}</div>
<div>Dear {{LastName}}</div>
<div>Your email address: {{Email}}</div>
Order
The following placeholders are supported in all email types.
{{OrderReceiveDate}}{{OrderTrackingNumber}}{{OrderId}}{{MerchantOrderId}}{{MerchantInternalOrderId}}{{OrderConfirmedDate}}
Usage:
<div> We have received your order on {{OrderReceiveDate}}.</div>
<div> Your tracking number is {{OrderTrackingNumber}} </div>
<div> Your order id is {{OrderId}} </div>
<div> Your merchant order id is {{MerchantOrderId}} </div>
<div> Your merchant internal order id is {{MerchantInternalOrderId}} </div>
<div> Your order has been confirmed on {{OrderConfirmedDate}}</div>
Merchant
The following placeholders are supported in all email types.
{{CustomerSupportEmail}}{{MerchantName}}{{MerchantStatementName}}
Shipping
The following placeholders are supported in all email types.
{{ShipFullName}}{{ShipFirstName}}{{ShipAddress}}{{ShipAddress2}}{{Company}}{{ShipState}}{{ShipCity}}{{ShipZip}}{{ShipPhone}}{{ShipCityRegion}}{{ShipCompanyName}}{{ShipCountry}}{{ShippingMethodName}}{{ShippingService}}{{CarrierName}}{{ShipVatRegistrationNumber}}{{ShippedTo<CountryCode>}}Note
ShippedTois a 2-letterCountryCode. For example, IL, TW, U.S. To be able to add logic per shipping country like extra-legal text for Taiwan.
Usage:
{{#ShippedToTW}} // If shipping country is TW

<div>Due to recent regulatory changes for orders shipped to Taiwan, you are required to register your mobile phone number through the EZWAY Customs application, and then pre-authenticate the order once as soon as you are notified by the shipping partner (via SMS/e-mail) and via the EZWAY application to allow the Customs Clearance of the goods.</div>

{{/ShippedToTW}}
Billing
The following placeholders are supported in all email types.
{{BillFullName}}{{BillAddress}}{{BillAddress2}}{{BillState}}{{BillCity}}{{BillZip}}{{BillPhone}}{{BillCityRegion}}{{BillCountry}}{{BillCompanyName}}{{BillVatRegistrationNumber}}
Payment
The following placeholder is supported in all email types.
{{PaymentDetails}}
Other
The following placeholders are supported in all email types except for {{RefundTotals}}, which is only supported in Refund emails.
{{EmailDirection}}- Values: “rtl”, “ltr”.{{Culture}}- See the Culture object.{{Products}}- See the Products, OOSProducts, RefundProducts objects.{{OOSProducts}}- See the Products, OOSProducts, RefundProducts objects.{{OrderTotals}}- See the Order Totals object.{{RefundProducts}}- See the Products, OOSProducts, RefundProducts objects.{{RefundTotals}}- See the Refund Totals object. These placeholders are only supported in Refund emails.{{DisplayGiftMessageInConfirmationEmail}}{{GiftMessage}}{{IsFlashSale}}{{IsRaffle}}{{OrderEtaMessage}}
Usage:
EmailDirection
<body dir=”{{EmailDirection}}”>
Your content here
</body>
Products, OOSProducts, RefundProducts
The following placeholders are supported in all email types. Data availability is based on the status of the order. For example, the OOS products placeholder remains empty if there are no products that are out of stock in the order.
Use the <div> tag as a generic container for associating similar content. In this case, Products, Out of Stock Products, and Refunds Products and their properties. See Products, Out-of-Stock Products, and Refund Products for the list of product properties.
The following example shows the structure for all Product placeholders: 'Products', 'RefundProducts', 'OOSProducts'.
Example:
<div>
{{#Products}}
<span>{{Name}}</span>
{{/Products}}
</div>

<div>
{{#OOSProducts}}
<span>{{Name}}</span>
{{/OOSProducts}}
</div>

<div>
{{#RefundProducts}}
<span>{{Name}}</span>
{{/RefundProducts}}
</div>
Products, Out-of-Stock Products, and Refund Products
You can include the following placeholders in all email types.
The Products, Out-of-Stock, and Refund placeholders serve as containers for general product information and assets.
{{ImageURL}}{{Name}}{{OOSQuantity}}{{OrderedQuantity}}{{Price}}{{ProductCode}}{{#Products}}{{ProductAttributesHTML}}{{/Products}}{{Quantity}}{{Size}}{{Url}}
Products Attributes
You can include the following placeholder in all email types.
This placeholder serves as a container for product attributes.
{{ProductAttributes.[Attribute key name]}}
Example: Render the product attribute ‘Color’ ‘size’.
{{#Products}}<div><span>{{ProductAttributes.color}}</span><span>{{ProductAttributes.size}}</span></div>{{/Products}}
Culture Information
The following placeholders are supported in all email types.
{{Culture.CultureName}}{{Culture.CultureNameDisplay}{{Culture.CultureNameOriginal}}{{Culture.CultureProgId}}{{Culture.CultureURL}}{{Culture.IsRTL}}
Example:
<div>My culture is {{Culture.CultureName}} </div>Order Totals
You can use the following placeholders in all email types.
These placeholders contain the amount with the currency symbol - for example, $100.
{{OrderTotals.OrderDiscounts}}{{OrderTotals.OrderSubTotal}}{{OrderTotals.ShippingDiscounts}}{{OrderTotals.TotalCustomerPrepaidRefundAmount}}{{OrderTotals.TotalDutiesAndTaxes}}{{OrderTotals.TotalDutiesAndTaxesRefundAmount}}{{OrderTotals.TotalGiftCardsRefundAmount}}{{OrderTotals.TotalLoyaltyPointsRefundAmount}}{{OrderTotals.TotalMoneyRefundAmount}}{{OrderTotals.TotalPrice}}{{OrderTotals.TotalProductsRefund}}{{OrderTotals.TotalServiceGestureAmount}}{{OrderTotals.TotalShipping}}
Refund Totals
You can use the following placeholders as part of the Refund Notification Template, to build a dynamic message per refund reason.
These placeholders contain the amount with the currency symbol - for example, $100.
{{RefundTotals.TotalDutiesAndTaxes}}{{RefundTotals.AvalaraSalesTaxes}}{{RefundTotals.TotalDutiesAndTaxesRefundAmount}}{{RefundTotals.TotalGiftCardsRefundAmount}}{{RefundTotals.TotalLoyaltyPointsRefundAmount}}{{RefundTotals.TotalPrice}}{{RefundTotals.TotalProductsRefund}}{{RefundTotals.TotalServiceGestureAmount}}{{RefundTotals.TotalShipping}}
Refund Reasons
You can add the following refund reasons to the Refund notification template to build a dynamic message for each refund reason. For example, if the refund reason is out of stock, render the out-of-stock message as detailed below.
Out-of-Stock Refund Reason
{{#IsOutOfStockRefundReason}}
<tr>
      <td>{{TR_OutOfStockRefundReason}}</td>
</tr>
{{/IsOutOfStockRefundReason}}
Shipping Cost Refund Reason
{{#IsShippingCostRefundReason}}
<tr>
      <td>{{TR_ShippingCostRefundReason}}</td>
</tr>
{{/IsShippingCostRefundReason}}
No SSD Refund Reason
{{#IsNoSDDRefundReason}}
<tr>
       <td>{{TR_NoSDDRefundReason}}</td>
</tr>
{{/IsNoSDDRefundReason}}
Cancelled Order Refund Reason
{{#IsCancelledOrderRefundReason}}
<tr>
       <td>{{TR_CancelledOrderRefundReason}}</td>
</tr>
{{/IsCancelledOrderRefundReason}}
Return Refund Reason
{{#IsReturnRefundReason}}
<tr>
       <td>{{TR_ReturnRefundReason}}</td>
</tr>
{{/IsReturnRefundReason}}
Wrong Item Refund Reason
{{#IsWrongItemRefundReason}}
<tr>
       <td>{{TR_WrongItemRefundReason}}</td>
</tr>
{{/IsWrongItemRefundReason}}
Missing Item Refund Reason
{{#IsMissingItemRefundReason}}
<tr>
       <td>{{TR_MissingItemRefundReason}}</td>
</tr>
{{/IsMissingItemRefundReason}}
Damaged Item Refund Reason
{{#IsDamagedItemRefundReason}}
<tr>
       <td>{{TR_DamagedItemRefundReason}}</td>
</tr>
{{/IsDamagedItemRefundReason}}
Warranty Issue Refund Reason
{{#IsWarrantyIssueRefundReason}}
<tr>
       <td>{{TR_WarrantyIssueRefundReason}}</td>
</tr>
{{/IsWarrantyIssueRefundReason}}
Lowest Price Guarantee Refund Reason
{{#IsLowestPriceGuaranteeRefundReason}}
<tr>
        <td>{{TR_LowestPriceGuaranteeRefundReason}}</td>
</tr>
{{/IsLowestPriceGuaranteeRefundReason}}
Service Gesture Refund Reason
{{#IsServiceGestureRefundReason}}
<tr>
        <td>{{TR_ServiceGestureRefundReason}}</td>
</tr>
{{/IsServiceGestureRefundReason}}
Swapped Part Refund Reason
{{#IsSwappedPartRefundReason}}
<tr>
        <td>{{TR_SwappedPartRefundReason}}</td>
</tr>
{{/IsSwappedPartRefundReason}}
Lost In Transit Refund Reason
{{#IsLostInTransitRefundReason}}
<tr>
       <td>{{TR_LostInTransitRefundReason}}</td>
</tr>
{{/IsLostInTransitRefundReason}}
Out-Of-Stock Item Refund Reason
{{#IsOutOfStockItemRefundReason}}
<tr>
        <td>{{TR_OutOfStockItemRefundReason}}</td>
</tr>
{{/IsOutOfStockItemRefundReason}}
Cancelled Pending Payment Refund Reason
{{#IsCancelledPendingPaymentRefundReason}}
<tr>
        <td>{{TR_CancelledPendingPaymentRefundReason}}</td>
</tr>
{{/IsCancelledPendingPaymentRefundReason}}
Gift Card Redeem Failed Refund Reason
{{#IsGiftCardRedeemFailedRefundReason}}
<tr>
        <td>{{TR_IsGiftCardRedeemFailedRefundReason}}</td>
</tr>
{{/IsGiftCardRedeemFailedRefundReason}}
Damaged Box Received Refund Reason
{{#IsDamageBoxReceivedRefundReason}}
<tr>
        <td>{{TR_DamageBoxReceivedRefundReason}}</td>
</tr>
{{/IsDamageBoxReceivedRefundReason}}
Damaged Product Received Refund Reason
{{#IsDamagedProductReceivedRefundReason}}
<tr>
        <td>{{TR_DamagedProductReceivedRefundReason}}</td>
</tr>
{{/IsDamagedProductReceivedRefundReason}}
Item Not Received Refund Reason
{{#IsItemNoReceivedRefundReason}}
<tr>
        <td>{{TR_ItemNoReceivedRefundReason}}</td>
</tr>
{{/IsItemNoReceivedRefundReason}}
Lost In Shipment Refund Reason
{{#IsLostInShipmentRefundReason}}
<tr>
        <td>{{TR_LostInShipmentRefundReason}}</td>
</tr>
{{#IsLostInShipmentRefundReason}}
Missing Item From Order Refund Reason
{{#IsMissingItemFromOrderRefundReason}}
<tr>
         <td>{{TR_MissingItemFromOrderRefundReason}}</td>
</tr>
{{/IsMissingItemFromOrderRefundReason}}
Other Refund Reason
{{#IsOtherRefundReason}}
<tr>
         <td>{{TR_OtherRefundReason}}</td>
</tr>
{{/IsOtherRefundReason}}
Product Out-of-Stock Refund Reason
{{#IsProductOutOfStockRefundReason}}
<tr>
          <td>{{TR_ProductOutOfStockRefundReason}}</td>
</tr>
{{/IsProductOutOfStockRefundReason}}
Wrong Item Received Refund Reason
{{#IsWrongItemReceivedRefundReason}}
<tr>
       <td>{{TR_WrongItemReceivedRefundReason}}</td>
</tr>
{{/IsWrongItemReceivedRefundReason}}
Wrong Price Charged Refund Reason
{{#IsWrongPriceChargedRefundReason}}
<tr>
       <td>{{TR_WrongPriceChargedRefundReason}}</td>
</tr>
{{/IsWrongPriceChargedRefundReason}}
Lost by Merchant and Refund Refund Reason
{{#IsLostbymerchantandrefundRefundReason}}
<tr>
        <td>{{TR_LostbymerchantandrefundRefundReason}}</td>
</tr>
{{/IsLostbymerchantandrefundRefundReason}}
Gift Card Redeem Refund Reason
{{#IsGiftCardRedeemRefundReason}}
<tr>
         <td>{{TR_GiftCardRedeemRefundReason}}</td>
</tr>
{{/IsGiftCardRedeemRefundReason}}
Cancelled By Customer Request Refund Reason
{{#IsCanceledByCustomerRequestRefundReason}}
<tr>
         <td>{{TR_CanceledByCustomerRequestRefundReason}}</td>
</tr>
{{/IsCanceledByCustomerRequestRefundReason}}
Currency
The following placeholders are supported in all email types.
{{CurrencyCode}}{{CurrencyName}}{{CurrencySymbol}}
Return
The following placeholders are included when return information is available.
{{ReturnId}}{{RMANumber}}{{ReturnDate}}{{ReturnProducts}}- See the Return Product objects.{{TotalProductsRefund}}{{TotalShippingRefund}}{{TotalDutiesRefund}}{{TotalRefund}}
Return Product
The following placeholders are included when return information is available.
{{ProductName}}{{ProductCode}}{{UnitSalePrice}}{{ApprovedQuantity}}{{TotalPrice}}
Store Info
The Store Info placeholders are supported in the following email types:
OrderReplacementDeliveredToStoreOrderDeliveredToStore
Placeholders:
{{Store.Name}}{{Store.Description}}{{Store.Address1}}{{Store.Address2}}{{Store.StateOrProvince}}{{Store.City}}{{Store.Zip}}{{Store.Phone1}}{{Store.Phone2}}{{StoreOpeningHours}}
Tracking Info
The following placeholders are supported when tracking information is available.
{{TrackingNumber}}{{TrackingLink}}
Example of Placeholders in the Products Section
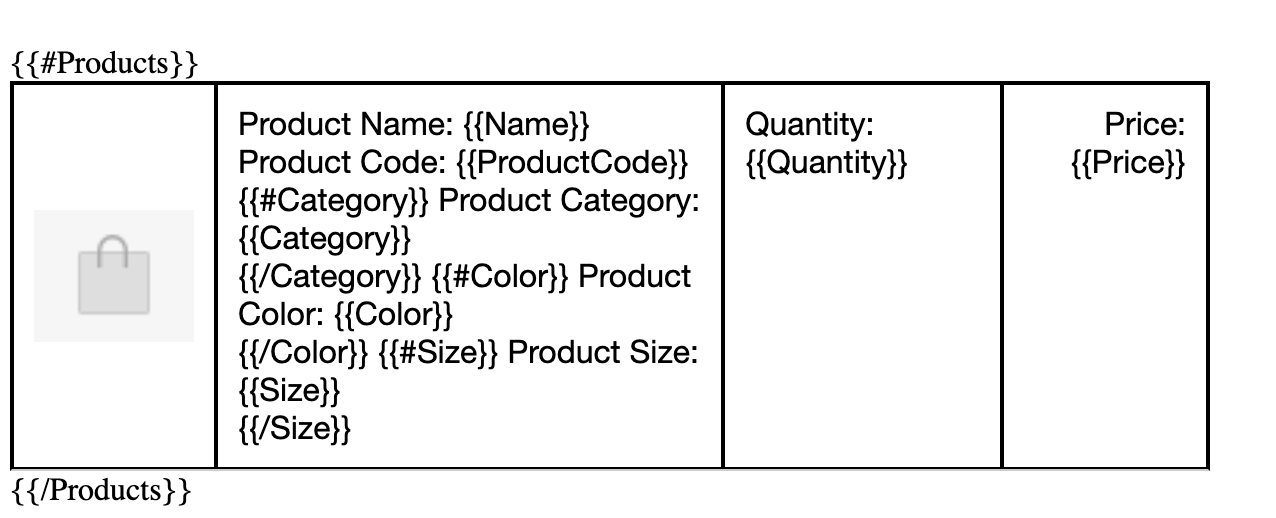 |
Example of Placeholder Rendering in the Products Section
 |
Examples and File Formats
Global‑e Default HTML Template
The following table lists all the HTML file and their related TextResource Excel file offered by Global-e.
# | Email Name | HTML File | TextResource Excel File |
|---|---|---|---|
1 | Customer Line Cancellation | ||
2 | Order Cancelled by Customer | ||
3 | Order Cancelled by Customer - Discontinued Product | ||
4 | Order Cancelled by Customer - Fraud Check | ||
5 | Order Cancelled by Customer - Incorrect Address Details | ||
6 | Order Cancelled by Customer - Out of Stock Product | ||
7 | Order Confirmed | ||
8 | Order Dispatched | ||
9 | Order Received | ||
10 | Partial Shipment | ||
11 | Refund Notification | ||
12 | RMA Created |
Note
If you have the New Returns Portal set up, the RMA Created email is not configured via the Email Tool. Unlike other transactional emails, this email is managed directly within the Returns Portal. For more details, refer to Customizing Email Notifications.
TextResources (Excel)
Important
By default, the language of all text resources is set to English United Kingdom. In the text resources file, the column English - United Kingdom must always contain text in English. This text is used as a basis for the translation to other languages.
TextResources are listed in the Text Resources Excel file’s ResourceKey column and are preceded by TR_.
The TextResources Excel file features the following text resource columns:
ResourceKeyResourceGroupTypeIdResourceGroupReferenceIdResourceMerchantPlatformIdEnglish United Kingdom (default language) - See Translation.
Translation to Other Languages - See Translation.
Important
The column English - United Kingdom must always contain text in English. This text is used as a basis for the translation to other languages.
ResourceKey | ResourceGroupTypeId | ResourceGroupReferenceId | ResourceMerchantPlatformId | English – United Kingdom (2057) | Additional Languages |
|---|---|---|---|---|---|
| 0 | 0 | 0 | Translation | |
| 0 | 0 | 0 | Global‑e | Translation |
| 0 | 0 | 0 | Your order is confirmed – order number | Translation |
| 0 | 0 | 0 | Disclaimer | Translation |
| 0 | 0 | 0 | Duties & Taxes | Translation |
| 0 | 0 | 0 | ltr | Translation |
| 0 | 0 | 0 | <td class=”grey” mc:edit=”para_3” align=”center” style=”font-family:Arial,sans-serif; font-size:16px; line-height:23px; color:#000000;”> <br> <br> <strong>You have questions ? We are here to help you.</strong> <br>Do not hesitate to contact our support service by phone or by e-mail via the following link <br><a href=”https://[YourDomain]/store-support/faq?utm_source=automation&utm_medium=email&utm_campaign=global_auto_transactional-emails&utm_term=TOP&utm_content=generic” target=”_blank”>See our support service</a>. </td> | Translation |
| 0 | 0 | 0 | E-commerce services provided by Global‑e. | Translation |
| 0 | 0 | 0 | Thanks for shopping at | Translation |
| 0 | 0 | 0 | Order Discounts | Translation |
| 0 | 0 | 0 | Hi There! Questions? <a href=”mailto:[email protected]”>Contact us</a> | Translation |
| 0 | 0 | 0 | Order Number: | Translation |
| 0 | 0 | 0 | Order Placed: | Translation |
| 0 | 0 | 0 | Payment Details | Translation |
| 0 | 0 | 0 | This is the PreHeader…. | Translation |
| 0 | 0 | 0 | Product Support | Translation |
| 0 | 0 | 0 | Qty | Translation |
| 0 | 0 | 0 | Dear | Translation |
| 0 | 0 | 0 | Once your order has been shipped, we will send you an email, which will include the shipment tracking number for your reference. | Translation |
| 0 | 0 | 0 | Shipment Items | Translation |
| 0 | 0 | 0 | Shipping | Translation |
| 0 | 0 | 0 | Shipping refund | Translation |
| 0 | 0 | 0 | Shipping Method | Translation |
| 0 | 0 | 0 | Store Support | Translation |
| 0 | 0 | 0 | Subtotal | Translation |
| 0 | 0 | 0 | Total | Translation |
| 0 | 0 | 0 | Your billing address: | Translation |
| 0 | 0 | 0 | You Ordered | Translation |
| 0 | 0 | 0 | Your shipping address: | Translation |