Process Orders
Overview
When an online store receives an international order, fulfilling an order is the last step before the order is shipped to the customer. This process usually takes place at the Merchant's warehouse.
Express orders are usually processed at the Merchant warehouse, while non-express orders are processed at the Global‑e hub for the final mile shipment.
The Merchant Warehouse Operator or Manager performs the pick and pack, processes the order, makes sure the parcels are ready for shipment and produces the relevant documentation by means of the Global-e Merchant Portal.
This document guides the Warehouse Operator or Manager through the steps required to complete the entire fulfilment process.
Fulfilment (Video )
Processing Orders (Duration: 3:53)
For additional questions, contact us.
Accessing the Process Orders Screen
The Process Order screen is the core of the fulfilment process.
To access the Process Orders screen:
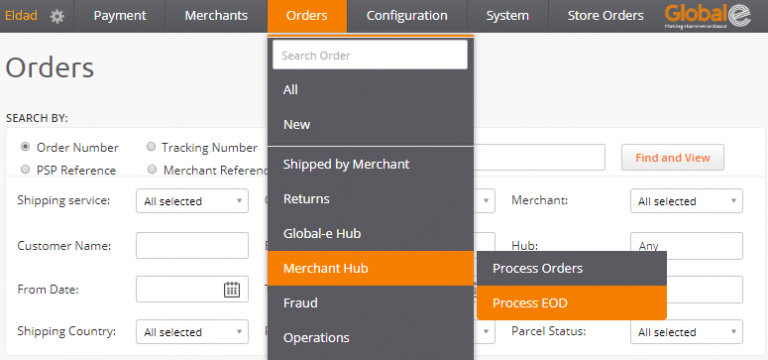
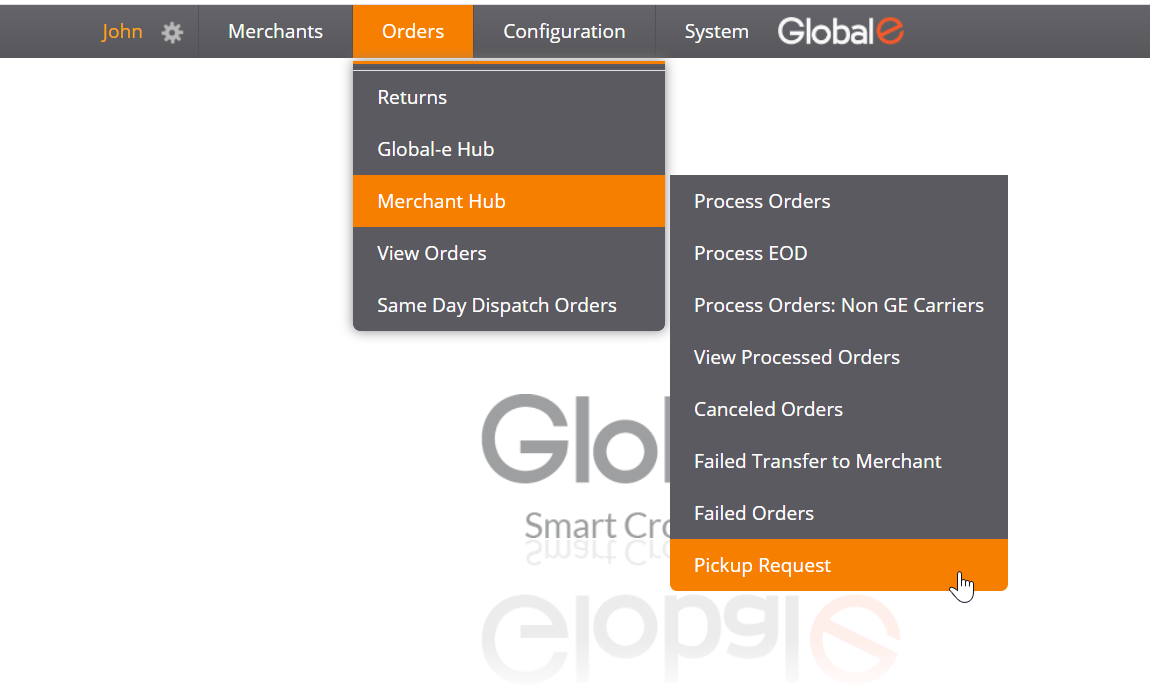
In the Global‑e Merchant Portal, navigate to Orders → Merchant Hub → Process Orders
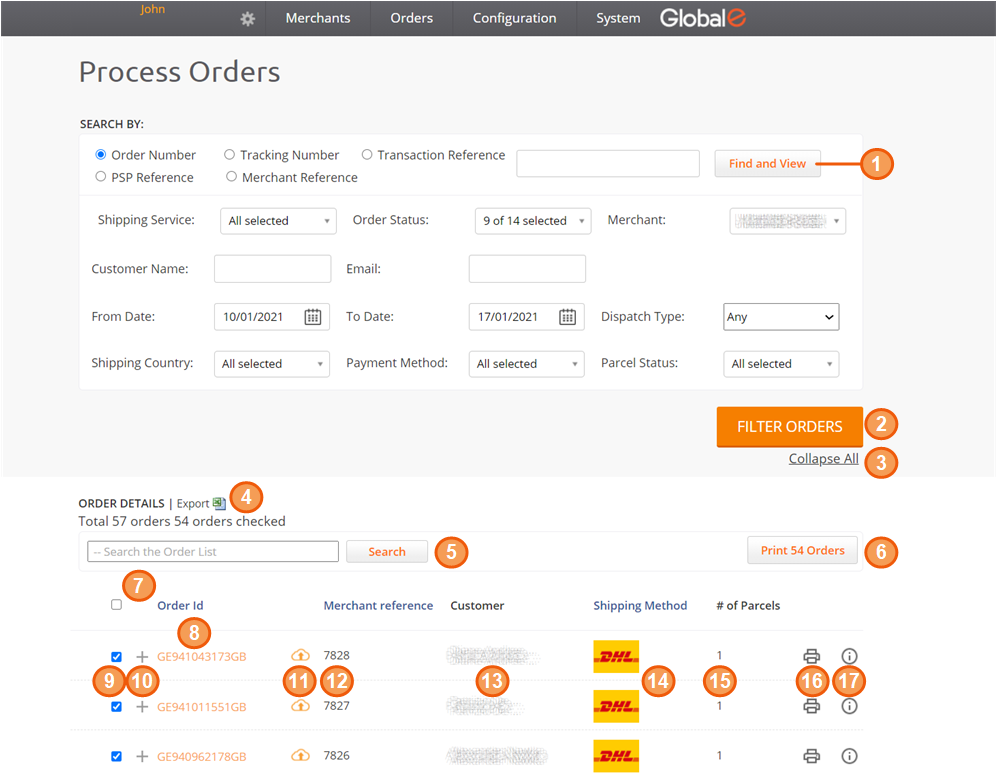
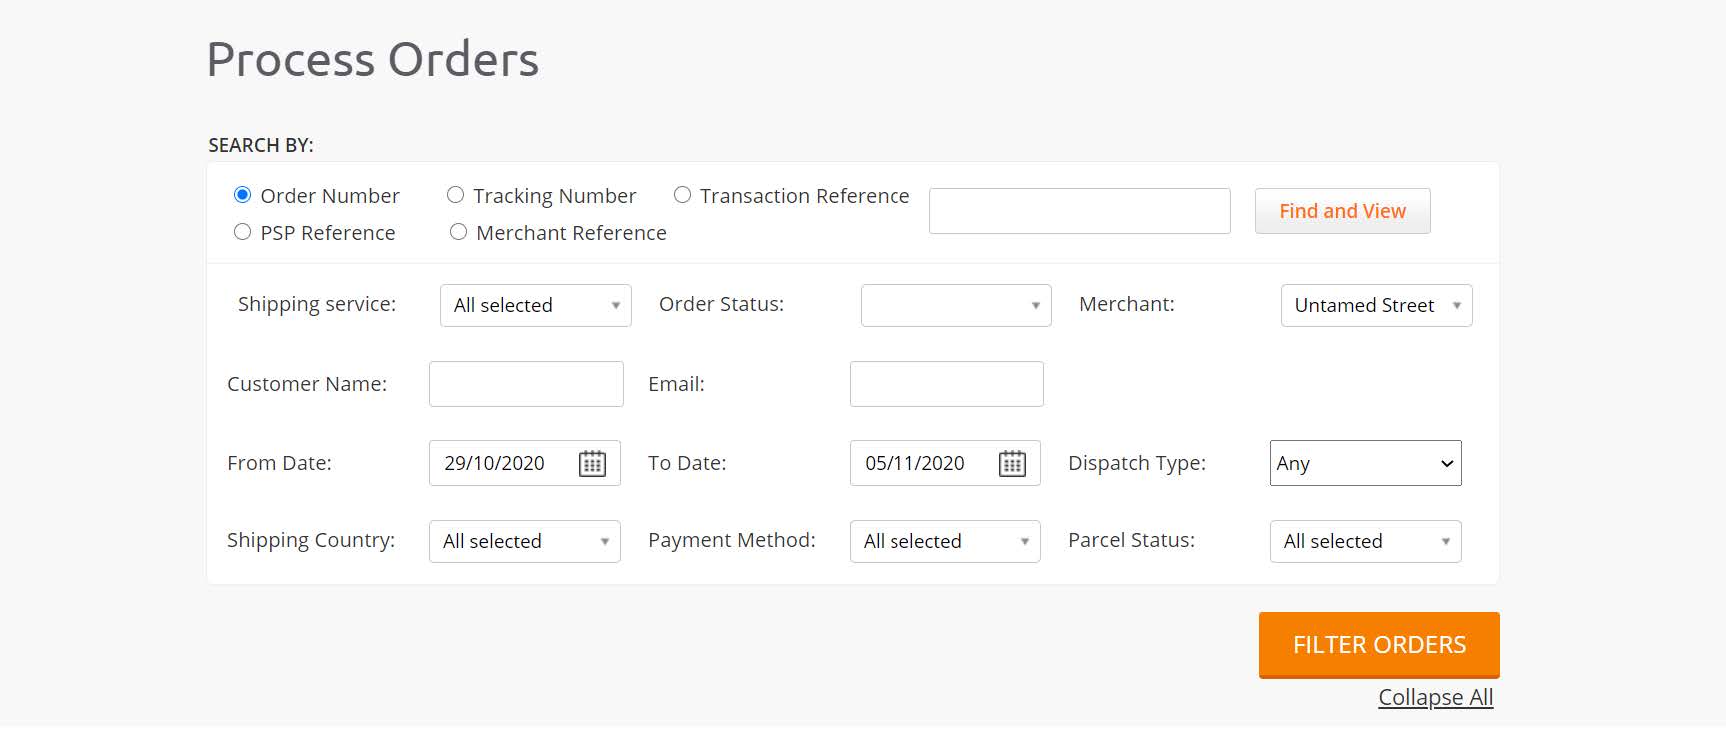
The Process Orders screen opens, showing by default the list of orders that are ready for processing according to date range settings; each order is also selected by default. Make sure to scroll down the list to view all orders.
Process Order Screen Description
1 | Find and View | Find a specific order by Order Number or Tracking Number. This search opens the Order Details screen (if permissions allow). See Using Filters. |
2 | Filter Orders | Narrow down the list of orders according to selected parameters. See Using Filters. |
3 | Collapse All | Collapse the filter section (default: expanded). |
4 | Export | Export the list of orders to an Excel file. |
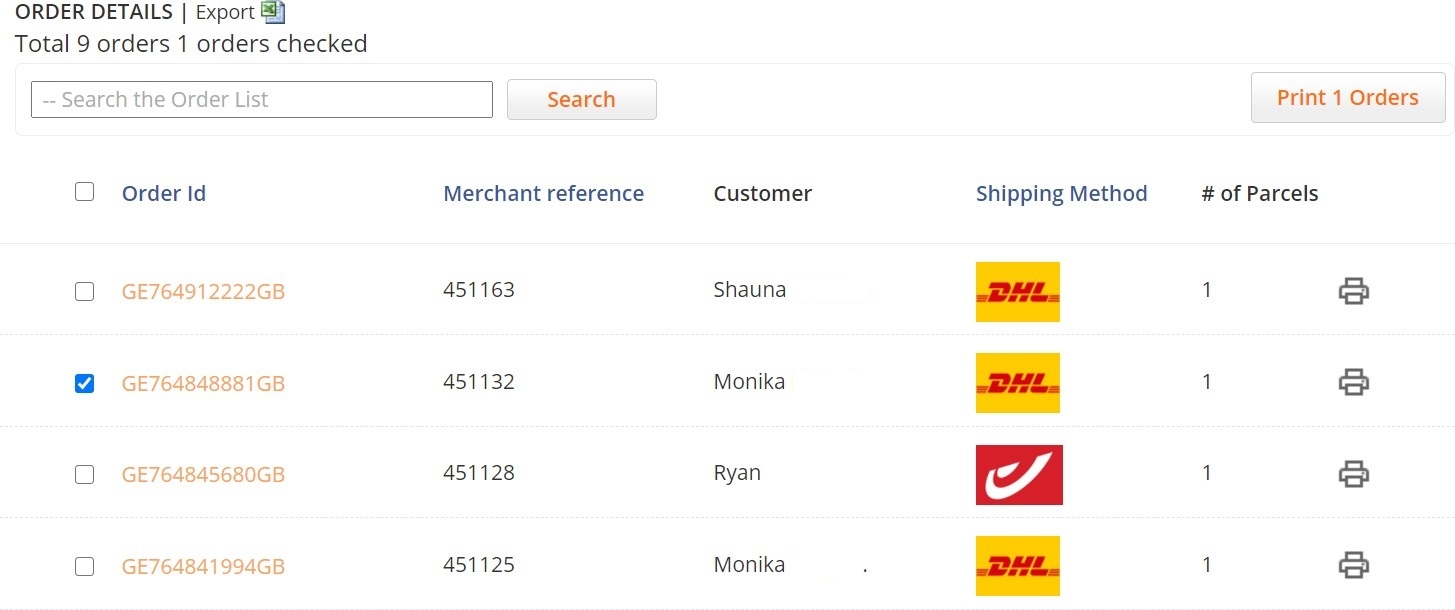
5 | Search | Search for an order within the list by full Order Number (ID) or Merchant Reference (e‑Commerce platform Order ID). |
6 | Print [n] Orders | Print the selected orders in bulk. See Processing Documents in Bulk. |
7 |
| Select all orders on the page. |
8 | GE193457628GB | The order ID. Example: GE193457628GB. Click to open the Parcel screen. |
9 |
| Single order selection. |
10 | + | Expand / collapse the order to view the parcels in the order. |
11 |
| PLT icon. Represents a PLT (Paperless Trading) policy order (if applicable). See Commercial Invoice. |
12 | Merchant reference | Ecommerce platform Order ID; for merchant reference. |
13 | Customer | Customer name |
14 | Shipping Method | Shipper’s logo |
15 | # of Parcels | Number of parcels in the order |
16 |
| Print button (for individual order processing): Print the selected order. |
17 | ⓘ | Open the Additional Information popup: ORDER DETAILS Example Country of origin: United Kingdom Shipping to: United States Created on: 10/02/2021 13:16:34 Status: Received by Global‑e |


Prerequisites
Before processing an order, verify that it does not contain Out of Stock items. If it does, amend the order or cancel it completely. See Amend Order Line Item and Quantities and Cancelling Orders.
Quick Start
Step 1: Process Orders Screen
To process Orders:
Login to the Global‑e Merchant Portal and navigate to the Process Orders screen:
Orders > Merchant Hub > Process Orders
Use this screen to process all orders that are shipped by Global-e carriers.
Only orders that are ready to be shipped by Global‑e carriers are shown.
Orders are displayed according to the date range filter.
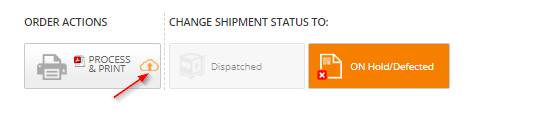
Step 2: Print the order’s documents
In bulk mode – select the relevant orders (1) and click the Print Orders button (2)
In individual order mode – click the Printer icon (3) on the relevant order line
Note
Note the difference between fulfilling DHL orders vs. non-DHL orders, as detailed in the following sections.
DHL Orders
Step 3: Apply the order’s documents to the parcel
For DHL orders, documents consist of:
NoteThe invoice is not printed in the following cases: - PLT orders (marked with - EU merchants shipping within the EU | 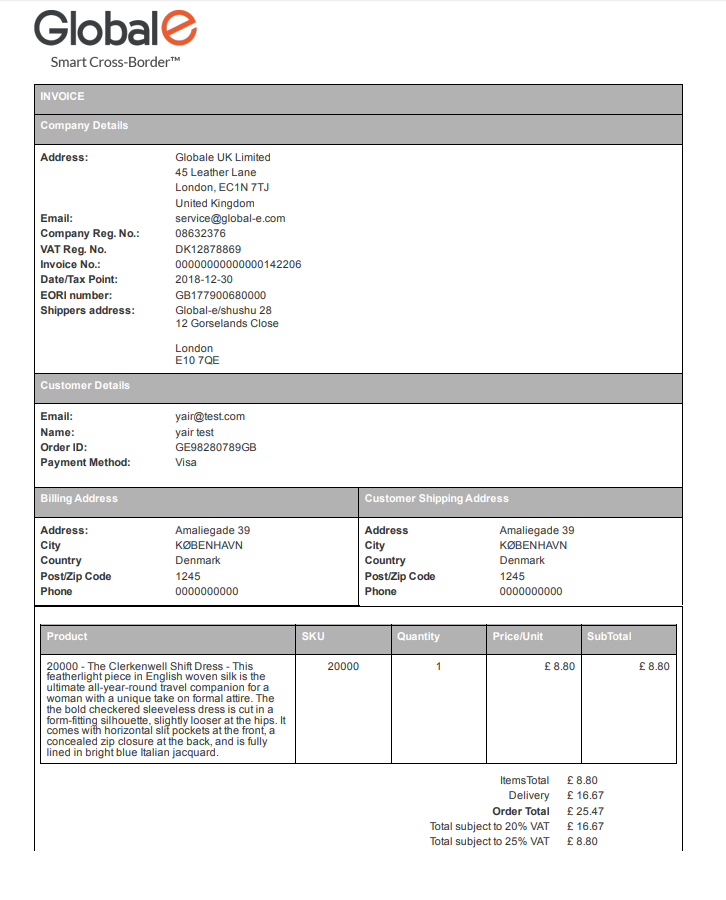 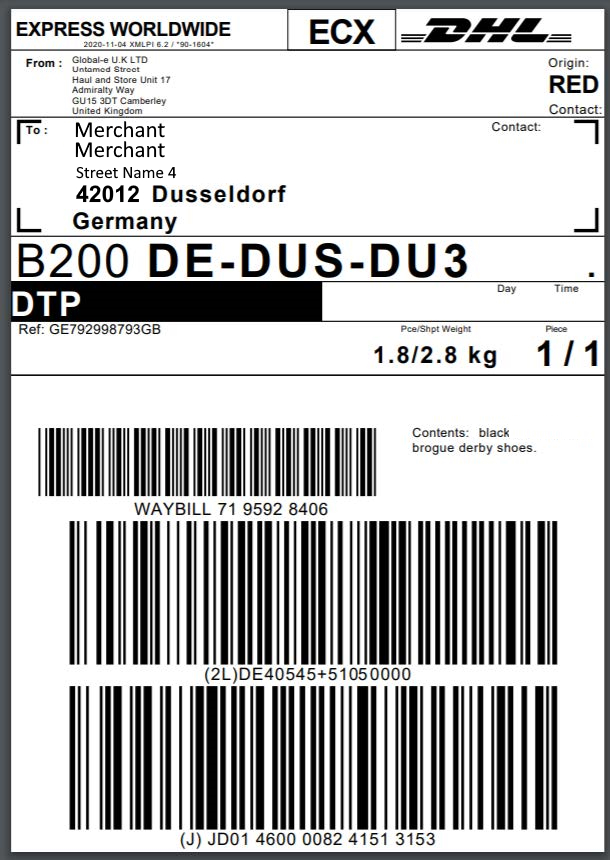 |

Step 4: Schedule a pick-up
If you don’t have a scheduled DHL daily pickup, you can arrange a pickup through the following screen on the Global‑e Merchant Portal: Orders > Merchant Hub > Pickup Request | 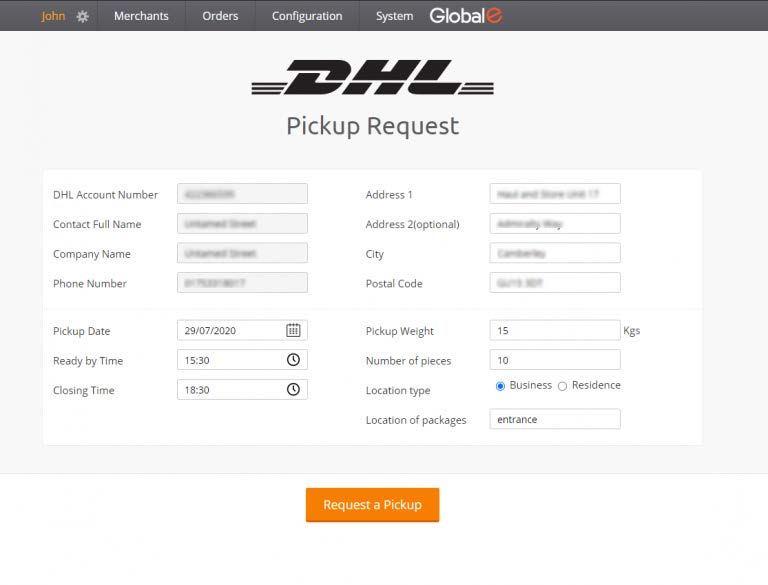 |
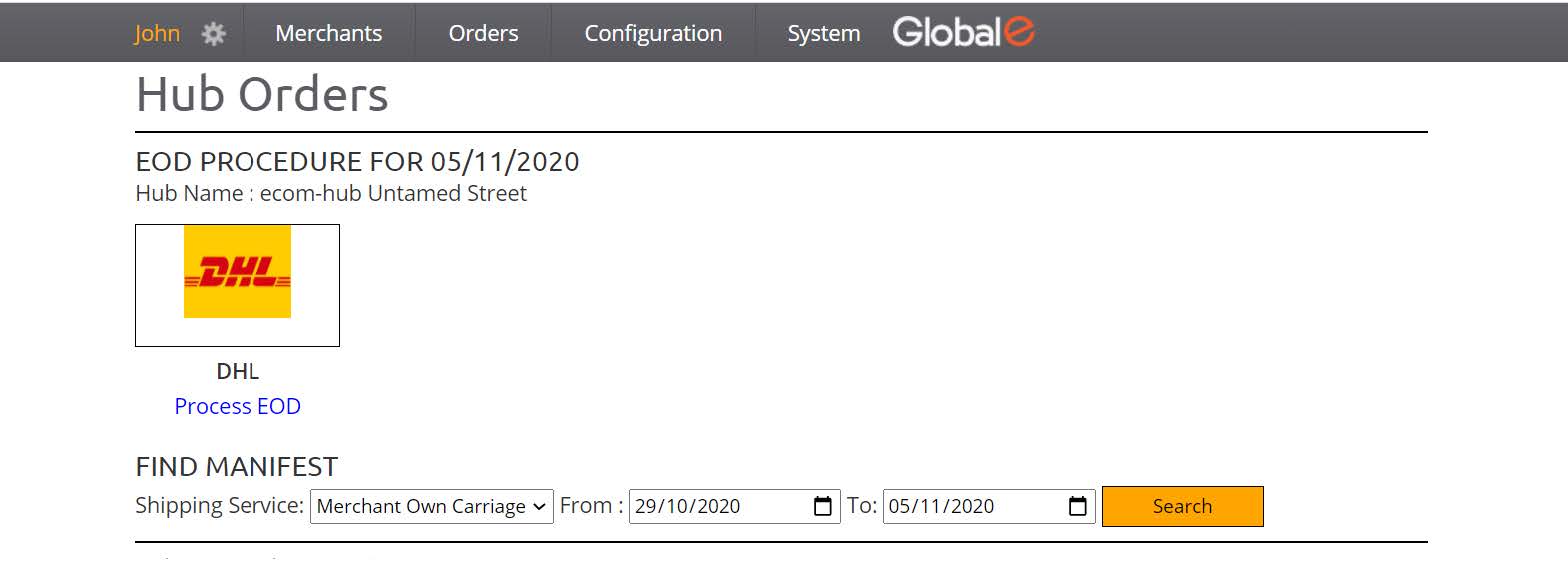
Step 5: The End-of-Day (EOD) procedure
The procedure changes the status of the order in your ecommerce platform and notifies the customer that the order has been dispatched. The procedure should be performed after DHL arrives for the pick-up.
To perform the End-of-Day procedure:
From the Merchant Portal, go to Orders > Merchant Hub > Process EOD.
Click the DHL logo.
Confirm the number of orders.
A manifest is issued as a reference for the orders that were part of the EOD procedure.
Non-DHL Orders
For non-DHL orders, repeat Step 1 and Step 2 and proceed with Step 3 below.
Step 3. Apply the waybill on the order's parcel
For non-DHL orders, the system only prints a shipping label with the GE hub address. | 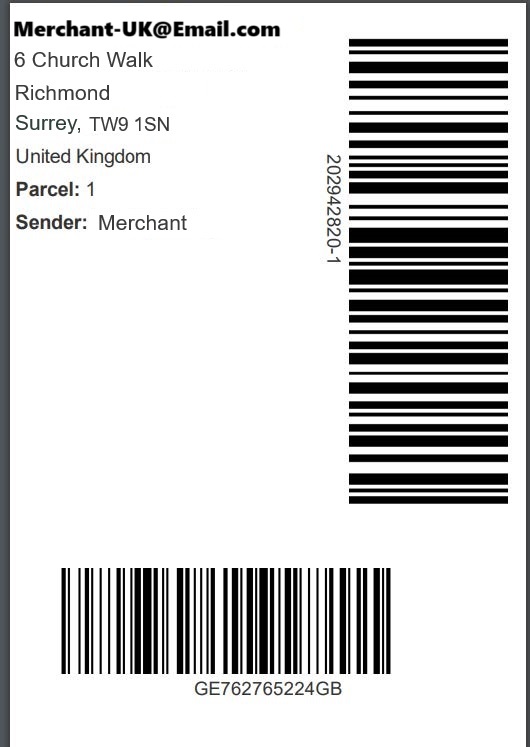 |
Step 4. Have all non-DHL orders shipped to the Global‑e hub through your local shipper
At the GE hub, non-DHL orders go through further processing. Their final destination AWB is applied, and they are shipped by the relevant carrier to your customer.
Processing Orders
You can process:
Regular or split orders
Each order separately or as a group of orders, in bulk
Processing a Regular Order
This section provides instructions on how to process a regular order for which all parcels are shipped the same day.
What is a Regular Order?
A regular order contains a single package or multiple packages to be processed and shipped as a single entity on the same day.
Processing a Single Parcel Order
If all items ordered by the customer can fit into one parcel, process the order as a single-parcel order.
To process the order as a single parcel:
Click
 on the relevant order line (#16).
The relevant order documents are printed.
Attach the documents to your parcel.
Processing a Multi-Parcel Order
At times, the content of an order needs to be packed in more than one parcel. A multiple-parcel order contains several parcels that must be processed and shipped on the same day.
The Parcel screen allows you to create additional parcels and move the order’s items between parcels.
To process a multi-parcel order:
In the Process Order screen, click the Order ID (#8).
The Parcel screen opens.

Figure: Parcel Screen
Click
 (the + sign) to create a new parcel.
A new parcel is generated.
Move items to the new parcel P2 by dragging them from parcel P1 (left) to the new parcel P2 (right).
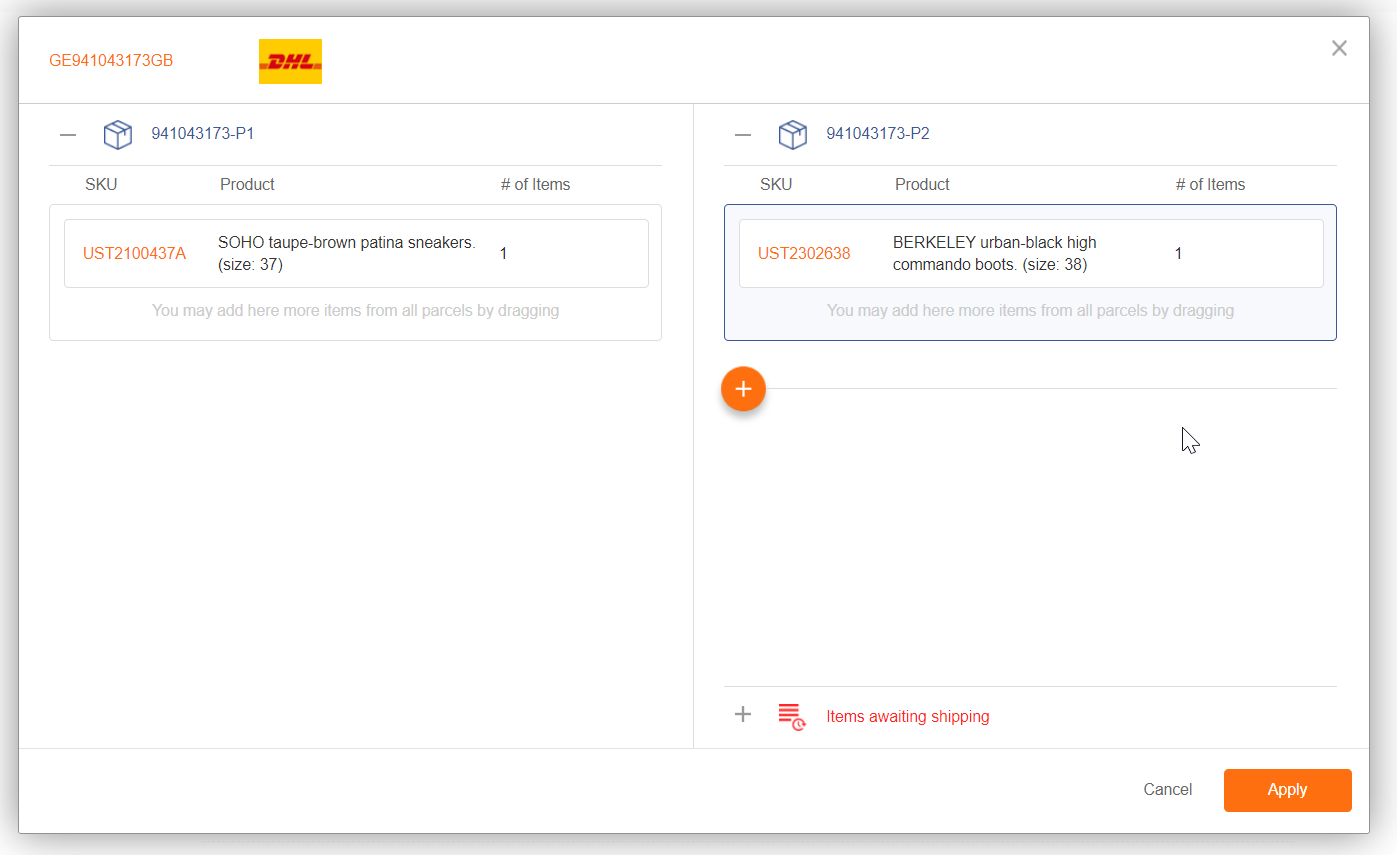
Figure: Parcel Screen – Move Items to a Parcel (P1 to P2)
To distribute items with the same product (SKU) between parcels:
Select an entire product SKU row and drag it from parcel (P1) to parcel (P2).
From the drop-down list, select the number of items to move to parcel P2.
The rest of the items remain in parcel P1.
Repeat steps 2 and 3 for as many parcels as needed.
Each additional parcel denotes a consecutive suffix (P2, P3, P4, and so on).
Click Apply.
The new parcels are saved, and the Parcel screen closes.
In the Process Order screen:
Click
on the relevant order line (#16)The relevant order documents are printed. Note that an Airway Bill is issued per parcel.
Attach the document to your parcels.
Processing Documents in Bulk
To process orders in bulk:
Select the checkbox next to each order to process.
Or
Select All (box) at the top of the column (#7) to process all the orders on the page.
Click Print Orders (#6).
The shipping documents of all the orders you selected are printed in bulk. If an order contains several documents (such as an airway bill and an invoice), these documents are printed consecutively followed by the next order’s documents.
Attach the required order documents to each parcel.
See Order and Shipping Documentation for more information on the applicable shipping documentation.
Processing Split Orders
This section provides instructions on how to process an order whose content is split based on time or location.
What is a Split Order?
A split order is an order for which some items can be shipped:
At different times – or -
From different locations
Order items are shipped at different times when:
Some items do not currently exist in your warehouse (pre-order, item is out of stock, and item was ordered as a backorder) - or -
It takes additional time to prepare items per customer requirements (such as tailor-made shoes, engraving on jewellery, and more).
In such cases, these items are shipped to the customer at a later stage, while the rest of the order’s items are shipped immediately; hence the order is split.
Order items are shipped from different locations when your company works with:
Several warehouses and different items are shipped from different warehouses.
A warehouse and a physical store and some items exist exclusively at one location, for instance the physical store. Therefore, the items can only be shipped from that location and not from the main warehouse.
In such cases, the order is split between several locations.
Processing Orders at different times or from different locations
Processing orders split between different shipping times or between different locations are almost identical. In both cases, you need to treat the order as a split order and process it accordingly.
Processing Split Orders
To split an order:
Log in to the Global‑e Merchant Portal and access the Process Orders screen (see Getting Started).
Click the Order ID of the order you wish to split (#8).
The Parcel screen opens. See the figure below.
Click the title Items Awaiting Shipping (bottom right). A red area opens; items are displayed in this area until they are ready to be shipped.
Move items that are not ready to be shipped from the main order (parcel P1) to Items Awaiting Shipping:
To move one item, drag and drop the item from parcel P1 to Items Awaiting Shipping.
To move several items that have the same product (SKU):
Drag the entire product row from parcel P1 to Items Awaiting Shipping.
From the drop-down, select the number of items that are not ready to be shipped at the current time.
The rest of the items remain in parcel P1.
To move several products, repeat the procedure in the previous bullet for each product row.
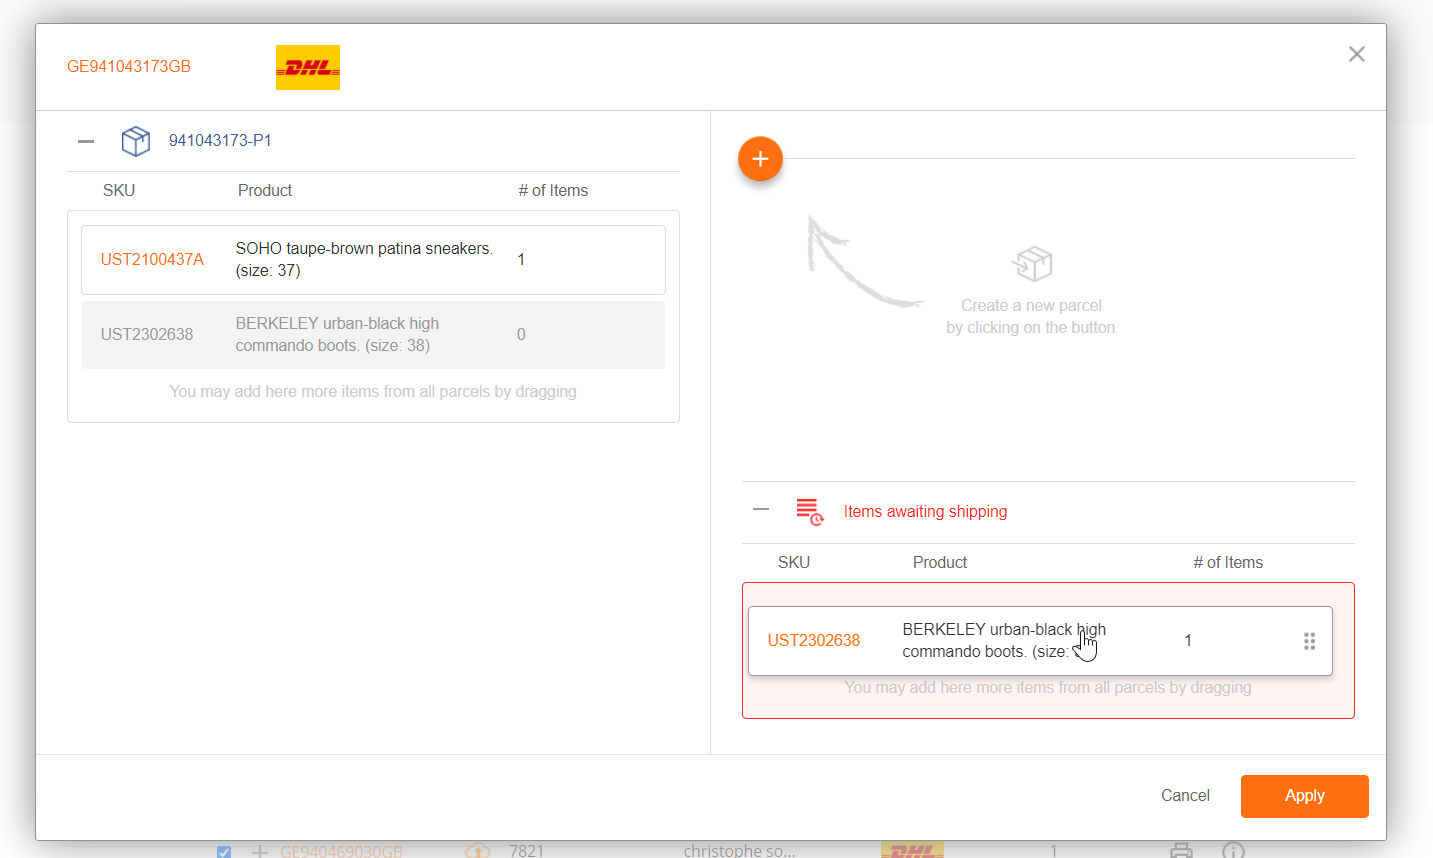
Figure: Split item – Dragging an Item to Awaiting Shipping
After you have moved all the items, the Items Awaiting Shipping section contains all the products that are currently not being shipped. The rest of the items remain in parcel P1.
If the remaining items can fit into a single parcel, leave them as is in parcel #1 (P1).
Otherwise, create additional parcels and move some of the products to these parcels. See Processing a Multi-Parcel Order for more information on managing parcels in multi-parcel orders.
Click Apply.
In the Process Orders screen, a split order designation icon
 is now displayed next to your order.
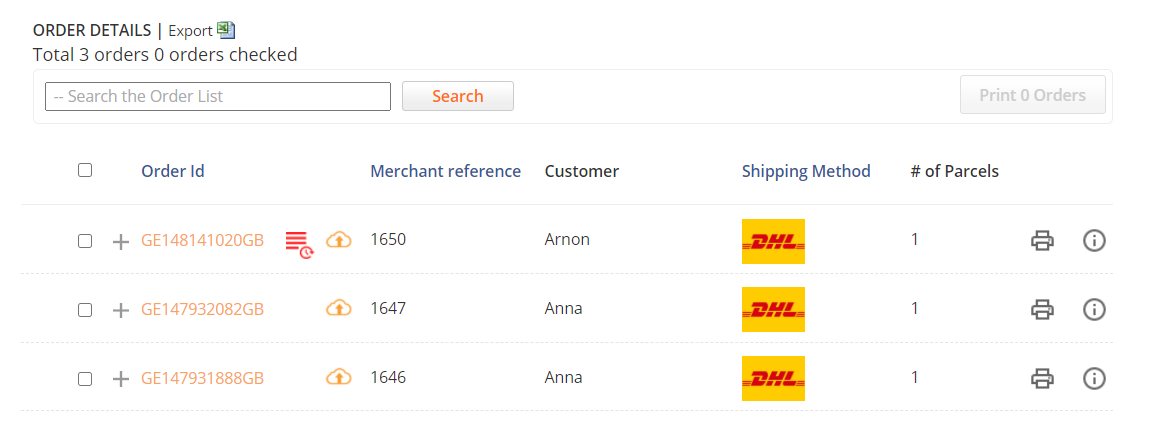
Figure: Split Order in Process Orders Screen
Process the split order as it is done for a regular order, by printing the order’s documentation. See Processing a Regular Order.
Note
Since the order has not been fully shipped, it remains in the Process Orders list where orders are pending processing; it does not move to the Viewing Processed Orders screen, where you can view the orders that have been processed. The order moves to the Viewing Processed Orders screen once it has been fully processed and shipped.
When the items split from the order arrive at the warehouse, complete the fulfilment of the order:
In the Process Order screen, find the order:
In the Search box (at the top of the orders table), enter the order number. (#5)
Click Search.
After finding the order, click the order ID (#8).
The Parcel Screen opens.
The left side shows the parcels already shipped.
On the right side, create a new parcel by clicking
(the + sign).Select the desired Items Awaiting Shipping and drag them to the newly created parcel.
Create additional parcels and drag items to the new parcel, as needed.
Note that if some items are not ready to be shipped, you can leave them in the Items Awaiting Shipping section and repeat this procedure once they arrive at the warehouse.
Click Apply.
In the Process Orders screen, a new parcel has been added to the order and it is now ready to be processed, as previously done.
Once the documents have been printed and the order has been entirely processed, the order moves to the View Processed Orders Screen (if there are no items left to be shipped), for future reference and document reprinting.
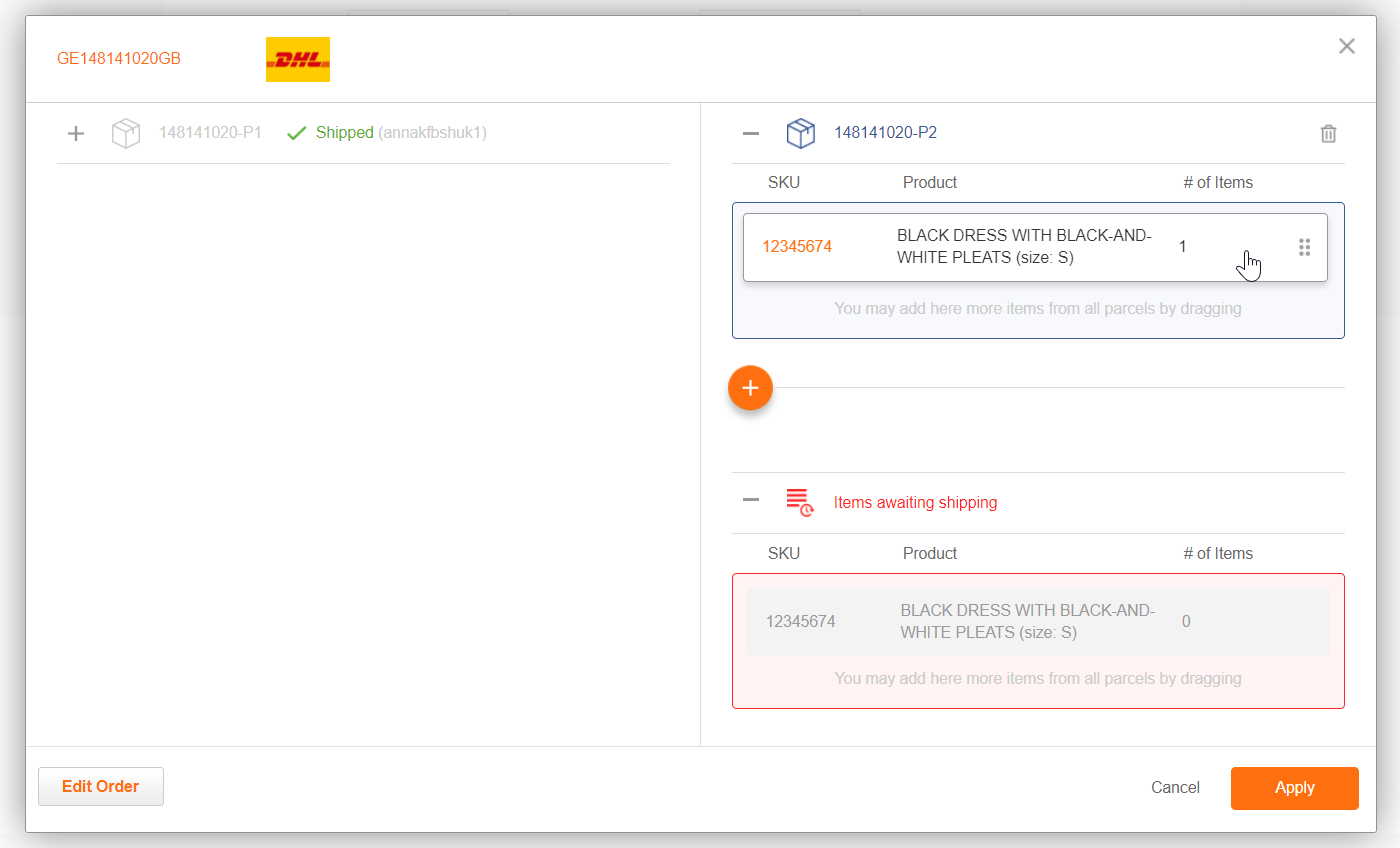
Figure: Processing Items Awaiting Shipping
Splitting and Processing an Order Distributed between Different Warehouses
The process of splitting orders containing items that are shipped from different warehouses is similar to the standard split order process with the following exception:
In the Process Order screen, you are prompted to select the warehouse from which you are currently fulfilling the order.
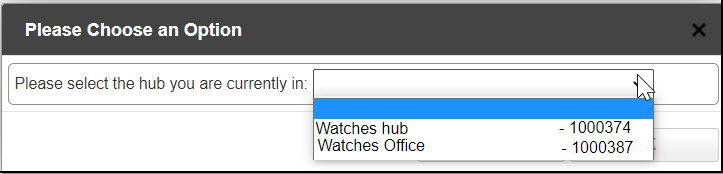
Figure: Selecting a Hub
Proceed with the steps detailed in the standard Processing Split Orders section.
Example:
An order contains 5 items that need to be processed but the items are available in two different warehouses.
3 items are in warehouse A while the remaining 2 items are in warehouse B.
The Operator/Manager in Warehouse A:
Opens the Parcel Screen of the relevant order.
Moves (drag and drop) the 2 items that are in warehouse B to Items Awaiting Shipping.
If needed creates (+) another parcel and moves there some of the items. Otherwise, all the 3 items remain in parcel 1.
Confirms.
Prints the documents.
Once Warehouse A is done processing the 3 items, the Process Order screen still shows this order since Warehouse B has not completed their part of the order yet.
The Operator/Manager in Warehouse B:
Finds the relevant orders (now designated with the Items Awaiting Shipping icon).
Opens the Parcel Screen.
Creates a new parcel.
Moves the 2 remaining items to that new parcel.
Confirms.
Prints the documents.
Note
To prevent collisions, the order is locked during the processing of one of the warehouses. Once the processing is done in one warehouse, the other warehouse can process the rest of the items.
Edit Parcels in View Processed Orders Screen
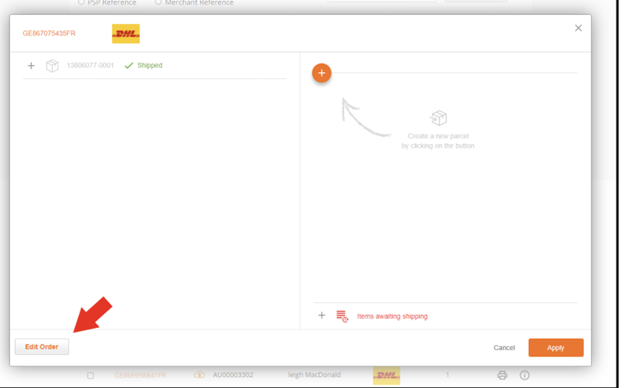
You can edit the parcel content and split items after the order changes its status to Received in Hub / Shipped by Merchant.
Users can find orders in status Received in Hub (in most cases in the View Processed Orders screen) and when entering the Parcel screen (clicking the GE number), an Edit Parcel button is at the lower left corner of the screen. Pressing it will enable the content of the allegedly shipped parcels to be editable again, and the user will be able to drag and drop items from the current parcels to newly created ones or move them to the Items Awaiting Shipping area, as split items.
Once changes are made, the user needs to confirm the changes (press the Apply button), and process again the order if needed. The edit procedure itself does not change the order status (it will remain Received in Hub / Shipped by Merchant)
If an order is changed from 1 parcel to 2 parcels, make sure the original label is discarded and two new labels that are provided are used on the parcels.
Process Orders: Non-GE Carriers
If you are shipping your orders through non-Global‑e carriers, regardless of how many non-GE carriers, Global‑e enables you to update these orders on the Merchant Portal and provides your customers with the correct tracking link for the order.
Important
Make sure to perform the following procedure only after the orders have been collected from your warehouse since Global‑e notifies your customers that their order is on the way as soon as they have been collected. A pickup delay may cause a longer wait for your customers.
To upload your list of orders to be shipped with non-GE carriers to the Merchant Portal:
From the Merchant Portal, go to Orders > Merchant Hub > Process Orders: Non-GE Carriers.
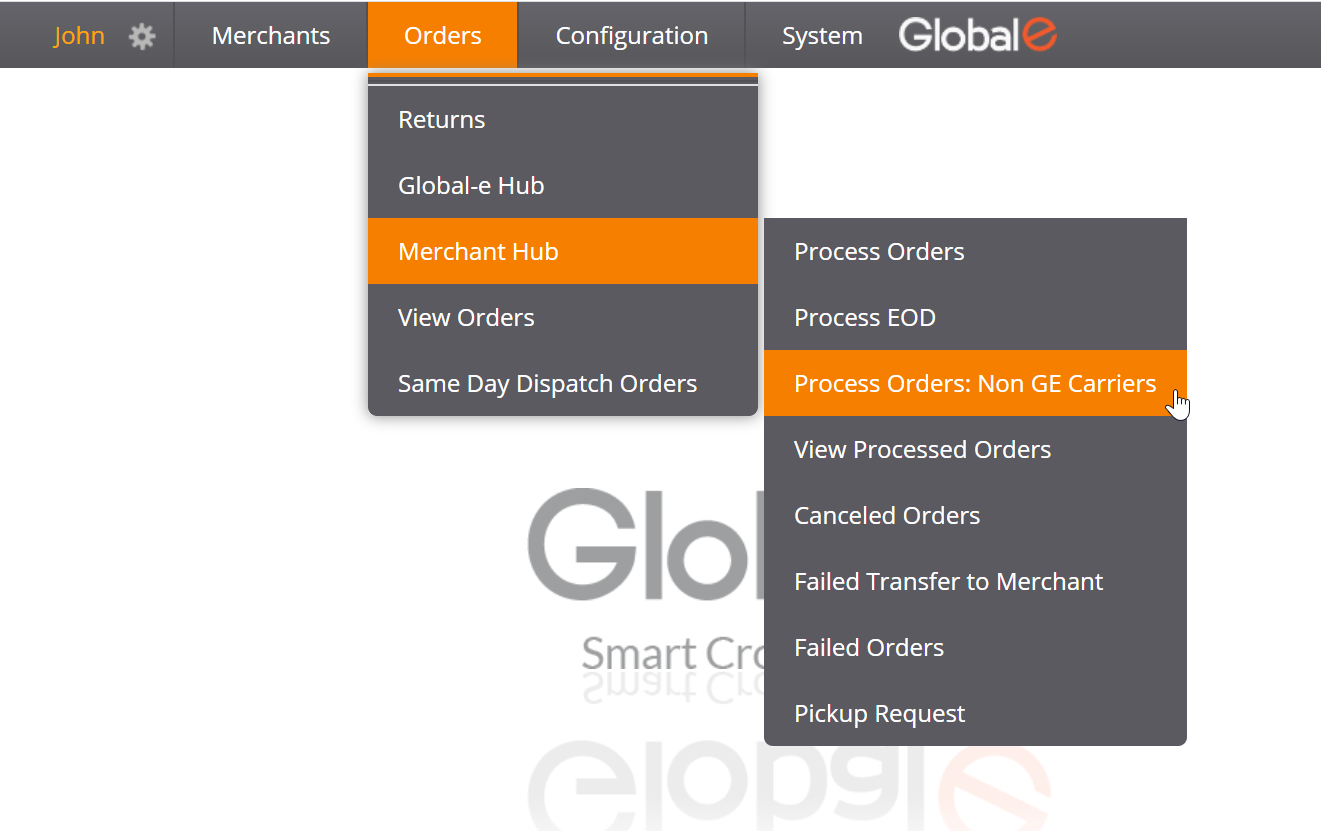
The Non-GE Carriers screen opens.
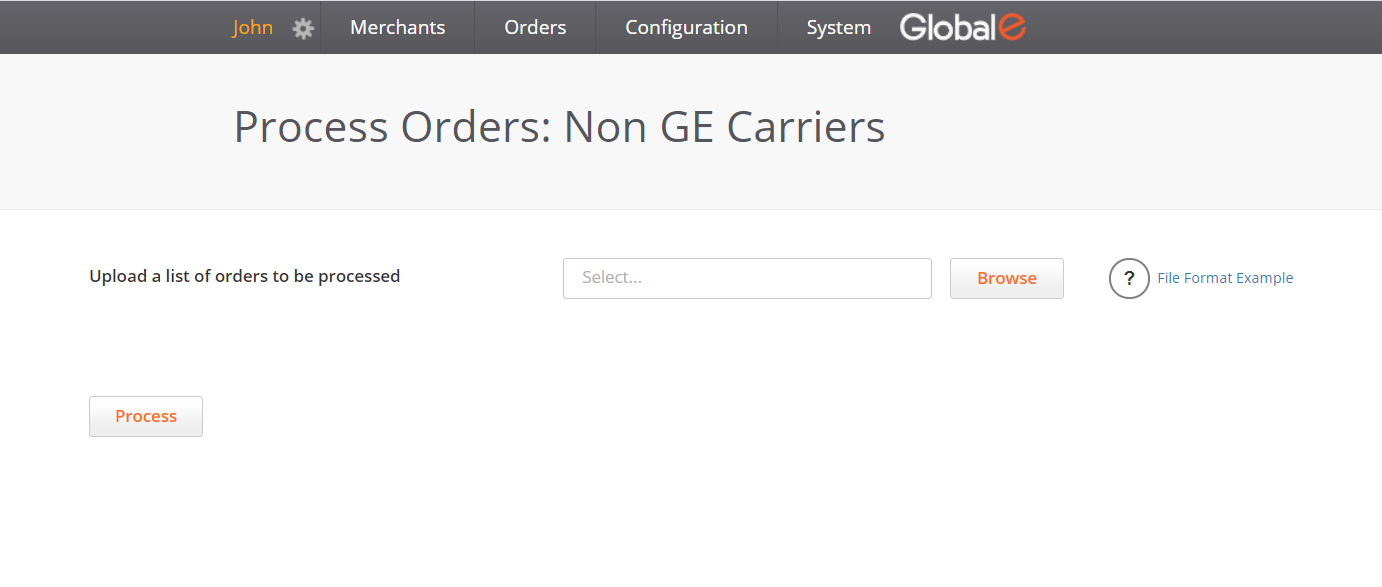
Prepare a list containing the orders to be shipped with non-GE carriers.
You can use the file format example in the Non-GE Carriers screen for correct formatting, reference, and download.
Enter each order as a single line.
For each order, enter:
The Order ID
The Order ID is your order identifier with can be either, a unique Global-e order ID or your store order ID.
Each order must either be by either, a unique Global‑e order ID (starting with GE) or by your store order ID.
The tracking ID
The Shipper's tracking number will appear in the email sent to the customer.
Optional: The tracking URL
The shipper's tracking URL will appear in the email sent to the customer. Same comment When not listed, the default URL for that shipper is used along with the provided tracking number.
Once your file is ready, click Browse to upload it to the Merchant Portal.
Click Process.
Once you have successfully completed this process, Global-s notifies customers by email that the order is on its way. This email includes the tracking link and ID, enabling customers to check the status of their order.
Notes:
You can use either a Global-e order ID (starts with GE) or your ecommerce platform ID within the file. .
Make sure each order is represented in the file as a single line (identified by either the GE Order ID or your ecommerce platform ID) and has its own tracking ID.
Duplicated orders are ignored, and if there are the same tracking IDs in two or more orders, the system prompts you to correct the file.
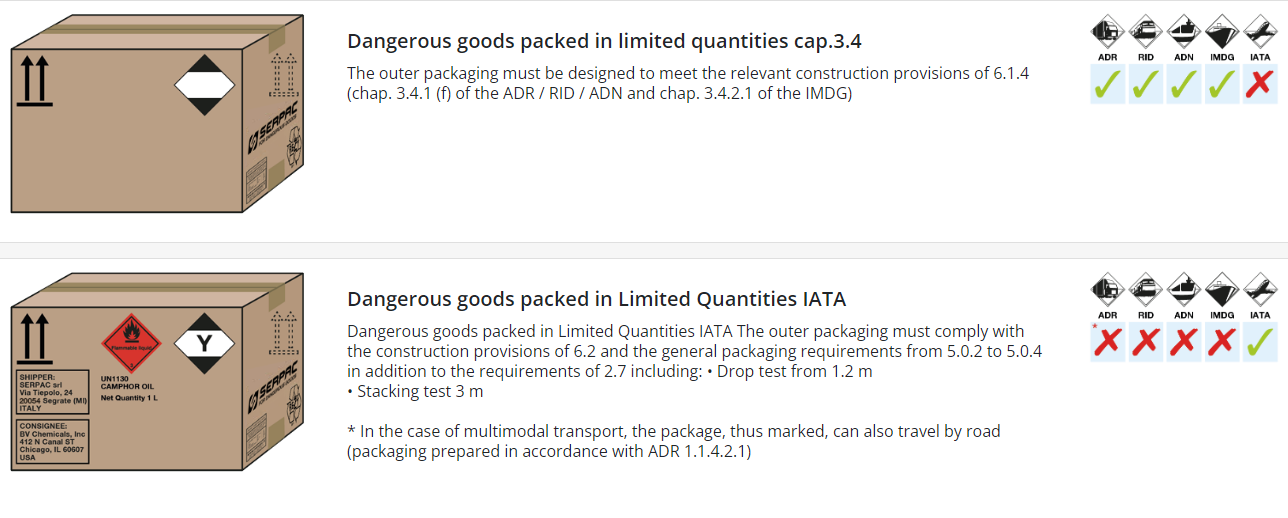
Dangerous Goods Indication
The dangerous goods level indication is essential for letting merchant hub operators know how to process shipments that contain dangerous goods.
If a parcel or order contains items considered dangerous goods, a message pops up on the Process Order screen indicating the level of the dangerous goods.
There are three levels of dangerous goods:
Dangerous goods packed in excepted quantities
Dangerous goods packed in limited quantities
Dangerous goods packed in limited quantities IATA

Dangerous goods level indication is available in the Global-e admin as part of the order processing flow.
To view the dangerous goods level of a parcel or order:
On the Process Order screen enter the Order ID or Parcel Code.
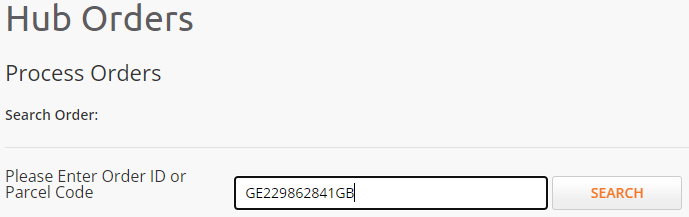
Click Search.
A notification pops up indicating the level of dangerous goods.
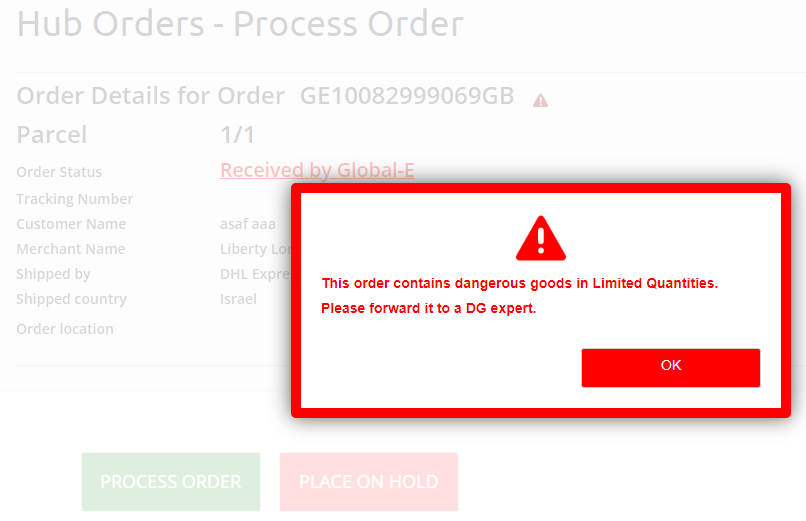
When processing a split shipment the level of dangerous goods refers to the parcel.
When processing a consolidated shipment the level of dangerous goods refers to the order.
Shipping Orders Through Different Carriers
An order can be shipped as:
An express order from the merchant’s warehouse (via DHL).
A standard (non-express service) order via the Global‑e hub. At the Global‑e hub, the order is re-labelled and proceeds to the customer's destination via the last-mile carrier.
Shipping Express Orders: Performing the End of Day Procedure
The End of Day (EOD) procedure ensures that the customer is notified that the order is on its way and gets the carrier’s tracking number.
Global‑e recommends that you perform the EOD procedure after the orders have been collected from the warehouse so that the customer can be notified in real-time that the order is on its way.
Note: if you don’t have a daily pickup service, perform the EOD procedure after the orders have been picked up from your warehouse, and not necessarily at the end of each working day.
To perform the End of Day procedure:
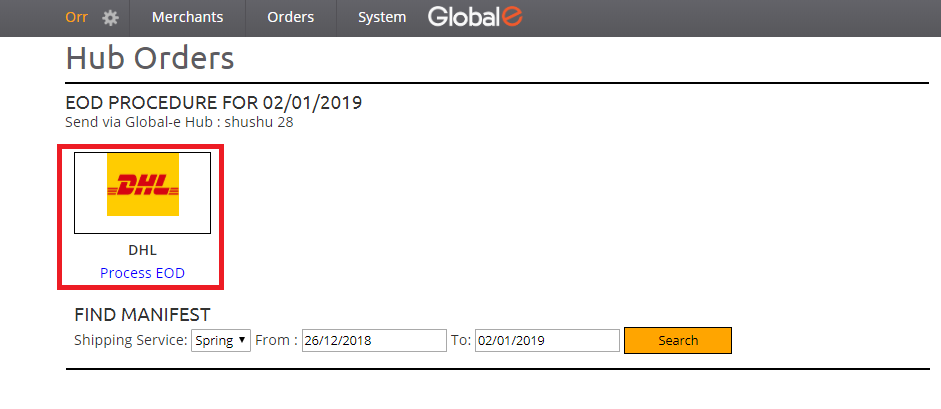
Navigate to Orders → Merchant Hub → Process EOD.

In the Hub Orders/EOD Procedure screen, click the Process EOD link.

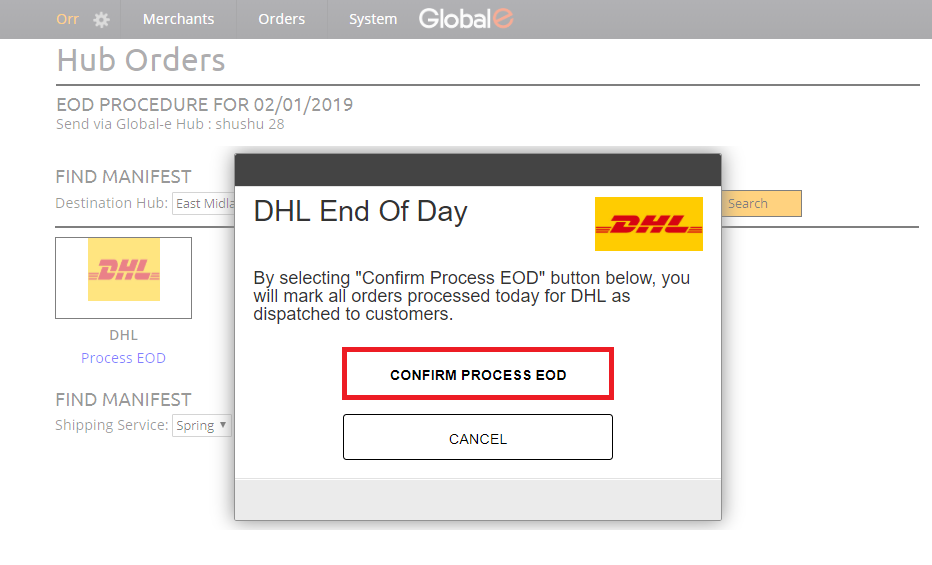
In the confirmation popup, click Confirm Process EOD.
The screen displays:
The number of orders processed and dispatched to the customers.
A Print Manifest option. You can print the manifest to use as a reference for the orders that have been processed.
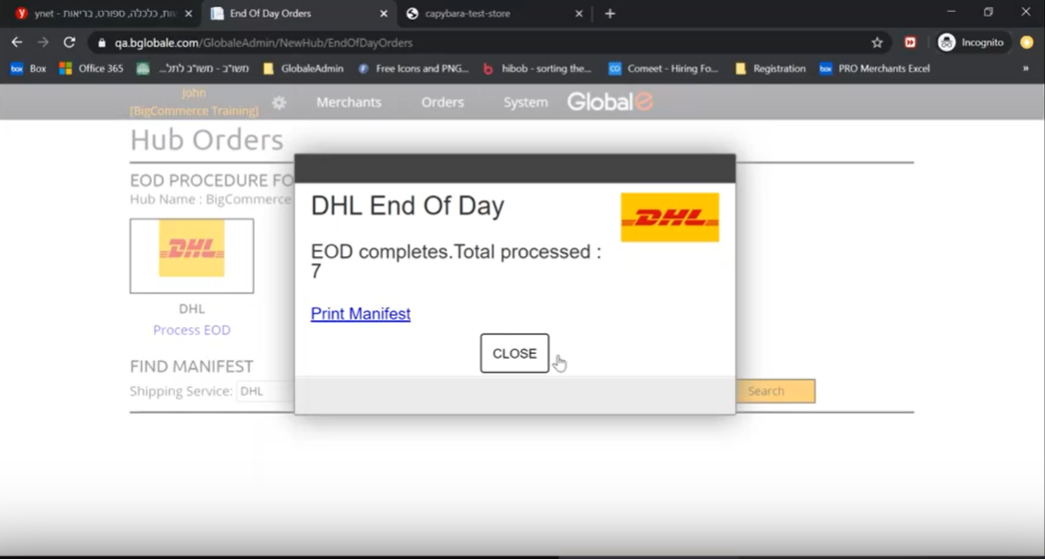
The End of Day procedure is now complete. The customer is notified that the order is now on its way and of the carrier’s tracking number.
Shipping Non-Express Orders via the Global‑e Hub (Standard Shipping)
Non-DHL orders do not require the EOD procedure as explained in the previous section.
Instead, ship these orders with your local carrier to the Global‑e hub. At Global‑e, the orders are re-labelled and handed to the final-mile carrier that will deliver them to their destination.
To ship non-express orders via the Global-e hub:
For each non-express order, print the domestic waybill with the Global‑e hub address and logo.
Apply the waybill on each parcel.
Have your domestic carrier deliver all orders to the Global‑e hub, at the address designated on the waybill.
Note
To shorten transit times, deliver these orders daily to the Global-e hub, as early as possible.
As part of the process at the Global‑e hub, these orders undergo the EOD procedure; the customer is notified that the order is on its way and gets the order tracking information.
Email Notifications for Unfulfilled Orders
if you have unfulfilled orders that should have been picked up and delivered (either to our warehouse or directly to the order’s final destination), Global‑e sends you an automatic email, at least every other week, with a list of these orders, to help to expedite delivery and offer your customers improved service.
Email frequency depends on the type of goods and the length of time needed to prepare them for shipping.
Note that emails are not sent to Merchants selling customized products or other items that may take a longer time than average to ship.
The email is sent to the address used by the merchant to register to the Global‑e system.
The email includes two tables in the following format:
Global‑e Order ID | Order Date | Merchant Reference ID |
|---|---|---|
The first table includes orders that should have been picked up by the carrier from the Merchant’s warehouse. (This mostly applies to DHL Express).
The second table includes orders that should have been sent to the Global-e Hub. (This mostly applies to non-express orders).
Make sure to follow up on this email, to ensure that your customers receive their orders quickly.
Order and Shipping Documentation
When processing orders, some or all the documents listed in this section are sent to your printer. Apply them to the package as detailed in this section.
If you are bulk processing several orders, the documents are printed per order, consecutively.
Documents:
Express orders: DHL’s Airway Bill (AWB)
Non-express orders: The Global‑e Waybill
Commercial Invoice (if applicable)
Packing List (if applicable)
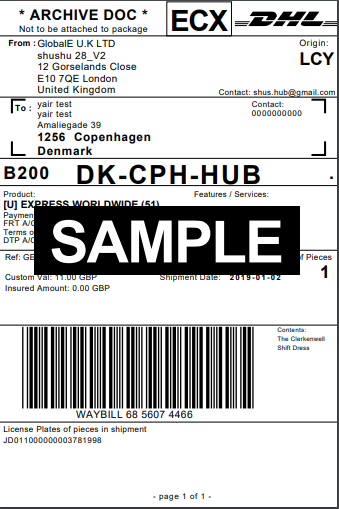
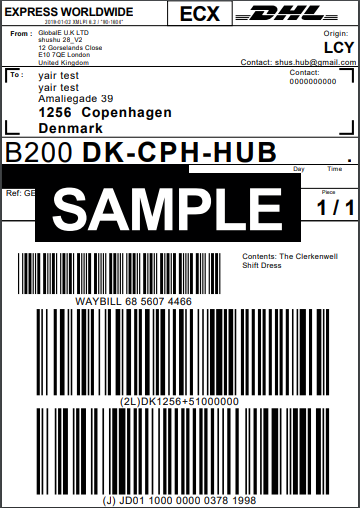
DHL’s Airway Bill (AWB) (Express Orders)
The airway bill (AWB) accompanies parcels shipped by international express courier (DHL).
The airway bill contains the shipping information, the customer’s address, and the shipper’s details and logo.
This document is usually printed on a sticker, using a label printer. Attach the AWB to the parcel; if there is more than one parcel, attach one to each parcel.
Example of an AWB
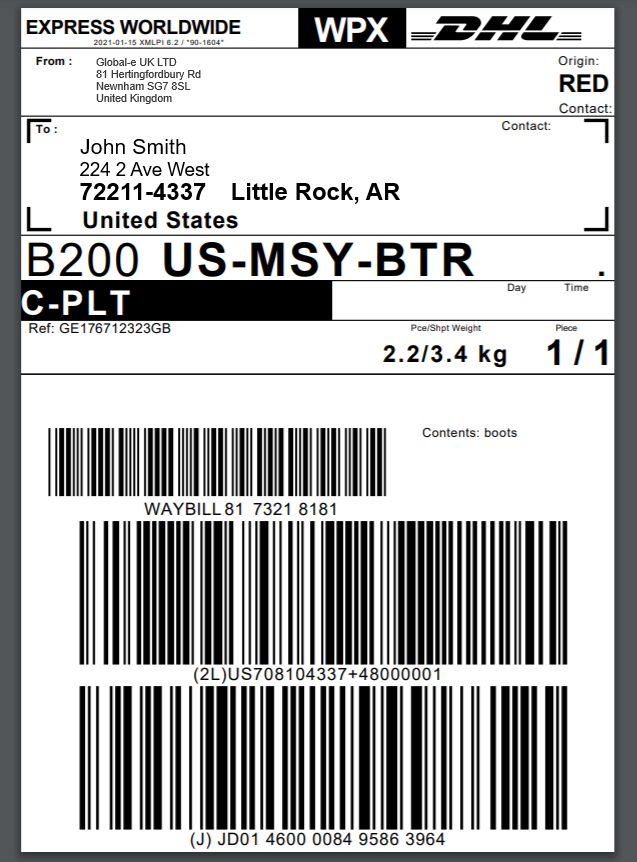 |
Figure: DHL AWB Example
Global‑e Waybill (Non-express Orders)
The Global-e waybill accompanies parcels shipped through the Global-e hub in your country. These parcels are cross-docked (relabelled) upon processing in the Global-e hub and proceed with the relevant shipper to their destination.
The waybill contains the Global-e hub full address and usually the Global-e logo, as well as the order information.
Apply the waybill to each parcel to be sent to the Global‑e hub.
Example of a Global‑e Waybill
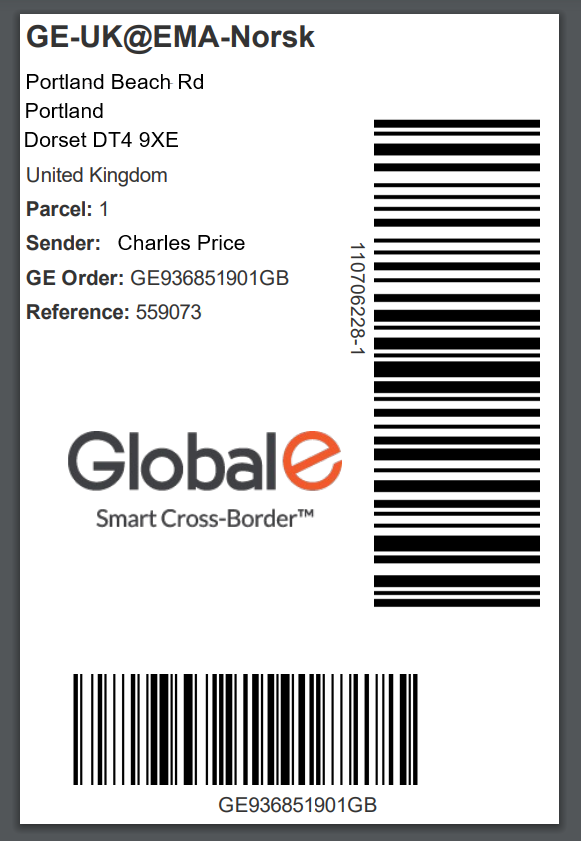 |
Figure: Global‑e Waybill Example
Commercial Invoice
The invoice is a necessary document for customs clearance when the order is shipped abroad. The invoice is printed after the waybill. Only one invoice is generated even if the order has more than one parcel.
Place the invoice inside a pouch and attach it to the parcel. Make sure that the invoice content is clear and visible.
Invoices are NOT printed:
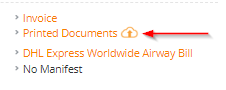
If the order is of PLT type (Paperless Trading policy), the invoice information is transmitted electronically by the shipper at customs. In that case, a cloud indication (
 ) is displayed next to the order in the Process Order Screen (#11).
If an EU merchant ships within the EU, clearing customs is not needed and therefore the invoice is not printed.
Example of an Invoice
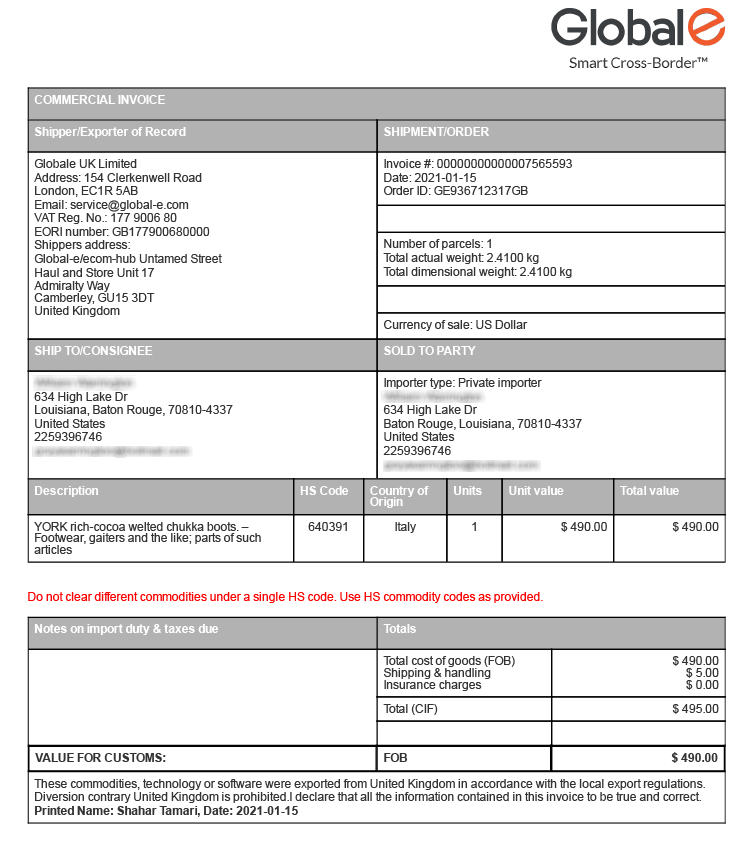 |
Figure: Invoice Example
Packing List
The Packing list shows the entire content of the order and usually helps you in the pick and pack process. You can also add it to the order as a reference for the customer. This document bears the merchant’s logo.
Note
The packing list is not generated by default as part of the order documentation. Contact Global-e to obtain this document.
Example of a Packing List
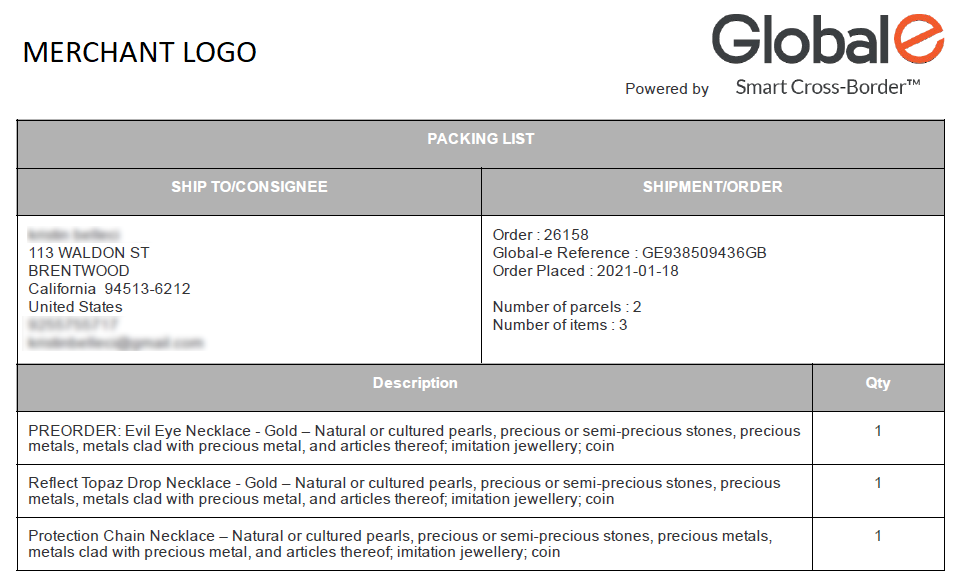 |
Figure: Packing List Example
EOD Process
DHL EOD process
Express/Standard EOD process
Fulfil each order as usual and print its label and invoice using the Global‑e Merchant Portal.
After DHL collects all the orders- proceed to the EOD process:
Orders ⇒ Merchant Hub ⇒ Process EOD
( https://web.global-e.com/GlobaleAdmin/NewHub/EndOfDayOrders)
The EOD form opens.
All DHL orders that are in the status “received in hub” are included under this icon.
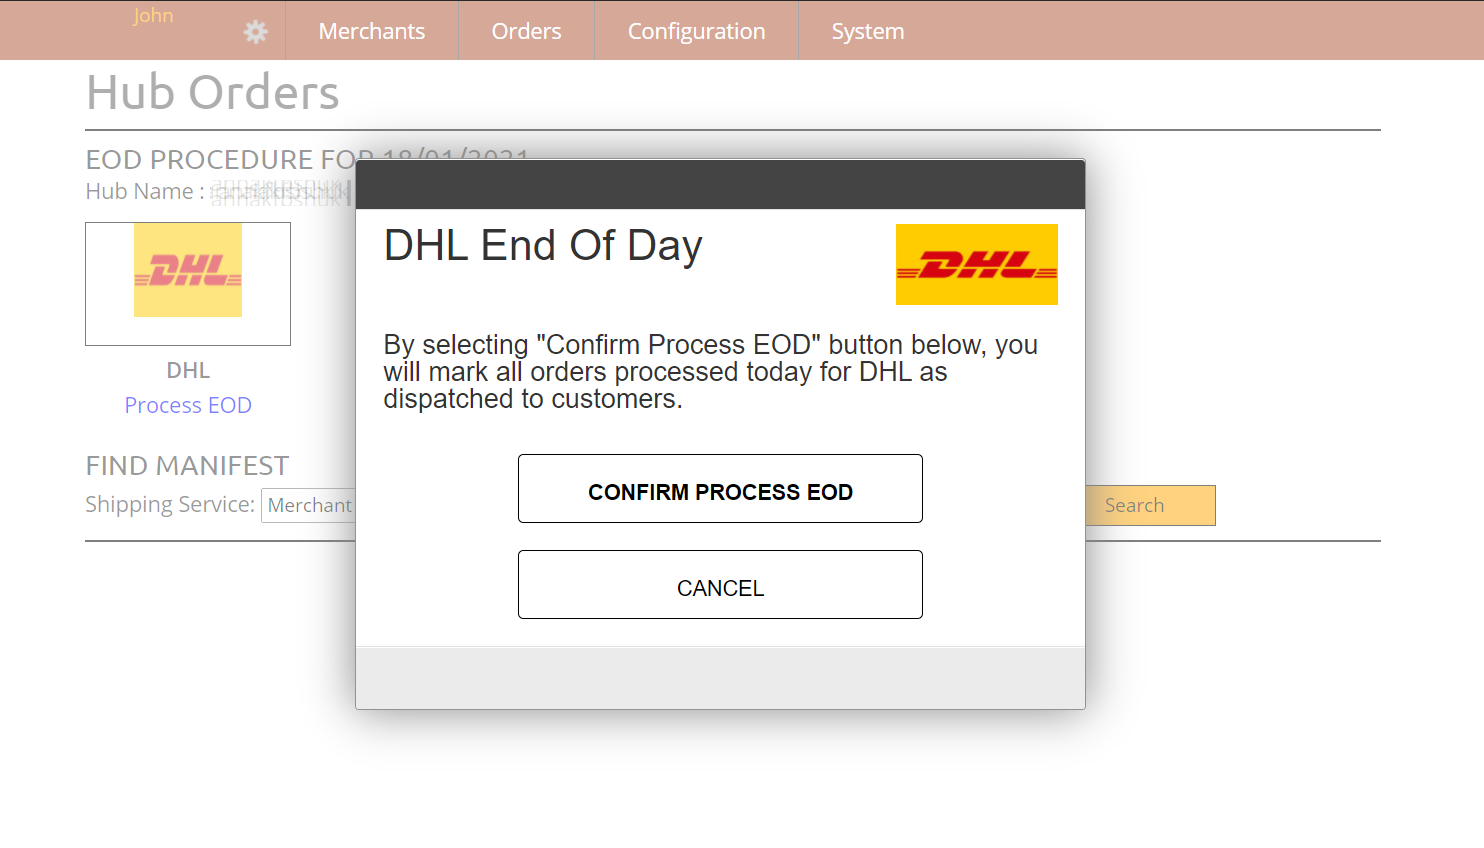
Click Process EOD below the DHL logo.
In the DHL End Of Day box, click CONFIRM PROCESS EOD.
The total number of orders processed is listed.
Click Print Manifest.
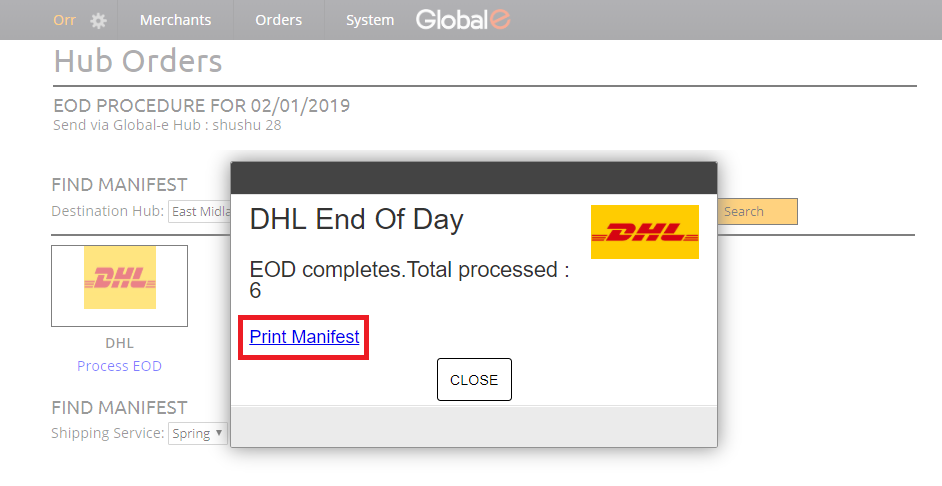
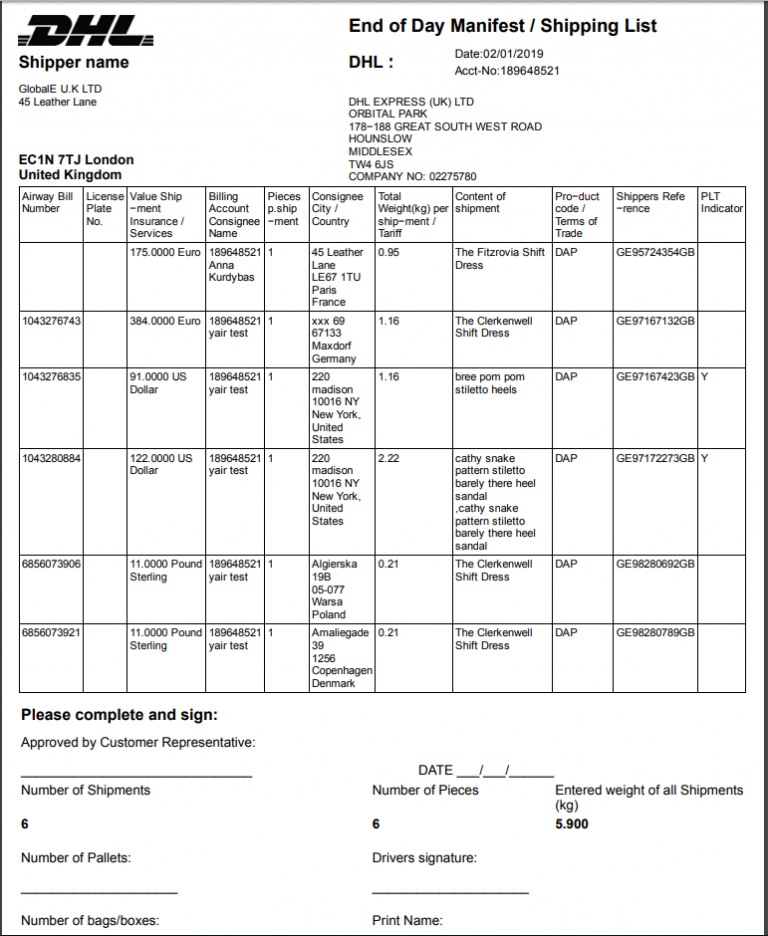
Keep the manifest file as a reference.
During the EOD process, a notification is sent to the client.
DHL Pickup Request Form
The following table shows the countries that Global-e serves starting with the following letters:
DHL Country/Region Name | |||
|---|---|---|---|
Afghanistan | Bhutan | Congo | Gabon |
Algeria | Bolivia | Congo, the Democratic Republic of | Gambia |
American Samoa | Bosnia and Herzegovina | Costa Rica | Georgia |
Angola | Botswana | Cote D Ivoire | Germany |
Anguilla | Brazil | Croatia | Ghana |
Antigua | Brunei | Curacao | Greece |
Argentina | Bulgaria | Cyprus | Grenada |
Armenia | Burkina Faso | Czech Republic, the | Guadeloupe |
Aruba | Burundi | Denmark | Guam |
Australia | Cambodia | Dominica | Guatemala |
Austria | Cameroon | Dominican Republic | Guinea Republic |
Azerbaijan | Canada | Ecuador | Guinea-bissau |
Bahamas | Cayman Islands | Egypt | Guinea-equatorial |
Bahrain | Central African Republic | El Salvador | Guyana (British) |
Bangladesh | Chad | Estonia | Haiti |
Barbados | Chile | Ethiopia | Honduras |
Belarus | China, Peoples Republic | Fiji | Hong Kong Sar, China |
Belgium | Colombia | Finland | Hungary |
Benin | Commonwealth No. Mariana Islands | France | |
Bermuda | Comoros | French Guyana | |
DHL Country/Region Name | |||
|---|---|---|---|
Iceland | Kyrgyzstan | Mauritania | Nigeria |
India | Lao Peoples Democratic Republic | Mauritius | North Macedonia |
Indonesia | Latvia | Mayotte | Norway |
Iran (Islamic Republic of) | Lebanon | Mexico | Oman |
Iraq | Lesotho | Moldova, Republic of | Pakistan |
Ireland, Republic of | Liberia | Mongolia | Panama |
Israel | Libya | Morocco | Papua New Guinea |
Italy | Lithuania | Mozambique | Paraguay |
Jamaica | Luxembourg | Myanmar | Peru |
Japan | Madagascar | Namibia | Philippines, the |
Jordan | Malawi | Nepal | Poland |
Kazakhstan | Malaysia | Netherlands, the | Portugal |
Kenya | Maldives | Nevis | Puerto Rico |
Korea, Republic of (South K.) | Mali | New Zealand | |
Korea, the D.p.r of (North K.) | Malta | Nicaragua | |
Kuwait | Martinique | Niger | |
DHL Country/Region Name | |||
|---|---|---|---|
Qatar | South Africa | Switzerland | Ukraine |
Reunion, Island of | South Sudan | Syria | United Arab Emirates |
Romania | Spain | Taiwan | United Kingdom |
Russian Federation, the | Sri Lanka | Tajikistan | United States of America |
Rwanda | St. Barthelemy | Tanzania | Uruguay |
Saudi Arabia | St. Kitts | Thailand | Uzbekistan |
Senegal | St. Lucia | Timor Leste | Venezuela |
Serbia, Republic of | St. Maarten | Togo | Vietnam |
Seychelles | St. Vincent | Trinidad and Tobago | Virgin Islands (British) |
Sierra Leone | Sudan | Tunisia | Virgin Islands (Us) |
Singapore | Suriname | Turkey | Yemen, Republic of |
Slovakia | Swaziland | Turks and Caicos Islands | Zambia |
Slovenia | Sweden | Uganda | Zimbabwe |
Requesting a DHL Pickup Service
To request a DHL pickup service from your hub:
Requesting a DHL pickup service from your hub applies when you don't have a scheduled daily pickup.
From the Merchant Portal, select Orders > Merchant Hub > Pickup Request.
The Pickup Request form opens pre-populated with default information.

Change this information as required. See field details in the following table.
When done, click Request a Pickup to submit your request.
Keep your confirmation number for future inquiries.
The following table shows the DHL Pickup Request Fields:
Field | Description and instructions |
|---|---|
Address | Your default hub address. To request a pickup from a different address, you can edit the address field. When you log in again, your default hub address is restored. |
Pickup date | Default: today. Change the date if needed (for example, for a pickup service tomorrow). |
Ready by Time | Set the time by which your parcels will be ready for pickup. Note that the time is set to 24H according to the local time zone. |
Closing Time | Set the closing time of your warehouse or store. This is the latest time for DHL to arrive for the pickup. The pickup should arrive in the time frame between the Ready by Time and the Closing Time. |
Pickup Weight | Set the estimated total weight (in Kg) of all of the parcels for this pickup. |
Number of Pieces | Set the number of parcels to be picked up. |
Location Type | Specify whether your location is a business warehouse or a residential apartment |
Location of Packages | If required, provide a description of the location of the parcels within the warehouse. |
Country/Region Code | Supported as Origin Country/Region | Region Code in XML Services Level | DHL Country/Region Name |
|---|---|---|---|
AE | Y | AP | United Arab Emirates |
AF | Y | AP | Afghanistan |
AG | Y | AM | Antigua |
AI | Y | AM | Anguilla |
AM | Y | AP | Armenia |
AO | Y | AP | Angola |
AR | Y | AM | Argentina |
AS | Y | AM | American Samoa |
Q&A Fulfilment
 What is a Split Order?
A split order is an order for which some items can be shipped at different times.
Order items are shipped at different times when:
Some items do not currently exist in your warehouse (pre-order, item is out of stock, and item was ordered as a backorder)
– or –
It takes additional time to prepare items per customer requirements (such as tailor-made shoes, engraving on jewellery, and more).In such cases, these items are shipped to the customer at a later stage, while the rest of the order’s items are shipped immediately; hence the order is split.
You can learn more by visiting the link to the Fulfilment Video Tutorial (2 parts) (part 2) and Fulfilment Overview.
Missing invoice – only the airway bill is printed out when clicking the “Process&Print” button. Why?
In selected destinations your shipper may use a Paperless Trade policy (PLT), meaning that the invoice is sent electronically to the shipper without printing it.
PLT orders can be recognized by the cloud icon with an arrow pointing up.
Orders, where PLT was used, will be cleared in customs even before the order is physically shipped, and the goods will be released to customers much faster than in other cases, so whenever this functionality is supported by the relevant shipper, Global‑e will generate a PLT invoice. In these cases, only the airway bill will be printed out.
If you don’t see the cloud icon as shown above, and still don’t get the invoice printed, please contact us by clicking the “Contact Us” button below.
Which documents are generated when processing an order for shipment?
When shipping with DHL:
Invoice – VAT invoice for all orders within the EU, and a commercial invoice for all orders outside of the EU. These invoices need to be inserted into the pouch that is attached to the parcel. Note that whenever possible paperless trading is used to speed up the release from the customs process in the destination country. In these cases, the invoice will not be printed. Read more about paperless trading here – PLT Orders.
Two airway bills – one to be attached to the parcel (if more than one parcel, one for each parcel), and another one as a reference (with ** Archive ** printed on it).
When shipping with TrakPak:
Invoice – VAT invoice for all orders within the EU, and commercial invoice for all orders outside of the EU. To be inserted into the pouch that is attached to the parcel.
Airway bill – to be attached to the parcel.
When shipping with Spring:
Airway bill – to be attached to the parcel.
How can I ship back-ordered products (for example, customised or personalized items)?
Bespoke products are supported. However,
You will have to consolidate the order and ship in-stock items together with the bespoke items.
You need to inform your customers about the consolidation and that the order will only be shipped once all items are ready. You can advertise a disclaimer on your website such as:
If your order consists of a mix of pre-ordered and in-stock items, your order will be dispatched in one shipment and this includes next-day orders. Any next-day orders with pre-ordered items will be dispatched once the stock has been delivered to our warehouse.
Note that we will support split orders (where you don’t need to consolidate the orders and wait for bespoke items to be ready)